Returnstar Interactive Technology Group Co., Ltd. IQTouchScreen User Manual (Hardware Part) Copyright(C) 2003-2013 Returnstar Interactive Technology Group Co., Ltd. Web: www.iqboard.net; www.recoverystar.com Tel: 0086-591-87274373 Fax: 0086-591-87274383 E-mail: master@iqboard.
Returnstar Interactive Technology Group Co., Ltd. Thank you for purchasing the best natural color interaction touch control TV, for your better use, please read the manual carefully before your using, and well reserve the manual for your need later. Statement This manual is for IQTouchScreen. Use this product strictly according to detailed operation instruction in this manual so as to ensure proper use. Please read this manual carefully before you install this product.
Returnstar Interactive Technology Group Co., Ltd. Cautions Do not damage the internal fittings and not use any settings which are not included in the manual. The screen is made of glass, easy to be damaged by sharp pounding and depiction. If the screen is broken, please be careful not to be hurt by the glass. Before cleaning the machine, please make sure the power plug is out of the power socket and use the dry and soft cloth to wipe the surface.
Returnstar Interactive Technology Group Co., Ltd. CONTENT STATEMENT ................................................................................................................................... 2 TRADEMARK NOTICE ................................................................................................................... 2 ATTENTIONS .................................................................................................................................. 2 CAUTIONS .....................
Returnstar Interactive Technology Group Co., Ltd. Chapter 1 Product Introduction IQTouchScreen are the latest touch interactive integrated machine. Combining the technologies including high definition display, man-machine interaction, multimedia information processing and network transmission, IQTouchScreen, which gets all functions of projection, computer, curtain, stereo and interactive whiteboard, promotes the interaction solution into a new level.
Returnstar Interactive Technology Group Co., Ltd. Chapter 2 Specifications Excellent Performance 16:9 HD display; 10bit (8+FPC), 1073.7M true color display; Best resolution 1920×1080 RGB; 32767×32767 touch resolution with built-in infrared multi-touch technology; Support multi-user writing (according to your product model) with finger or any other objects; Power supply ≤250W (without computer), stand by ≤1 W.
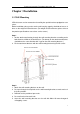
Returnstar Interactive Technology Group Co., Ltd. Chapter 3 Installation 3.1 Wall Mounting IQTouchScreen can be mounted on the wall by the special brackets equipped to save space. Before installation, please make sure the wall carrying capacity should be at least as 4 times as the weight of IQTouchScreen. (For weight of IQTouchScreen, please refer to the product specification or consult our service center.) Step 1 1.
Returnstar Interactive Technology Group Co., Ltd. Step 3 Fix the connection fittings on the IQTouchScreen by the M10×30 outer-hexagonal self-tapping screws. Connecting Fittings Step 4 Hang the IQTouchScreen on the wall mounting brackets.
Returnstar Interactive Technology Group Co., Ltd. 3.2 Remote Controller Installation Battery Installation 1. Pull the back cover of the battery on the remote controller. 2. Input two cells 1.5V AAA battery; make sure the polar of the battery (+/-) matching with direction on the controller. 3. Pull back the cover until you hear tick sound. Attentions to Use Battery ● Do not mix use the new and used battery together. ● Do not mix use different types of battery (e.g. manganese and alkali battery).
Returnstar Interactive Technology Group Co., Ltd. ● ● ● ● ● Headset Audio Cable Touch Pen (for some models) Wall Mounting Brackets (for some models) USB Transfer Cable (for some models) User Manual (CD) Note: Different accessories for different models, please check the attached packing list.
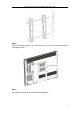
Returnstar Interactive Technology Group Co., Ltd. Chapter 4 Function Front View Note: Rear View The views of different models are not exactly the same. Please in kind prevail. 4.1 Ports Buttons and Extended Interfaces Front I/O Ports Touch Frame PC TV 4.2 Turn on Power Put the machine stably (or on the brackets), connect one end of the power adaptor with the power socket on the machine and insert the other to the AC power (Input Voltage: 220V; AC Frequency: 50/60Hz).
Returnstar Interactive Technology Group Co., Ltd. connect the VGA port inside the back shell with the VGA of PC end by a VGA cable, and connect PC-USB with PC-TOUCH by an USB cable. Press the POWER button, the power indicator light turns red and the IQTouchScreen is in standby mode, and then press ON/OFF button on the controller or the front key board of the machine, the power indicator light turns green and images will be shown on screen in several seconds.
Returnstar Interactive Technology Group Co., Ltd. Chapter 5 Remote Controller 1. Power Supply Mode Control, On or Standby Mode 2. Mute Mode 3. Current Signal Display 4. Image Enlargement and Reduction 5. Image Mode 6. Sound Mode 7. Sleep and Sleep Time Setting 8. Energy-saving Mode, No display in the Screen, only Sound Playing 9. Channels Selecting 10. VGA auto Adjusting 11. Select the Signal Sources 12. Auto Sweep the TV Frequency Point 13. OK 14. OSD Menu Operation Guide 15. Enter OSD Menu 16.
Returnstar Interactive Technology Group Co., Ltd. Chapter 6 Remote Controller Menu Select a Channel 1. Press [+]/[-] on the Remote Controller or TV to select a channel. Press [+] to go to next channel. Press [-] to back to last channel. 2. Press Number Key 0-9 to go to a channel you want. Volume control 1. Press [+]/[-] to adjust the volume. 2. Press Mute key to close the volume. Press Mute key again or press [+]/[-] to cancel mute mode.
Returnstar Interactive Technology Group Co., Ltd. Chapter 7 OSD Menu 7.1 Input Source Press [Input Source] to display the input source list. Press [●]/[◆] to highlight the input source. Press [OK] to confirm. Press [MENU] to hide the On-Screen menu, or it will disappear in seconds. (You can set the time, see [TIME] –OSD TIME) 7.2 Main Menu Press [MENU] to enter main menu, included: Channel, Picture, Sound, Time and Option. Press [ ]/[ ] to select. Press [EXIT] to quit. 7.2.
Returnstar Interactive Technology Group Co., Ltd. Press [ ]/[ ]/[OK] to select among: Auto Tuning, ATV Manual Tuning, Program Edit. Press [ ]/[ ]/[OK] to enter and adjust. Press [OK] to confirm. Press [EXIT] to exit. Note: Channel Menu is only available under TV mode. Auto Tuning: Auto Tuning will search for available channels and program receivable. Press [ ]/[ ]/[OK] to select Auto Tuning, then press [OK] to start.
Returnstar Interactive Technology Group Co., Ltd. Program Edit: The 4 color keys are the shortcut keys for programming the channel. First press [ ]/[ ] to highlight the channel you want to edit. Then press channel. Press then press [ to delete this to enter rename state, ]/[ ] to select the letters you need and press [OK] to confirm. Press to enter moving state, and press [ ]/[ ] to move the channel. Press to skip the channels you don’t want.
Returnstar Interactive Technology Group Co., Ltd. Sharpness, Color Temperature, Noise Reduction. Press [ ]/[ ]/[OK] to enter and press [ ]/[ ] to select, then press [OK] to confirm. Press [EXIT] to exit. Note: When the picture mode is standard, dynamic, mild, contrast, brightness, color, tint and sharpness aren’t available. When the picture mode is user, you can adjust as you like. Picture Mode: Choose the picture mode.
Returnstar Interactive Technology Group Co., Ltd. Cool: Give white colors a blue tint. Medium: Give white colors a neutral tint. Warm: Give white colors a red tint. Noise Reduction: Adjust how the picture fills the screen. Press [ ]/[ ]/[OK] to select, and press [OK] to confirm. 7.2.3 Sound Menu Press [MENU] to enter the main menu, and press [ ]/[ ] to select, then press [ ]/[OK] to enter. Press [EXIT] to exit or back to parent menu.
Returnstar Interactive Technology Group Co., Ltd. Sound Mode: Select a Sound Mode to achieve ideal sound. Press [ ]/[ ]/[OK] to enter. Press [ ]/[ ] to select. Press [OK] to confirm. Standard: Produces a balanced sound in all environments. Music: Preserves the original sound. Good for musical programs. Movie: Enhances treble and bass for a rich sound experience. Sports: Enhances vocals for sports. User: Select to customize audio settings. Treble: Adjust high frequency sound.
Returnstar Interactive Technology Group Co., Ltd. Press [ ]/[ ]/[OK] to select among: Sleep Timer, Auto Sleep, OSD Timer. Press [ ]/[ ]/[OK] to enter, press [ ]/[ ] to adjust, and press [OK] to confirm. Press [EXIT] to exit. Sleep Timer: Press [ ]/[ ] to select the time in minutes (off, 10mins, 20mins, 30mins, 60mins, 90mins) that you want to TV to shut off automatically after you set the time. Before the last minute of Sleep, system will prompt “Press any button to cancel Sleep.”.
Returnstar Interactive Technology Group Co., Ltd. OSD Timer: Press [ ]/[ ]/[OK] to select the time in seconds (5s,10s, 15s, 20s, 25s, 30s) that you want the On-Screen Menu remain display after your last operation. 7.2.5 Option Menu Press [MENU] to enter the main menu. Press [ ]/[ ] to select, then press [ ]/[OK] to enter. Press [EXIT] to exit. Press [ ]/[ ]/[OK] to select among: OSD Language, Aspect Ratio, Blue Screen, Reset and Update (USB). Press [ ]/[ ] to enter and adjust. Press [OK] to confirm.
Returnstar Interactive Technology Group Co., Ltd. Aspect Ratio: Adjust how the picture fills the screen. Blue Screen: Set background color to blue or dark. Reset: Reset all the Settings to factory mode. Software Update (USB): Update the TV software. Select the software in the root of your USB memory, and press [OK] to confirm, then press [ ] to update or press [ ] to cancel. If there’s no software in the root of your USB memory, it will show: 7.2.6 Screen Menu Press [MENU] to enter the main menu.
Returnstar Interactive Technology Group Co., Ltd. enter. Press [EXIT] to exit. Press [ ]/[ ]/[OK] to select among: Auto Adjust, Horizontal Pos,. Vertical Pos., Clock and Phase. Press [ ]/[ ] to enter and [ ]/[ ] to adjust. Press [OK] to confirm. Press [EXIT] to exit. Note: The Screen Menu is available only I VGA source. Under Computer source, press [ATV MENU] to enter menu, and press [ ]/[ ] to select, then press [ ]/[OK] to enter submenu.
Returnstar Interactive Technology Group Co., Ltd. Auto Adjust: Auto adjust the horizontal position, vertical position, clock and phase. Horizontal Position: Adjust the horizontal position of the picture. Press [ ]/[ ] to adjust. Vertical Position: Adjust the vertical position of the pictures. Press [ Clock: Minimize vertical stripes in the screen image. Press [ Phase: Minimize horizontal distortion. Press [ ]/[ ] to adjust. ]/[ ] to adjust. ]/[ ] to adjust. 7.3 Media Menu Press [INPUT] to enter.
Returnstar Interactive Technology Group Co., Ltd. When the USB is connecting, the color is blue and the light is shining. Press [ ]/[ ] to select Photo/Music/Movie/Text icon and [OK] to enter the USB memory. Note: The Media Menu is available only in Media source. 7.3.1 Photo Move the cursor on a photo, then it will display this photo and its information as above. Select a photo to and press [OK] to show it in full screen.
Returnstar Interactive Technology Group Co., Ltd. Press to play or pause. Press to stop and back to the previous folder. Press to view Photo/Music/Video/File information. Press to view the previous picture. Press to view the next picture. Press to play all the pictures repeated in the current folder. Press [OK] to select the repeat mode: Repeat 1/All/None. Press to play or stop the background music. Music and pictures should be under the same catalog.
Returnstar Interactive Technology Group Co., Ltd. 7.3.2 Music Select one and press [OK] to display the menu. Press to play or pause. Press to stop and back to the previous folder. Press to view the Photo/Music/Video/File information. Press to rewind.
Returnstar Interactive Technology Group Co., Ltd. Press to wind. Press to play the previous song. Press to play the next song. Press to play all the music in repeat in the current folder. Press [OK] to select the repeat mode: Repeat 1/All/None. Press to choose the play time. Press to display the information of the current music (Resolution/Size/Date/ Time). Press to Mute. 7.3.3 Movie Select one and press [OK] to display the menu.
Returnstar Interactive Technology Group Co., Ltd. Press to play or pause. Press to stop and back to the previous folder. Press to view the Photo/Music/Video/File information. Press to rewind. Press to wind. Press to view the previous movie. Press to view the next movie. Press to play all the movie repeated in the current folder. Press [OK] to select the repeat mode: Repeat 1/All/None. Set A-B to play in repeat. Press once to set A, and press again to set B, then press the third time to chancel.
Returnstar Interactive Technology Group Co., Ltd. Zoom the picture out. Press to choose the zoom mode. Zoom in the picture first. Highlight the icon and press [OK], then press [ ]/[ ] &[ ]/[ ] to move the picture. 7.3.4 Text Note: The *.txt file can be detected and read only. Press [OK] to display the menu. Press to play or pause. Press to stop and back to the previous folder. Press view Photo/Music/Video/File information. Press to rewind. Press to wind.
Returnstar Interactive Technology Group Co., Ltd. Press to view the previous text. Press to view the next text. Press to play all the text in repeat in the current folder. Press [OK] to select the repeat mode: Repeat 1/All/None. Press to play or stop the background music. Press to display the (Resolution/Size/Date/Time).
Returnstar Interactive Technology Group Co., Ltd. Chapter 8 Multi-user Mode The Multi-user Mode of IQTouchScreen should be used with IQ Interactive Education Platform in the PC Mode. 8.1 PC and Display Connection 1. Connect PC and TouchScreen with an USB cable. USB Port of TouchScreen USB Port of PC 2. Connect PC with LCD by a VGA cable.
Returnstar Interactive Technology Group Co., Ltd. Note: If your product is Integrated PC hardware, you only need to connect this integrated PC directly. 8.2 Software and Driver Installation 1. Double click “MultiTouchScreen.exe” and follow the steps to install driver. 2. Double click “IQ Interactive Education Platform V5.1” and follow the steps to install software. 3. Please restart PC after driver and software installation. 8.
Returnstar Interactive Technology Group Co., Ltd. 3. After calibration, the calibration interface will be closed automatically. Now your TouchScreen is ready to use. Note: 1. If you have not located the accurate central point or clicked the wrong point or the next fixed point appeared without pressing, please press “ESC” on the keyboard to exit calibration and re-calibrate. 2. Please make your pen or finger upright when calibrating. 8.
Returnstar Interactive Technology Group Co., Ltd. 3. You can rotate or zoom one or several objects selected in the whiteboard page by Gesture Recognition in Windows OS. 4. Tick the Inertial Movement under “System Setting > Other Settings”, the object will speed up automatically according to the moving speed when moving the object. Multi-user Mode Tips: Multi-users should use the same pen tool to write in Multi-user Mode.
Returnstar Interactive Technology Group Co., Ltd. Chapter 9 Simple Repair Common faults analysis below can be reference for you when you meet same occasions. Poor sound, normal image ● Bad image, normal sound ● ● Poor signal ● ● Fuzzy image ● Doubled image ● Jamming image ● ● Image distortion ● ● ● Poor program signal ● ● ● ● Horizontal fringe in image Image vertical rolling ● Bad color ● ● No color ● ● Operation of the ● Check if there is battery in the controller.
Returnstar Interactive Technology Group Co., Ltd. Chapter 10 Fault Phenomenon The newest synthetic TV receiving device can eliminate the interference of other signals. As the local radiation will have obvious impact on the quality of the image, installing a good antenna or receiver is the best way to protect from the interference. Radio Frequency Interference: The sloshing fringe image is possibly caused by the interference of local shortwave devices.