
User Manual


Wireless Grinding Jar Cover
33
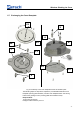
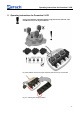
Fig. 13: Replacing the filter fleece
• Replace the filter fleece.
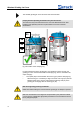
• Before assembly, check the state and the correct position of the seals and
the filter fleece.
• Now, insert the cover baseplate back in the cover housing; when doing so,
pay attention to the position of the filter fleece (11).
• Next, tighten the cover baseplate with the three screws (13).
• Screw the antenna (4) onto the grinding jar cover. Tauschen Sie das
Filtervlies aus.
6.10 Replacing the Filter Fleece When Using the Gassing Function
Tools required:
13-mm open-jaw wrench
Hexagon socket screw key 2.5 mm:
• Unscrew the antenna (4).
• Remove the two de-aeration valves (2), using a 13-mm open-jaw wrench.
• Remove the three screws (13) on the pre-assembled standard cover
baseplate and lift the plate up from the cover housing.
• Replace the filter fleece (see fig. Replacing the filter fleece)
• Before assembly, check the state and the correct position of the seals and
the filter fleece.
• Now, insert the cover baseplate with the mounted de-aeration tubes in the
cover housing und when doing so, pay attention to the position of the filter
fleece (11).
• Next, tighten the cover baseplate with the three screws (13).
• Screw the two de-aeration valves (2) into the venting holes (9) and tighten
them with a 13-mm open-jaw wrench.
• Screw the antenna (4) onto the grinding jar cover. Schrauben Sie die
Antenne (4) ab.
Pos: 8.20 /00020 BDA Softwar e/20005 PMGC K apitelsammlung/Ü berschrifte n/1.1 Überschrift en/11 Mahlbecher sc hließen @ 0 \mod_1214 827689298_9. doc @ 1861 @ @ 1
6.11 Clamping the Grinding jar with the Clamping Ring
Pos: 8.21 /00020 BDA Softwar e/20005 PMGC K apitelsammlung/ Warnhinweise /Hinweis nicht in PM 200 verwen dbar @ 0\ mod_12100567 16286_9.doc @ 766 @ @ 1
The wireless grinding jar cover cannot be used in the PM 200.