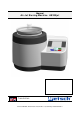
Manual Air Jet Sieving Machine AS200jet Translation © Retsch GmbH, 42781 Haan, Retsch-Allee 1-5, Germany 18.09.
Copyright © Copyright by Retsch GmbH Haan, Retsch-Allee 1-5 D-42781 Haan Federal Republic of Germany 2
1 1.1 1.2 1.3 Notes on the Operating Manual ............................................................................................................ 6 Explanations of the safety warnings .................................................................................................. 7 General safety instructions ................................................................................................................ 8 Repairs.....................................................................
.13.4 Open Mesh .............................................................................................................................. 32 5.13.5 Save parameters ..................................................................................................................... 32 5.13.6 Suction apparatus .................................................................................................................... 32 5.14 Programs ..............................................................
Notes on the Operating Manual Pos : 1.1 /0005 R ETSCH /0015 RET SCH R eparatur- und M ontageanl eitungen/00000 Übersc hriften/1. Ü bersc hriften/1 Hinweis e z ur Bedienungsanl eitung @ 0 \mod_1222347415287_9.doc x @ 2631 @ 1 @ 1 1 Notes on the Operating Manual Pos : 1.2 /0005 R ETSCH /0005 RET SCH Bedienungs anl eitung en Kapi tels ammlungen/Cr yoMill/0001 Hi nweis e zur Bedi enungsanleitung/Modul Hinweis z ur Bedienungs anl eitung @ 0\mod_1222347341773_9.
Notes on the Operating Manual Pos : 2.2 /0020 Ü bersc hriften/1.1 Übersc hriften/1.1 Übersc hriften BD A/11 Er kl ärungen z u den Sicherheits warnungen @ 0 \mod_1222344569771_9.doc x @ 2484 @ 2 @ 1 1.1 Explanations of the safety warnings Pos : 2.3 /0010 R ETSCH Standard Kapitel General M odul Warnhinweis e Er kl ärung neu @ 0\mod_1234858329746_9.doc x @ 6190 @ @ 1 In this Operating Manual we give you the following safety warnings Serious injury may result from failing to heed these safety warnings.
Notes on the Operating Manual Pos : 2.5 /0020 Ü bersc hriften/1.1 Übersc hriften/1.1 Übersc hriften BD A/11 Generell e Sicherheits hinweis e @ 0\mod_1222344568974_9.doc x @ 2463 @ 2 @ 1 1.2 General safety instructions Pos : 2.6 /0025 Warnhinweise/V0002 VOR SICHT Bedi enungsanleitung les en @ 2 \mod_1263894982815_9.doc x @ 18630 @ @ 1 CAUTION Read the Operating Manual Non-observance of these operating instructions – The non-observance of these operating instructions can result in personal injuries.
Notes on the Operating Manual Pos : 2.11 /0020 Übersc hriften/1.1 Ü bersc hriften/1.1 Ü berschriften BDA/11 R eparatur en @ 0 \mod_1223624336511_9.doc x @ 2978 @ 2 @ 1 Reperatur en 1.3 Repairs Pos : 2.12 /0010 RET SCH Standard KapitelGener al Modul R eparatur en @ 0\mod_1228722954535_9.doc x @ 4079 @ @ 1 This operating manual does not contain any repair instructions. For your own safety, repairs may only be carried out by Retsch GmbH or an authorized representative or by Retsch service engineers.
Confirmation Pos : 3.2 /0010 BDA Software/Übersc hriften/1. Ü bersc hriften/1 Bestätigung (F ormular für den Betr eiber) @ 0\mod_1208870841095_9.doc x @ 430 @ 1 @ 1 Bes tätigung 2 Confirmation Pos : 3.3 /0005 R ETSCH /0099 RET SCH Standar d Kapitel/Gener al M odul Bes tätigung @ 0\mod_1228722962707_9.doc x @ 4114 @ @ 1 This operating manual contains essential instructions for operating and maintaining the device which must be strictly observed.
Technical data Pos : 5.1 /0020 Ü bersc hriften/1. Ü bers chriften/1 T ec hnisc he D aten @ 0\mod_1222344525522_9.doc x @ 2407 @ 1 @ 1 3 Technical data Pos : 5.2 /0020 Ü bersc hriften/1.1 Übersc hriften/1.1 Übersc hriften BD A/11 Ei nsatz der Masc hi ne bei bes ti mmungsgemäß er Ver wendung @ 0\mod_1226476732248_9.doc x @ 3243 @ 2 @ 1 3.1 Use of the machine for the intended purpose Pos : 5.3 /0025 Warnhinweise/V0005 VOR SICHT explosionsgefär dete Atmos phäre @ 1\mod_1239868668923_9.
Technical data Pos : 5.7 /0025 Warnhinweise/H0007 HIN WEIS Ei nsatz ber eich des Ger ätes 8 Stündiger @ 1\mod_1236240219096_9.doc x @ 7693 @ @ 1 NOTICE Area of use of the machine – This machine is a laboratory machine designed for 8-hour single-shift operation. This machine may not be used as a production machine nor is it intended for continuous operation. • Pos : 5.8 /0025 Warnhinweise/H0005 HIN WEIS Defekt von Bauteil en durc h Fl üssig keiten N assiebung @ 1\mod_1243925266971_9.
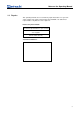
Technical data I IB IS Fig. 1: Connecting the sound absorber Put the position pin (IB) into the opening marked in the picture in order to lock the sound absorber in a horizontal position. Pos : 5.13 /0020 Übersc hriften/1.1 Ü bersc hriften/1.1 Ü berschriften BDA/11 M axi mal e Bel astung @ 0\mod_1228983528905_9.doc x @ 4880 @ 2 @ 1 3.3 Maximum Load Pos : 5.
Technical data Pos : 6.1 /0020 Ü bersc hriften/1.1 Übersc hriften/1.1 Übersc hriften BD A/11 T ypensc hild Beschr eibung @ 3\mod_1280933953941_9.doc x @ 22302 @ 2 @ 1 3.8 Type plate description Pos : 6.2 /0005 R ETSCH /0099 RET SCH Standar d Kapitel/Gener al M odul T ypensc hild @ 3 \mod_1280931092443_9.doc x @ 22278 @ @ 1 5 1 2 6 3 4 9 11 12 8 10 13 7 14 Fig.
Transport, scope of delivery, installation Pos : 8.1 /0020 Ü bersc hriften/1. Ü bers chriften/1 Ver pac kung, Tr ans port und Aufstellung @ 0\mod_1226494451893_9.doc x @ 3380 @ 1 @ 1 4 Transport, scope of delivery, installation Pos : 8.2 /0020 Ü bersc hriften/1.1 Übersc hriften/1.1 Übersc hrift en BD A/11 Verpac kung @ 0\mod_1226495088973_9.doc x @ 3392 @ 2 @ 1 4.1 Packaging Pos : 8.3 /0005 R ETSCH /0099 RET SCH Standar d Kapitel/Gener al M odul Ver pac kung @ 0 \mod_1228984618355_9.
Transport, scope of delivery, installation Pos : 8.13 /0005 RET SCH/0099 R ETSCH Standar d Kapitel /General Modul Aufs tell ungs höhe @ 0 \mod_1228918538349_9.doc x @ 4724 @ @ 1 Installation height: maximum 2000 m above sea level Pos : 8.14 /0005 RET SCH/0005 R ETSCH Bedienungsanlei tungen Kapitelsamml ung en/AS200Jet/0006 AS200J et Transport, Li eferumfang und Aufstellen/AS200J et M odul Grafi ken Lufteinl ass offen hal ten @ 3\mod_1307347943605_9.doc x @ 25260 @ @ 1 Pos : 8.15 /0020 Übersc hriften/1.
Transport, scope of delivery, installation • Use the supplied connection cable to connect the device to the mains power supply. Pos : 8.18 /0005 RET SCH/0005 R ETSCH Bedienungsanlei tungen Kapitelsamml ung en/AS200Jet/0006 AS200J et Transport, Li eferumfang und Aufstellen/AS200J et M odul externe Absicherung @ 1\mod_1243926769314_9.doc x @ 10385 @ @ 1 The external fuse must be at least T15A (230V) T15A (100/120V). Pos : 8.
Operating the machine Pos : 9.2 /0020 Ü bersc hriften/1. Ü bers chriften/1 Bedienung des Gerätes @ 0 \mod_1226565880211_9.doc x @ 3519 @ 1 @ 1 5 Operating the machine Pos : 9.3 /0020 Ü bersc hriften/1.1 Übersc hriften/1.1 Übersc hriften BD A/11 Ansic hten des Ger ätes R etsc h @ 0\mod_1228990581782_9.doc x @ 4966 @ 2 @ 1 5.1 Views of the Instrument Pos : 9.
Operating the machine H I K L J M P O Fig. 4: Rear view T H S R Fig.
Operating the machine Pos : 9.5 /0020 Ü bersc hriften/1.1 Übersc hriften/1.1 Übersc hriften BD A/11 Ansic hten der Bedienel emente und der Anz eige @ 0\mod_1226566362336_9.doc x @ 3537 @ 2 @ 1 5.2 Operating elements and displays Pos : 9.6 /0005 R ETSCH Bedi enungsanlei tungen Kapitelsamml ung en/AS200Jet/0007 AS200J et Bedi enung/AS200Jet M odul Ansic ht der Dis playeinheit @ 1\mod_1236682005889_9.doc x @ 7916 @ @ 1 C F G Fig. 6: View of the display unit Pos : 9.
Operating the machine Pos : 9.8 /0020 Ü bersc hriften/1.1 Übersc hriften/1.1 Übersc hriften BD A/11 Übersichtstabelle der Ger äteteile @ 0\mod_1228990616846_9.doc x @ 4972 @ 2 @ 1 5.3 Overview table of the parts of the device Pos : 9.9 /0005 R ETSCH Bedi enungsanlei tungen Kapitelsamml ung en/AS200Jet/0007 AS200J et Bedi enung/AS200Jet M odul T abelle der Ger äteteil e @ 1\mod_1239875152197_9.
Operating the machine Pos : 9.11 /0020 Übersc hriften/1.1 Ü bersc hriften/1.1 Ü berschriften BDA/11 Arbeits weise Retsc h @ 0 \mod_1228990496537_9.doc x @ 4960 @ 2 @ 1 5.4 Working procedure Pos : 9.12 /0005 RET SCH Bedi enungs anleitung en Kapitels ammlungen/AS200J et /0007 AS200Jet Bedienung/AS200J et Modul Ar beits weis e @ 1\mod_1243413970772_9.doc x @ 9550 @ @ 1 The AS 200 jet has an air nozzle, which is set rotating. The sieve with lid is put on top of that.
Operating the machine 5.6.1 Sieve lid for 50--mm/25--mm sieve height 1 2 Fig. 8: Sieve lid The sieve lid for 50-mm (2-inch) sieves lies on the top edge of the sieve (1). The sieve lid for 25-mm (1-inch) sieves lies on the ledge inside the sieve (2). Pos : 9.17 /0020 Übersc hriften/1.1 Ü bersc hriften/1.1 Ü berschriften BDA/11 Sc honhammer – Anwendung und Gebrauc h @ 2\mod_1256728342926_9.doc x @ 17460 @ 2 @ 1 5.7 Soft-faced mallet – Application and Use Pos : 9.
Operating the machine Pos : 9.21 /0025 War nhi nweis e/V0049 VORSICHT H erausgeworfenen Gegenstände ( AS200J et) @ 3\mod_1282734264369_9.doc x @ 22789 @ @ 1 CAUTION Objects thrown-out or falling down Connection of compressed air instead of vacuum cleaner – If compressed air is connected to one of the two air openings, the sieve lid and the sieve will be hurled out. • This device may not be operated with compressed air. Pos : 9.
Operating the machine • To turn the vacuum cleaner off, press the STOP button or use the turn-andpush dial. Pos : 9.23 /0020 Übersc hriften/1.1 Ü bersc hriften/1.1 Ü berschriften BDA/11 Steuerung der Lufts trom-Stär ke @ 1\mod_1240308048818_9.doc x @ 8180 @ 2 @ 1 Pos : 9.24 /0020 Übersc hriften/1.1.1. Übersc hriften/111 Manuell e Steuerung der Luftstr omstär ke @ 1 \mod_1240309295943_9.doc x @ 8201 @ 3 @ 1 Pos : 9.
Operating the machine The air jet can be changed by turning the manual air jet setting (U). [1] Air entry opening (V) closed maximum air jet [2] Air entry opening (V) open minimum air jet The difference in air pressure (differential pressure) between the air inlet and air outlet at a given moment is displayed on the screen. Pos : 9.
Operating the machine Pos : 9.30 /0020 Übersc hriften/1.1 Ü bersc hriften/1.1 Ü berschriften BDA/11 Dis playei nheit - Bedi enung des Ger ätes @ 1\mod_1236677049299_9.doc x @ 7890 @ 2 @ 1 Pos : 9.31 /0005 RET SCH/0099 R ETSCH Standar d Kapitel /General Modul Displ ayeinhei t - Bedienung des Gerätes @ 1\mod_1236681950483_9. doc x @ 7908 @ 33 @ 1 This device offers a new, very convenient operator guidance.
Operating the machine Pos : 9.32 /0020 Übersc hriften/1.1 Ü bersc hriften/1.1 Ü berschriften BDA/11 Symbol e in der Dis playei nheit @ 1\mod_1249991350589_9.doc x @ 13770 @ 2 @ 1 5.9 Symbols in the Display Unit Pos : 9.33 /0005 RET SCH Bedi enungs anleitung en Kapitels ammlungen/AS 200J et/0007 AS200Jet Bedienung/AS200J et Modul Gr afi kdi spl ay M enü neu @ 7\mod_1386159686424_9.
Operating the machine Pos : 9.36 /0020 Übersc hriften/1.1 Ü bersc hriften/1.1 Ü berschriften BDA/11 Direktz ugriff auf das Sprac henmenü @ 7\mod_1386851099017_9.doc x @ 53612 @ 2 @ 1 5.10 Direct access to the language menu Pos : 9.37 /0005 RET SCH Bedi enungs anleitung en Kapitels ammlungen/AS200J et/0007 AS200Jet Bedienung/AS200j et M odul Sprac hei nstell ungen extr a @ 7\mod_1386769736915_9.
Operating the machine Pos : 9.39 /0020 Übersc hriften/1.1 Ü bersc hriften/1.1 Ü berschriften BDA/11 M enüstr uktur @ 1\mod_1239699858524_9.doc x @ 8120 @ 2 @ 1 5.11 Menu structure Pos : 9.40 /0005 RET SCH Bedi enungs anleitung en Kapitels ammlungen/AS200J et/0007 AS200Jet Bedienung/AS200j et M odul Gesamtmenüstru ktur 01 @ 7\mod_1386754070774_9.
Operating the machine Pos : 9.41 /0020 Übersc hriften/1 .1 Ü bersc hriften/1.1 Ü berschriften BDA/11Betri ebs modi @ 7\mod_1386851520343_9.doc x @ 53623 @ 2 @ 1 5.12 Operating modes Pos : 9.42 /0005 RET SCH Bedi enungs anleitung en Kapitels ammlungen/AS200J et/0007 AS200Jet Bedienung/AS200j et M odul Betri ebs modi @ 7\mod_1386769949365_9.doc x @ 53496 @ 2444 @ 1 You can select the following operating modes using the menu navigation (C1): 5.12.1.
Operating the machine Pos : 9.43 /0020 Übersc hriften/1.1 Ü bersc hriften/1.1 Ü berschriften BDA/11 M anueller Betrieb @ 7 \mod_1386773101603_9.doc x @ 53507 @ 3 @ 1 5.13 Manual operation Pos : 9.44 /0005 RET SCH Bedi enungs anleitung en Kapitels ammlungen/AS200J et/0007 AS200Jet Bedienung/AS200j et M odul M anueller Betr ieb @ 7\mod_1386774886925_9.doc x @ 53540 @ 233333 @ 1 5.13.1 Sieve duration 00:01 to 99:59 (minutes : seconds) 5.13.
Operating the machine • – Press the operating button (F). The Off display appears in the suction apparatus menu point. • • • Press the START button to switch the power on. Press the STOP button to turn the power off. Press the operating button (F) to exit the suction apparatus menu point. Pos : 9.45 /0020 Übersc hriften/1.1 Ü bersc hriften/1.1 Ü berschriften BDA/11 Programm @ 5\mod_1344511635554_9.doc x @ 33985 @ 2 @ 1 5.14 Programs Pos : 9.
Operating the machine - Back to cancel without saving. This returns you to the program level. – NOTE A program which has not been saved cannot be started. 5.14.4.2 Delete program In this menu you can delete the stored parameters of each program. NOTE Only the parameters saved in the respective program are deleted. The program memory location remains in place. The parameters in the Quick Start program cannot be deleted. • By turning the operating button (F) switch to the Delete program menu point.
Operating the machine 5.16.4 Date The current date can be entered here. The device can be disconnected from the mains for up to 30 days without losing the settings. 5.16.5 Time The time can be entered here. The time then appears in the stand-by screen. The device can be disconnected from the mains for up to 30 days without losing the settings. 5.16.6 Signal tone The error messages on incorrect operation can be supported by an acoustic signal tone.
Operating the machine – The data are sent by the connected PC via interface cable (RS232 or USB) to the controller PCB. The controller PCB forwards the data on to the boot loader of the display unit. – The target device controller is selected on the PC via a software update selection menu. The data are sent by the connected PC via interface cable (RS232 or USB) to the controller PCB. The controller PCB forwards the data on to the boot loader of the display unit. 5.16.8.4.2 Controller – 5.16.8.
Operating the machine Pos : 9.57 /0020 Übersc hriften/1.1.1. Übersc hriften/11 Anschl uss der ger egelten Saug kr auftsteuer ung @ 1\mod_1240308097272_9.doc x @ 8187 @ 1 @ 1 5.19 Controlled suction force adjuster Pos : 9.58 /0005 RET SCH Bedi enungs anleitung en Kapitels ammlungen/AS200J et/0007 AS200Jet Bedienung/AS200J et Modul Ansc hlus s des Motor-Reg el ventils @ 1\mod_1240309232193_9.doc x @ 8194 @ @ 1 IS H SK J Fig.
Operating the machine Pos : 9.61 /0025 War nhi nweis e/V0003 VORSICHT Explosi ons- oder Br andgefahr Si eben @ 1\mod_1243924323407_9.doc x @ 10360 @ @ 1 CAUTION Risk of explosion or fire Changing sample characteristics – Note that the characteristics and accordingly the danger presented by a sample can change during sieving. • Do not sieve any potentially explosive or combustible materials in this device. Pos : 9.
Operating the machine Z6 Air outlet Connection for the industrial vacuum cleaner Z7 Cyclone cover Removable cover with air outlet Z8 Cyclone Separates sample material from air current Z9 Collecting vessel Collecting tank for sieved sample material Fig. 16: Connection of the cyclone Z3 Z2 Fig. 17: Steps 1 and 2 1. Push the pin (Z2) into the upper opening on the outer edge of the housing. 2. Push the cyclone support (Z3) onto the pin.
Operating the machine Z4 Z5 H Fig. 18: Steps 3 and 4 3. 4. Screw the screw (Z4) in. Push the manual suction power adjuster (Z5) into the air outlet‘ (H). Z1 Fig. 19: Steps 5 and 7 5. Push the cyclone with cover into the manual suction power adjuster. Position the cyclone with cover such that the support on the cyclone fits into the housing support (Z3). 6. Screw the knurled head screw (Z1) into the housing support.
Operating the machine Fig. 20: Connect the vacuum cleaner 7. Place the hose of the vacuum cleaner in the upper opening of the cyclone. Pos : 10 /0005 RET SCH/0005 R ETSCH Bedienungsanl eitungen Kapitelsamml ung en/------- Seitenumbr uc h ----------- @ 0\mod_1222344373758_0.
EasySieve® Pos : 11.1 /0005 RET SCH/0015 R ETSCH Reparatur- und M ontag eanleitungen/00000 Ü berschriften/1. Übersc hriften/1 Eas ySi e ve® @ 0\mod_1229520770280_9.doc x @ 5246 @ 2 @ 1 6 EasySieve® Pos : 11.2 /0020 Übersc hriften/1.1 Ü bersc hriften/1.1 Ü berschriften Software BDA11 Steuern, aus werten, dokumentieren @ 0\mod_1231151811461_9.doc x @ 5357 @ 2 @ 1 6.1 Control, evaluation, documentation Pos : 11.3 /0010 RET SCH Standard KapitelGener al Modul Eas ySieve @ 0\mod_1231151891210_9.
EasySieve® Pos : 13 /0005 RET SCH/0005 R ETSCH Bedienungsanl eitungen Kapitelsamml ung en/------- Seitenumbr uc h ----------- @ 0\mod_1222344373758_0.
Cleaning and service Pos : 14.1 /0020 Übersc hriften/1. Übersc hriften/1 Rei nigung und Wartung @ 0\mod_1231167007723_9.doc x @ 5450 @ 1 @ 1 7 Cleaning and service Pos : 14.2 /0025 War nhi nweis e/W0003 WARNUNG R ei nigung Str omstoß neu @ 1\mod_1236239978437_9.doc x @ 7686 @ @ 1 WARNING Risk of a fatal electric shock - An electric shock can cause injuries in the form of burns and cardiac arrhythmia, respiratory arrest or cardiac arrest. • Do not clean the blender under running water.
Cleaning and service MS Fig. 2 Sealing screws • Install a test sieve. • Install a sieve cover. • Connect the vacuum cleaner to the manual vacuum regulation. • Connect the two hoses of the manometer (Digital Manometer PCE-P05 or similar) to the two measuring ports. Abb. 23: Connecting the Manometer • With the operating button, navigate to the sensor calibration menu point. Manual operation sensor • Confirm the start of calibration by pressing the operating button.
Fault messages Pos : 15.2 /0020 Übersc hriften/1. Übersc hriften/1 Fehl ermeldungen @ 2 \mod_1259056589728_9.doc x @ 17580 @ 1 @ 1 8 Fault messages Pos : 15.3 /0005 RET SCH/0005 R ETSCH Bedienungsanlei tungen Kapitelsamml ung en/AS200Jet/0013 AS200J et Fehler meldung en/1301 AS200 Jet Modul F ehl ermel dungen @ 2\mod_1263548251088_9.
9 Index 1 D 1 inch 23 Date 35 Datenübergabe 43 Datenübernahme 43 Degree of protection 13 Degree of soiling 44 Delete program 34 Depth 13 Description 21 Description 28 Description 38 Device designation 14 Differential pressure 44 Differential pressure, maximum 13 Dimensions and weight 13 Direct access to the language menu 29 Disposal label 14 DROP IN VACUUM 46 Dust container 44 2 2 inch 23 25mm 23 5 50mm 23 9 9 polig 43 A Air jets through the manual suction force adjuster 25 Air outlet channel 44 Ambient
I Individual cyclone parts 38 Inserting the test sieve 22 Installation height 16 Installation of the machine 15 Interface 35 INTERRUPTION DUE TO MAINS FAILURE 46 Restart the device 46 Rückansicht 43 S Open Mesh 32, 33 Operating elements and displays 20 Operating hours 35 Operating modes 31 Operating the machine 18 Overview table of the parts of the device 21 Safety Spacing 13 Safety warnings 7 Save parameters 32 Schnittstelle 43 Sealing screws 45 selection bar 27 Sensor calibration 36 Serial number 14 Se
V Vacuum 32, 33, 34 Vacuum setting 32 Vacuum cleaner 44 Vacuum cleaner bag 44 Vacuum cleaner bag 44 Vacuum cleaner function 24 VACUUM TOO LOW 46 Vacuum, maximum 13 View of the Display Unit 20 View of the menu in the display unit 28 View of the sieve compartment 19 Views of the Instrument 18 W Weight 13 Width 13 Working procedure 22 Wrong language 29 Y Year of production 14 49
CERTIFICATE OF CE-CONFORMITY Translation SIEVE SHAKER AS200jet Certificate of CE-Conformity according to: EC Mechanical Engineering Directive 2006/42/EC Applied harmonized standards, in particular: DIN EN ISO 12100 Security of machines EC Directive Electromagnetic Compatibility 2004/108/EC Applied standards, in particular: EN 61000-3-2/-3 Electromagnetic compatibility (EMC) EN 61236 Electrical measuring, operating, controlling and laboratory equipment – EMCrequirements in conjunction with EN 61000 EN 55011
Copyright ® Copyright by Retsch GmbH Haan, Retsch-Allee 1-5 D-42781 Haan Federal Republic of Germany