
Installation guide


10.
•
.....
If
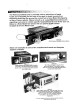
Prepare
to
set
up
your
vehicle-specific
kit
(Optional 67-72
GM
Truck
bezel
shown
as an
installation
example)
Once
shafts
are
lined
up
to
the
shaft
openings
on the
vehicle-specific
faceplate adapter,
use
a
nut
and
washer
to
hold
the faceplate in place
on
the
shafts
so
the Retro
Classic's
face is
flush
with
the
opening
of
the faceplate (see
photos
below). NOTE:
Modifying
or
cutting
the
radio's
brackets
will
not
void
your
warranty,
this
is
what
our
radio
is
designed
for.
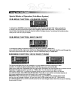
Use supplied
nuts
& washers
to
align bezel
onto
shaft.
Adjust
nut
height
to
allow bezel/faceplate
to
be
flush in
your
dash. Note, with
this
bezel, the area around the
radio face (chrome
or
black)
mounts
from
behind
your
dash.
·1IIlIIlI
Vehicle-specific
adapter
&
Retro
Classic
radio
face
should
be
flush
for
professional
appearance
Tighten
shaft
nuts
and
make
sure
that
shaft
depth
works
with
your
dash
configuration;
the
Retrosound
Infinimount
bracket
shaft
and
bracket
system
are
extremely
adjustable
and
care
should
be
taken
to
ensure
proper
final
fit
for
the
perfect
installation.