
Owner's Manual


23
USB DEVICE INSTRUCTIONS
Connecting a USB Device
The USB input is located at the rear of the radio body. The USB
cable must be routed to a convenient and accessible location for
plugging in USB devices.
Once you’ve turned on your radio and connected your ash drive
or supported USB device to the USB input, the radio will nd your
songs and automatically begin playing them.
The icon appears on the LCD during USB playback.
To change songs, rotate the right front knob (#8) to access the
next or previous song. The preset buttons on the front of the radio’s
control face (#3-7) will allow you to play/pause (#3), listen to 10
seconds of each song (INT) (#4), repeat the track you’re listening
to (RPT) (#5) or randomly select from all songs on the attached
ash drive or supported USB device (RDM) (#6).
About MP3/WMA Files
MP3 (MPEG Audio Layer-3) and WMA (Windows Media Audio) is a format for
compressed audio les. When your radio is in USB mode (USB 1 or USB 2), you can play
MP3 and unprotected (no DRM) WMA les off the ash drive.
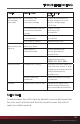
Common facts about these compressed-sound formats:
• High bit rate and high sampling frequencies are
recommended for high sound quality.
• Selecting VBR (Variable Bit Rate) is not recommended because playing time is
not displayed properly and there may be some audible skipping artifacts. The
playback sound quality differs depending on the encoding circumstances.
For details, refer to the user manual of your own encoding software.
• When adding MP3 les to your ash drive, it is recommended
to set the bit rate to 128 kbps or more and “xed.”
• When adding WMA les to your ash drive, it is recommended to set
the bit rate to 64 kbps or more and “xed.” Do not set the copy protect
attribute on the WMA le or you will not be able to play the track.