
Owner's Manual


13
INSTALLATION INSTRUCTIONS
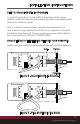
Rear USB Inputs
One USB connector cable is located at the rear of the Motor 2 radio
body. During installation, you must route the cable to a convenient and
accessible location for plugging in USB devices. If the cable provided
is not long enough (20 inches), you may use our optional USB/AUX
Extension Cable (not included) to extend the reach of the cable. This
cable also allows you to install the USB/AUX port into the factory location
for the cigarette lighter for a factory look and easy access.
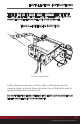
STEP 5: Finish the Installation
IF USING A BEZEL, place the bezel on the face of the radio, then install
the assembled radio from behind the dash until the bezel and radio face
are ush with the front of the dash and the radio shafts protrude through
the shaft openings in the dash. Using the supplied washers and shaft nuts
(see “What’s In the Box” on page 4), secure the radio to the dash.
IF USING A FACEPLATE, slide the radio into the hole from behind the
dash, then align the faceplate over the radio shafts from the front.
Using the supplied washers and shaft nuts (see “What’s In the Box”
on page 4), secure the faceplate to the dash and the radio.
DAMAGE RESULTING FROM OVERTIGHTENING THE SHAFT NUTS
WILL VOID YOUR WARRANTY.
Next, you’ll need to secure the rear of the radio using the supplied
back strap and hardware (see “What’s in the Box” on page 4). The
back strap mounts using the threads in the rear of the radio body and
can be bent and adjusted to align with the mounting point of the
original factory radio behind the dash.