
Owner's Manual


12
Copyright © 2018 Retro Manufacturing, LLC
NOTE: This unit requires +12 volts to both the red and yellow wires to operate properly.
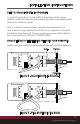
Locate the three wiring harnesses: main wiring harness, power
wiring harness and speaker wiring harness (see “What’s in the Box”
on page 4). First connect the main wiring harness to the back
of the radio. Then connect both the power and speaker Wiring
Harnesses to the black female plug of the main wiring harness.
After doing this, connect the bare wire ends of your power and
speaker wires to the appropriate power and speaker locations in your
vehicle (see Figure 5). Have your radio installed by a professional if this
part of the install is too difcult, or contact us if you have questions.
Installation Notes
• To prevent damage to the unit, do not connect the power
connector until you have completed the wiring process.
• This is a 12 volt negative ground ONLY radio. If you
have a positive ground, or a 6 volt system, you need
to either convert to 12 volts or purchase a separate
inverter that would increase the voltage to 12 volts.
• Please note that any inverter must be rated at 8 amps
or higher in order for the radio to operate properly.
Rear AUX Inputs
Two AUX inputs are located at the rear of the Motor 2 radio body.
These auxiliary inputs allow you to listen to any external source with
a standard headphone output. An example of an external source
would be a MP3 player, iPod
®
or iPhone
®
, portable CD player
or portable satellite radio receiver. To use this input, the auxiliary
cable must be routed to an accessible area during installation.
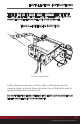
INSTALLATION INSTRUCTIONS