
Owner's Manual


Hermosa
Owner's
Manual
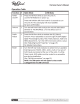
STEP
2:
Mount
Shafts
to
Brackets
1.
To
match
the
lnfiniMount
shaft and bracket system
to
the
proper
shaft
width
of
your
vehicle,
first measure the distance between
your
existing_
shaft holes
from center
to
center.
2.
Mount
a shaft system
to
each bracket using
the
supplied
shaft nuts, metal
and plastic washers.
3.
Finger tighten
to
prepare
for
the
final installation
(see Figure
2).
Use
supplied
washers and nuts
to
place
shafts
onto
brackets.
Important:
DO
NOT
overtighten.
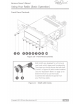
Figure
2 -
Mount
Shaft
to
Bracket
4.
Once
sure
of
the proper width, tighten
prior
to
final installation.
(DO
NOT
OVERTIGHTEN)
Be
sure
to
plug
the
shafts into each side
of
the
main
unit
to
activate
the
shaft-control
functions (see Figure
3)
NOTE:
Each
of
the
shafts
can
operate on
either
side
of
the
radio and are
not
left/right
dependant.
Figure
3 -
Insert
Shaft
Plugs
NOTE:
Modifying or cutting
the
radio's brackets
will
not
void your warranty.
The
system is designed to accommodate any installation scenario.
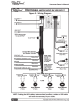
STEP
3:
Complete
Wiring
Connections
(See
"Wiring
Instructions"
on page 9).
Copyright 2015
©
Retro
Man
~~'
LLC
J