
Installation Guide

23
I
M
P
O
R
T
A
N
T
I
M
P
O
R
T
A
N
T
!
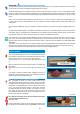
Be careful to center the Lateral Insect Screen Track (J) onto the appendage
from the Screen Cartridge Header (A) so as to be able to guide the Lateral
Insect Screen Track (J) to be pushed evenly into a parallell position to the
wall or window sides.
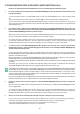
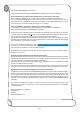
Move the Lateral Insect Screen Tracks (J) vertically so that they move INTO
the window jamb opening Make sure Lateral Insect Screen Tracks (J) insert
completely. (See Figure 3.1.2D)
REPEAT step 3.2.3. for the RIGHT Lateral Insect Screen Track (J)
Ensure that the Lateral Insect Screen Track (J) is aligned with the window
opening so that the distance from the corner of the wall is consistent and
so that the Lateral Insect Screen Track (J) on the left side of the window
is aligned with the Lateral Insect Screen Track (J) on the right side of the
window.
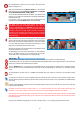
Using the included screws (M) affix the Lateral Insect Screen Tracks (J)
to the window's wall, by drilling screws (M) through the holes you drilled in
Step 2.3. (See Figure 3.1.2E)
Screw the included screws (M) into the Lateral Insect Screen Tracks (J)
AND into the window jamb walls.
STEP 3.1 TIPS
To affix to cement walls or to other wall structures requiring Wall Anchors,
mark hole positions on the wall that correspond to the pre-drilled holes in
the Screen Cartridge Header (A1) or to holes you measured for the Lateral
Insect Screen Tracks (J). (See Step 2.3.)
Drill corresponding holes with a 15/64 inch (6mm) drill bit (for concrete).
Insert the included wall anchors.
Realign the Lateral Insect Screen Track (J) and screw in the included
screws (M). (See Figure 3.1.2E)
Please be sure to firmly secure the Lateral Insect Screen Tracks (J) to the
side walls of the window opening even if the Screen Cartridge Header (A1)
and the Lateral Insect Screen Tracks (J) remain firmly in place even without
being screwed into the wall. As failure to screw the Side Insect Screen
Tracks (J) into the window jamb wall may cause Insect Screen performance
problems in the future.
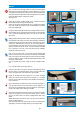
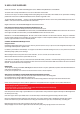
CLOSING THE RETRACTABLE BUG SCREEN… using the pull cord (C)
pull down the Pull Bar, when Pull Bar is within your reach grab the Pull
Bar Handles (B) and continue lowering the mosquito screen until it reaches
the apposite latch position, where you will slightly push rotate the handles
slightly downward towards the window sill and towards outside in order to
securely close. (See Figure 3.3)
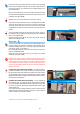
OPENING THE RETRACTABLE BUG SCREEN… put your fingertips IN
the handles (B) with your fingertips pointing down towards the window
sill, then apply slight forward/outward (toward outside) push pressure with
the front of your knuckles. (Rotating the handle downward and then slight
upward towards you)
Your knuckles should be pushing toward the outside or window and your
fingertips pointing toward the sill and then towards you as you execute the
rotation of the front of your knuckles outward.
THANK YOU for choosing RETRACTABLEBugScreen TM
Figure 3.1.2E
Figure 3.1.2D
A
J
Figure 3.3