
Installation Guide


14
VIII. ASSEMBLY & INSTALLATION DETAILED INSTRUCTIONS
STEP 1: MEASURING AND PREPARING THE MOSQUITO SCREEN
HEADER
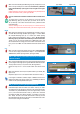
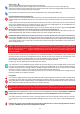
STEP 1.1. Measure the width the INSIDE HEAD JAMB
Use your household tape to Measure the width of the inside jamb of your
window at the Head Jamb level.
See Figure 1A and 1B.
Record the measurement you took in Step 1.1. as the window Head Jamb
opening width = W inches.
The measurement you note (W inches) will be used as a reference of
where to cut when cutting the Screen Cartridge Header and Pull Bar
(A1/A2).
Write the window's Head Jamb opening WIDTH measurement in Box
W to the right for easy reference.
In Step 1.2. below you will mark this “W” measurement ON the Glued
Measuring Tape Reference Guide (N) and CUT at the “W” inches NUMBER
on the Glued Measuring Tape Reference Guide (N).
STEP 1.1. TIPS
Note that the width of your window opening at the Head Jamb level may
differ from the width of your window opening at window Sill level. So be
sure to measure the window's opening width at the Head Jamb. and use
the measurement of the width at your window's Head Jamb as your WIDTH
measurement; “W” inches.
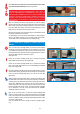
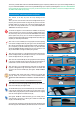
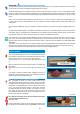
STEP 1.2. Align Screen Cartridge Header (A1) and Screen Pull Bar
(A2) and Cut at your pre-measured “Width” inches mark.
1.2.1. Ensure that the Screen Cartridge Header (A1 ) and Screen Pull Bar
(A2) are aligned so they can be cut evenly at the same time.so as to be able
to cut them both evenly at the same time. (See Figure: 1.2A)
1.2.2. On the Screen Cartridge Header (A1) you will find a Glued Measuring
Tape Template (N) pre-adhered to the Screen Cartridge Header (A1).
(See Figure:1.2B) MARK the Measuring Tape Template (N) on the Screen
Cartridge Header (A1) at “W inches” ( the window's Head Jamb opening
WIDTH measurement determined and recorded in Box W in Step 1.1.
above).
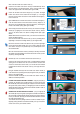
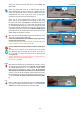
1.2.3. CUT the Screen Cartridge Header (A1) and Screen Pull Bar (A2)
contemporaneously AT the “W inches” width you
determined as the Head Jamb WIDTH in Step 1.1.
CUT at “W” ON the Measuring Tape Template (N) glued onto the Screen
Cartridge Header (A1).
DO NOT use YOUR household measuring tape to determine where to
cut on the Screen Cartridge Header A(A1/A2).
ONLY use of YOUR household measuring tape to MEASURING the Head
Jamb in Step 1.1. above NOT to cut here in Step 1.2..
Use the numbers on Glued Measuring Tape Reference Guide (N) to identify
where to cut the Screen Cartridge Header A(A1/A2)
A1&A2
N
Glued Measuring Tape Template
Figure 1.2A
BOX W
“W”= where to cut
Figure 1.2B
Figure 1A
Figure 1B
BOX W
Cut at “W” =
MEASURE
ALIGN
MARK
CUT