
Operating instructions
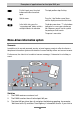


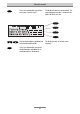

Examples of applications for the tiptel 345 pro
94
Quit the menu. Press the “stop” button several times
until the display resumes the initial state.
The display shows the three mailboxes
“1”, “2”, “3” and “4”.
After having activated the mailboxes, you may now record your mailbox messages in
the next step.
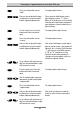
Recording mailbox messages
Press the select button next to the
mailbox symbol.
The first mailbox (from the left side of the
display) starts flashing. At the same time,
the OGM symbol in the bottom right cor-
ner of the display starts flashing.
(Press the select button several times to
move until the target mailbox number
starts flashing.)
Press OGM and keep pressed. Wait until you will hear a brief tone. The
display shows a microphone symbol to
indicate the readiness for recording.
Start speaking your outgoing mes-
sage (keep a distance of about 25
cm from the microphone).
The display shows the current duration of
your recording in minutes and seconds.
Remark: To allow a caller to get routed to
a contact partner after dialling a specific
number after the announcement, keep
the recording button pressed for some
few seconds.
Release the OGM button to stop the
recording.
The display shows “with incoming re-
cording” and “without incoming record-
ing”.
Use the select button next to the
corresponding line to determine that
the OGM shall be available without
an option for an incoming message
recording.
The recording is complete and it will be
played back for test purposes.
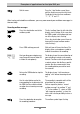
You can repeat the process “record
mailbox message” for mailbox “2” and
“3”. As for mailbox “4”, select an OGM
“with incoming recording”, as here, the
caller shall have the possibility to leave a
message.
Press the stop button to complete
the recording procedure.
The mailbox symbol stops flashing.