Operating instructions Call Manager tiptel 345 pro (UK)
Safety information Safety information When installing, connecting and operating the tiptel 345 pro, please make sure that the following is taken into consideration: • Connect the connecting cables only to the provided plugs. • Please take care that the cables do not lead to any danger of stumbling and avoid folding, pushing and pressing of the cables. • Avoid to install the device near electrical interference sources. • Only connect accessories that is approved for this device.
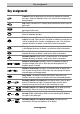
Key assignment Key assignment Playback: Starts the playback of new and not yet played back incoming messages. Allows the repetition of the last 3 seconds when being pressed during playback. Stop: Stops a function that is currently being executed and serves to exit an open menu. Answering mode: Activates or de-activates the answering mode and the greeting and call transfer. Menu: Opens the menu. Serves as an entry key for letters and numbers within the telephone directory.
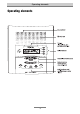
Operating elements Operating elements 5
Table of contents Table of contents Safety information ............................................................................................... 3 Key assignment ................................................................................................... 4 Operating elements ............................................................................................ 5 Table of contents ................................................................................................
Table of contents Deleting individual incoming messages ..................................................... Deleting all incoming messages ................................................................. 26 26 Two-way conversation recording/Personal information (dictation) .............. Two-way conversation recording (telephone calls) .................................... Personal information (dictation) .................................................................. 27 27 28 Time control ........
Table of contents Special functions ................................................................................................ Placing a telephone call on hold ................................................................. Music-on-Hold ............................................................................................. 56 56 56 Code lock ............................................................................................................. Locking the device/changing the PIN .....
Table of contents Appendix .............................................................................................................. Service ......................................................................................................... Guarantee .................................................................................................... CE sign ........................................................................................................ Ecological information .............
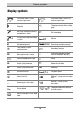
Display symbols Display symbols )& * p m x Answering mode is active, new messages exist )& v Answering mode is active, no new messages exist Playback T Telephone number of the calling party Message recording in process, microphone is active r Call forwarding 2-way conversation recording is active l Volume a Recording (general) 0k100% Remaining recording capacity u Time control is active, switching times z Secondary function n Message transfer is active UT Inserting a telephone numb
Initial operation Initial operation Scope of supply In the packaging carton of your tiptel 345 pro, you will find: • tiptel 345 pro • Telephone connecting cable • AC adapter 11.5V/ 500mA • Operating instructions • Cable for input/output (coying lead) Installation Your tiptel 345 pro was designed for normal use conditions. Solvents in some furniture lacquers or furniture cleaning products may attack the rubber at the feet of the device and thus cause patches.
Initial operation 4 If you want to record outgoing messages from an external source, plug the jack plug of the copying lead in the “IN” jack and plug the chinch plug in the audio output of the external device (tape recorder, audio device, CD player). 5 If you want to copy the telephone directory of your tiptel 345 pro to another tiptel 345 pro, use a copying lead with two jack plugs (accessory).
Settings Settings Programmable parameters Language ............................... German or English. Time ........................................ Here, you can set the time if necessary. Date ........................................ Here, you can set the date if necessary. Summer (daylight saving time)/winter ............................ Yes or no. If you set “yes”, the summer time (daylight saving time) will be set automatically on the last Sunday in March. Winter time, i. e.
Settings Length of inc. recordings ..... 1 to 12 minutes. Here, you can limit the time a caller has at disposal to leave a message. loudspeaker ........................... Yes, no or OGM. You can set here whether or not it is possible to use the loudspeaker function during the recording of an incoming message. If the option OGM (outgoing message) is selected, you can as well listen to your set announcement. Ringing signals ..................... 2 to 9 ringing tones.
Settings Call-back code ...................... Here, you enter the call-back code of your telecommunications provider (as for the Deutsche Telekom, this is H*37#). The “H” stands for the hook flashfunction. Up to 6 digits are at your disposal for entries. hold ......................................... Off or 1-8. This function allows you to set an outgoing message which can be played back during a telephone conversation on pressing one key (holdOGM). Telephone systems/PABXs .. >> Trunk access code ....
Settings Set-up menu Press the menu button. The display shows the main menu. Press the select button next to the corresponding menu item. The set-up menu is shown in the display. Use the arrow buttons (up/down) to view the available setting parameters. All available parameters for the function in question are shown in the display. Press the select button located next to the setting to be changed until the desired setting option is being displayed. The display shows the current setting.
Settings For settings with more than one digit or character, you can move the cursor by pressing the arrow buttons (left/right). The selected cursor position blinks. To complete the entry of numbers, press the select button next to the corresponding line again. The selected cursor position stops blinking. To complete the entry, press the stop button several times. The display goes back to initial state. Contrast adjustment You can adjust the display contrast when the device is in the stand by mode.
Outgoing messages Outgoing messages General information Your tiptel 345 pro provides 8 individual outgoing messages (OGM 1-8) and one prerecorded outgoing message (OGM 9). In addition each of the 8 mail boxes has an individual OGM. You can exchange the outgoing messages by pressing the function key next to the outgoing message symbol. For outgoing message number 9, no changes are allowed. The duration of an OGM can be between 3 seconds and 3 minutes.
Outgoing messages Recording outgoing messages For high quality recordings (e. g. outgoing messages with background music), we recommend to set the highest recording quality temporarily (see “settings”). Select the desired OGM by pressing the select button next to the OGM symbol. The selected OGM is displayed next to the symbol at the bottom right side. Keep OGM pressed. Wait until you will hear a brief tone, the display shows a microphone symbol to indicate the readiness for recording.
Outgoing messages If you record OGM 5 as outgoing message without incoming recording (announcement only), your tiptel 345 pro will automatically switch to this OGM as soon as the recording capacity for the current OGM with incoming recording should be exhausted. Recording OGMs from an external signal source Professional OGMs can also be recorded from external signal sources (e. g. tape deck) - via the audio input. Select the desired OGM by pressing the select button next to the OGM symbol.
Outgoing messages For high quality recordings (e. g. outgoing messages with background music), we recommend to set the highest recording quality temporarily (see “settings”). Testing the outgoing messages Select the desired OGM by pressing the select button next to the OGM symbol. The selected OGM is displayed next to the symbol at the bottom right side. Press the OGM button briefly. The OGM is being played back. The display shows the playback symbol, the current duration and the OGM number.
Answering mode Answering mode Make sure that you provide enough recording capacity for incoming messages. If required, you may delete individual recorded messages or all incoming messages (see chapter “telephone mode with greeting and call transfer”).. Select the desired OGM by pressing the select button next to the OGM symbol. The selected OGM is displayed next to the symbol at the bottom right side. Press the button for the answering mode. The answering mode button is lit.
Answering mode Press the answering mode button again to de-activate the answering mode. Further incoming calls are not answered. The display goes back to the initial state. The answering mode button flashes as long as the recorded messages have not been played back. If the recording capacity has been used up, your tiptel 345 pro automatically switches to OGM 5, but only if OGM 5 is an OGM without incoming recording.
Playing back and deleting incoming messages (ICMs) Playing back and deleting incoming messages (ICMs) Playback of new incoming messages Press the playback button. Use the arrow buttons to adjust the volume (left/right). The playback of new and not yet played back incoming messages starts. The display shows the running number, the remaining playback duration as well as date and time of the recording.
Playing back and deleting incoming messages (ICMs) Repetition Press the playback button during playback. The last 3 seconds will be repeated. Interrupting the playback Press the stop button. The playback is stopped. Press the playback button. The playback is continued. Search (Skip) Press the select button next to the FORWARD symbol or the REWIND symbol. The incoming message that is currently being played back is skipped or repeated.
Playing back and deleting incoming messages (ICMs) Direct connection to the caller During playback, press the select button next to the telephone number or name. The telephone number is being dialled directly. The call can be taken over by picking up the handset. Deleting individual incoming messages During playback, press the select button next to the “delete” symbol. The current incoming message is deleted. All remaining incoming message to get a new number.
Two-way conversation recording/Personal information (dictation) Two-way conversation recording/Personal information (dictation) Two-way conversation recording (telephone calls) You have the option to record important conversations directly. The corresponding recording may have a duration of 3 seconds to 12 minutes. During a telephone call, press the select button next to the symbol for “recording”. The device starts recording.
Two-way conversation recording/Personal information (dictation) Personal information (dictation) Personal information can be dictated directly via the built-in microphone. The length of the recording can be between 3 seconds and 12 minutes. Press the select button next to the symbol for “recording”. Wait until you hear a brief tone, the display shows a microphone symbol which indicates the readiness for recording. Start dictating (keep a distance of about 25 cm to the microphone).
Time control Time control The time control allows you to program up to 10 individual switching times at which you have the option to switch the answering mode on or off, exchange the outgoing messages, switch the call transfer or the message transfer on or off. How to use the time control function in connection with the voice mail system an/or the greeting and call transfer function, you can read in chapter “Application examples”. Programmable parameters for the time control Switching time ...............
Time control Programming the time control Press the menu button. The display shows the main menu. Press the select button next to the time control menu item. The entry field for the first switching time is shown in the display. Use the arrow buttons (up/down) to view and set individual switching times. The display switches between the 10 optional switching times. Press the select button next to the time control button and use the arrow buttons (up/down) to select the desired settings.
Time control Use the two select buttons (bottom side) and the arrow buttons (left/ right) to select the function to be executed. The symbols stand for: t o n r 2s = = = = Answering mode Outgoing message Message transfer Call transfer Use the arrow buttons (up/down) to set the desired state or parameters. “–” means that the current status is remains unchanged. To delete a programmed switching time, press the select button next to the “delete” symbol. The display shows the empty entry field again.
Time control Activate the time control Press the time control button. The display shows a clock symbol indicating the active time control function. The time control sets the current functional state. To de-activate the time control, press the time control button again. The clock symbol is no longer displayed.
Message transfer Message transfer For the message transfer, the answering machine always dials a stored target number after having recorded 1 to 5 incoming messages (see message collection). When the subscriber answers the call, the following announcement is heard: “Automatic call, x messages, please perform a remote interrogation. I repeat ...” or if you programmed your own telephone number as an identification number “Automatic call from ...
Message transfer Message transfer settings Press the menu button. The display shows the main menu. Press the select button next to the item “message transfer”. The message transfer menu is shown in the display. Use the arrow buttons (up/down) to view the available options. The display shows all available options. Press the select button next to the line with the desired entry. You can use the arrow buttons (up/down) to change parameters. The display shows the current parameter.
Message transfer Use the arrow button (right) to move the cursor to the next entry point and enter further numbers. The cursor jumps to the next entry point. If you need to move the cursor to the left, e. g. to overwrite a number, you can do that by pressing the arrow button (left). The cursor moves to the left side. In order to use a telephone number from the telephone cirectory, press the select button next to the “insert” symbol. The telephone number is inserted at the left side of the cursor.
Message transfer Example on how to enter the target number In the case of PABXs, the identification code is automatically dialled before each telephone number (see also “Settings, PABXs/access identification code”). In order to avoid this also for internal extension numbers, you need to dial “i” in front of those. As for paging services (e. g. Cityruf), you need to enter “ ” after the telephone number (wait for end of announcement).
Call forwarding Call forwarding If your telecommunications network or your PABX has the “call forwarding” function, you can use the necessary settings. You just need to enter the target time interval for call forwarding via the “time control”. This way, you may forward incoming calls to your private telephone after 6 p.m. In the morning, you can forward incoming calls to your business telephone again (day/night mode). Normally, you need to dial a code in front of the target number (e. g.
Call forwarding Call forwarding settings Press the menu button. The display shows the main menu. Use the arrow buttons (up(down) to select the menu item “call forwarding”. Press the select button next to “call forwarding”. The call forwarding menu is shown in the display. Press the select button next to the menu item to be changed. The cursor is positioned on the input position.
Call forwarding Use the arrow button (right) to go to the next entry point and enter further numbers. The cursor moves to the next entry point. If you need to move the cursor to the left, e. g. to overwrite a number, you can do that by pressing the arrow button (left). The cursor moves to the left side. In order to use a telephone number from the electronic directory, press the select button next to the “insert” symbol. The telephone number is inserted at the left side of the cursor position.
Call forwarding You can also activate the call forwarding function via remote control (see remote operation and control). Example on how to enter the call forwarding function Example 1: You have the 345 pro connected to a trunk line directly. The call forwarding feature is available. Activation ................................ *21* De-activation ........................... #21# Target number ........................
Individual ringing tone Individual ringing tone If you want to set a ringing tone different from the standard ringing tone, you have the option to record up to 8 different ringing tones. Ringing tone number 9 is preprogrammed and cannot be modified. Now, de-activate the ringing tone of your telephone and let your tiptel 345 pro play back the ringing tone. The individual ringing tone may have a length of up to 5 seconds.
Individual ringing tone To record a new ringing tone, press the select button next to the “recording” button and keep it pressed. Now, record your individual ringing tone via the built-in microphone. The length of the recording can be up to 5 seconds. Release the “recording” button. The recording is completed and it is played back for test purposes. To record ringing tones from an external signal source , press the button for the secondary function before starting the recording.
Automatic two-way conversation recording Automatic two-way conversation recording If you activate the function “automatic two-way conversation recording”, the recording of a telephone call starts as soon as you pick-up the handset. The recording stops as soon as you replace the handset or if the maximum recording capacity of 12 minutes has been reached. It is up to you whether you want to record all telephone calls or just incoming calls (threatening or malicious calls).
Automatic two-way conversation recording Use the arrow buttons (up/down) to select the menu item “autom. 2-way conversation recording”. Press the select button next to the menu item “autom. 2-way conversation recording”. The display shows the entry field for “autom. 2-way conversation recording”. Press the select button next to the setting to be changed until the desired menu option is displayed. The display shows the current setting. Press the stop button several times to complete the entry.
Call list Call list The last 50 incoming calls and information on date and time of the calls are stored in the call list. If the caller's telephone number is being displayed during a call, this information is also included in the call list. Should the telephone number in question belong to a person's name from the telephone directory, the name of the caller will also be included.
Call list 2s If you want to call a person back, just press the select button next to the corresponding telephone number. The telephone number is dialled automatically. To copy the telephone number to the telephone directory, press the select button next to the sub-menu symbol. The display shows the entry field for the electronic directory and the copied telephone number. Here, you just need to enter the person's name to complete the entry.
Telephone directory Telephone directory General information The telephone directory can store the names and telephone numbers of your contact partners and thus becomes your personal telephone manager. Up to 100 entries can be stored. An entry consists of the name (search criterion) and the telephone number, the name has to begin with a letter.
Telephone directory ... If necessary, you might change the assignments by pressing the arrow button (up) (see table “Overview of possible characters and numbers”). The display shows the possible assignments: ↑(ABC) = capital letters ↑(abc) = small letters ↑(12!?) = numbers and special characters Enter the name. The individual letters can be written by pressing the corresponding entry button one or several times. The cursor flashes.
Telephone directory 2s Move to the next entry position by pressing the arrow button (right). The cursor moves to the next entry point. If you need to move the cursor to the left, e. g. to overwrite a number, you can do that by pressing the arrow button (left). The cursor moves to the left side. Use the arrow button (down) to insert a character or number. A blank is inserted at the left side of the cursor.
Telephone directory Overview of possible characters and numbers Button Assignment (ABC) Assignment (abc) Assignment (12!?) ABCDEÄ abcdeä 12!?. FGHIJ fghij 34-+& KLMNOÖ klmnoö 56/: PQRST pqrstß 78(), UVWXYZÜ uvwxyzü 90*# Searching for entries Press the arrow button (down) or (up). The electronic directory opens with the letter A or the letter Z. Use the arrow buttons (up/down) to search for the desired entry. You browse through the entries.
Telephone directory Use the arrow button (right) and the corresponding entry keys to enter other letters for a generic search (up to 5 characters). The entries to be selected are shown in the display. Checking and changing entries Search for the name as described under “Searching for entries”. 2s Press the select button next to the desired name for 2 seconds. The display shows the entry field for the name and the telephone number. The cursor flashes. Enter your changes.
Telephone directory Personal announcement (call filter) You can assign one of the five individual and personal OGMs to each electronic directory entry. If the calling number matches the number from the electronic directory, the caller will hear the individual message that has been recorded for him/her. Another option allows you to de-activate the answering machine for specific callers. Open the entry field.
Telephone directory Vocal Clip You can assign one of the 8 individual ringing tones to each telephone directory entry. If the calling number matches the number from the telephone directory, you will hear the individual ringing tone via the loudspeaker of your tiptel 345 pro. Open the entry field. The display shows the entry field for the name and the telephone number For a new entry: Press the secondary button function, then the arrow button (up or down).
Telephone directory Dialling via the telephone directory You can directly dial all numbers stored in the electronic directory of your tiptel 345 pro. Select the name as described under “Searching for entries”. Press the select button next to the desired name. The device starts dialling the corresponding telephone number. You can listen to the dialling process via the builtin loudspeaker. When the dialling process is complete, just pick-up the handset to speak.
Telephone directory Automatic redialling/Call-back when busy If the target number is always engaged with your tiptel 345 pro call the subscriber in question again and again. In the case of the automatic redialling, a busy number is called at regular intervals – with a pause of a specific duration which you can set individually. In total, 10 dialling attempts are made.
Special functions Special functions Placing a telephone call on hold During an active telephone call, it is possible to place a call on hold so that the party placed on hold cannot listen to what is talked about in the room. If you want to use this function, it is necessary that the telephone is connected behind the tiptel 345 pro at the same receptacle (connection in series).
Special functions In this operating mode, the device neither works as an answering machine nor as welcoming or VoiceMail system. In this way, it can be avoided that currently recorded incoming messages are unintentionally played-back in the queue of an incorrectly programmed PABX. Select an outgoing message and record music-on-hold and an announcement text, such as “Hold the line please, your call will be connected as soon as possible” (see page 14).
Code lock Code lock You can use a PIN to prevent that your tiptel 345 pro from being used by unauthorised people. The PIN can be any 1- to 4-digit number. To unlock the device, the PIN needs to be re-entered. In the factory pre-set, the PIN is “0000”. Locking the device/changing the PIN Press the menu button. The display shows the main menu. Select the menu item “Code lock” using the arrow buttons (up/down). Press the select button next to “Code lock”. The display shows the entry field for the PIN.
Code lock Press the select button next to “Lock device”. The display goes back to the initial state. A small key symbol indicates that the device is locked. Press the select button next to “Change PIN”. Your tiptel 340 clip asks you to enter a new PIN. Use the arrow buttons to enter a new PIN. The current entry is shown in the display. To complete your entry, press stop several times. The new PIN is now valid. The display goes back to the initial state.
Message and VIP function Message and VIP function Message function The message function allows a caller to whom the message code is known – to leave a message on your answering machine even if your tiptel 345 pro only is on “online announce mode” without recording option. As for an OGM with recording option, the message function allows to skip the OGM. You can set your personal message code as described under “Settings”. Call the tiptel 345 pro. You hear the outgoing message.
Message and VIP function VIP function If you do not wish to be disturbed and have your tiptel 345 pro answering incoming calls, you can remain addressible for important callers using the VIP code. You can set your personal VIP code as described under “Settings”. Call the tiptel 345 pro. You hear yout OGM message. Press the star button. The OGM stops. Enter the VIP code via the telephone keypad.
Remote control Remote control You have the option to remote control your tiptel 345 pro via the numeric keypad of any DTMF telephone – world-wide, by means of a personal remote control code, which can be set individually. Follow the steps as described under “Settings”. Remote operation Call the tiptel 345 pro. You hear your current OGM message. Press the star button. The OGM stops. Enter the remote control code via the telephone keypad.
Remote control Remote control functions Playback Playback of all incoming messages Press “3”. The playback starts with the first ICM. Playback of new incoming messages Press “2”. The playback of the new, not yet played back incoming messages begins. Repetition Press “5” during playback. The last 3 seconds are repeated. Interrupting the playback Press “8”. Playback is interrupted. Continue with the playback Press “5”.
Remote control Room monitoring / Room speaking Room monitoring/room speaking Press “1”. The microphone turns on and you can listen to what is happening near your tiptel 345 pro. Press “1” again. The devices switches to the room speaking function. People present in the room can hear you through the loudspeaker. Activating / Deactivating functions Activation or de-activation of the message transfer Press “*” and “4” consecutively.
Remote control Changing the target number for message transfer Press “*” and “9” consecutively. The currently stored target number is announced by synthesised voice. Afterwards, you are asked to enter the new target number. Enter the new target number. For special characters, press the following buttons consecutively. Each number is acknowledged.
Remote control Deactivation of the answering mode Remote de-activation of the answering mode Press “*” and “0” consecutively. Your tiptel 345 pro disconnects the line and will not answer further incoming calls. Remote activation of the answering mode Call the tiptel 345 pro. After 50 seconds, the device picks up and a signal tone is heard. Enter the remote control code via the telephone keypad and complete your entry by pressing the # button. The OGM is played back for verification purposes.
Mailboxes Mailboxes General information Apart from the normal answering machine function, you also have the possibility to install up to 8 mailboxes. Each mailbox provides an additional outgoing message, its own remote control code and its own target number for the message transfer. If your tiptel 345 pro is used by several persons, the caller can leave a message for a specific person using the individual mailbox. In your outgoing message, you should inform the callers about this option.
Mailboxes Remote control code ............ If you intend to check your mailbox later with the remote control, you have to enter the individual remote control code for the mailbox in question. Extension ............................... If you want to use the function “automatic call forwarding to mailbox”, you can enter the desired extension number here. Target number ....................... If you want to use the mailboxes and the function “message transfer”, you have to enter a target number here.
Mailboxes Press the select button next to the menu item to be changed until the desired setting is shown in the display. The display shows the current setting. To enter numbers, press the select button next to the corresponding line. The cursor flashes. Press the arrow buttons to change the setting parameter (up/down). The cursor goes up or down. For parameters with more than one digit, you can move the cursor by pressing the arrow buttons (right/left). The current cursor position flashes.
Mailboxes Mailbox handling When you have installed mailboxes, the corresponding symbols are shown in the display. During the answering mode, the number of recorded incoming mailbox messages is displayed on the right side of the symbol. For new mailbox messages, the mailbox symbol is displayed inversely. The mailboxes provide the functions for playback and deleting of incoming messages. In addition to that, two-way conversation recording/personal information (dictate) and outgoing messages are included.
Mailboxes Remote control of the mailboxes In principle, the remote control of the mailboxes works in the same way as the remote control of the normal answering machine. A detailed description can be found in chapter “Remote control”. The following mailbox functions can be operated remotely. Room monitoring/room speaking Playback of all new incoming mailbox messages. Playback of all incoming mailbox messages.
Greeting and call transfer Greeting and call transfer General Your tiptel 345 pro (within PABXs) welcomes your callers and transfers them to another extension (for example a collective number). If the target number is engaged, the caller is brought back and hears the installed busy message. Callers know exactly that they are correctly connected and your staff will no longer have to record the greeting text.
Greeting and call transfer Automatic attendant .............. >> Extension number 1 .. Enter the extension number, to which the caller will be connected when he presses 1. Extension number 2 .. Enter the extension number, to which the caller will be connected when he presses 2. . . . Extension number 8 .. Enter the extension number, to which the caller will be connected when he presses 8. Settings for the greeting and call transfer Press Menu. The main menu appears on the display.
Greeting and call transfer Press the select button next to the setting that you wish to change. The input position flashes. Change the setting with the control buttons (upwards/downwards). The display shows the current setting. If a setting consists of more than one digit move the input position around with the control buttons (right/left). The chosen input position flashes. To finish input press the select button next to the relevant text. The input position stops to flash.
Greeting and call transfer Answering mode with greeting and call transfer With the select button next to the message symbol choose your selected greeting message. The selected message appears next to the symbol below right on display. Press the answering mode button. The button lights up. The symbol for “greeting and call transfer” appears on the display. The messages can be changed over between “normal answering” and “greeting and call transfer”.
Examples of applications for the tiptel 345 pro Examples of applications for the tiptel 345 pro In order to give you an idea on the variety of possible applications for the tiptel 345 pro, we have hereinafter outlined some example scenarios for using the device. We described a scenario and then summarised the solution. Afterwards, the required device settings are taken out. As for the described call transfer functions, the tiptel 345 pro has to be connected to an analog port (a/b port) of a PABX.
Examples of applications for the tiptel 345 pro 4. The caller wants to speak to the Service Department and presses 3. The tiptel 345 pro Call Manager routes the call to the correct extension. The call is taken and the conversation begins. 5. Called number busy: If the called subscriber is busy and the mailbox for extension 3 is configured, the caller hears, for example, the following message: “The extension you called is currently not available.
Examples of applications for the tiptel 345 pro Use the select button next to the relevant text to determine whether the OGM shall be available with or without an option for an incoming message recording. The recording is complete and it will be played back for test purposes. An OGM without incoming recording option is indicated by 2 signal tones at the end. (As this is a greeting and call transfer announcement, an incoming message recording is not necessary, here.
Examples of applications for the tiptel 345 pro Press the select button next to “resume” . The input position flashes. You can take out desired changes or adjustments using the control buttons (upwards / downwards). Here, enter the telephone system procedure on how to resume a transferred call. Normally, this is also the FLASH function “F”. But, there are also PABXs where e. g. “F0” or “FF” need to be set.
Examples of applications for the tiptel 345 pro You can take out desired changes or adjustments using the control buttons (upwards/downwards). Here, enter the first extension number to which the caller shall be connected to. Remark: If the caller hears the greeting message and gets the information “... Please press “1” to be connected to the sales department ....”, it must be made sure that the sales department's extension number is programmed correspondingly.
Examples of applications for the tiptel 345 pro Quit the menu. Press the “stop” button several times until the display resumes the initial state. The display shows the three mailboxes “1”, “2” and “3”. You can set up up to 8 mailboxes following the above procedure. After having activated the mailboxes, you may now record your messages for the individual mailboxes in the next step. Recording mailbox messages Press the select button next to the mailbox symbol.
Examples of applications for the tiptel 345 pro the activation. The display now shows “1” in the bottom right corner as a message selection option. Moreover, you will see the activated mailboxes “1”, “2” and “3” as well as the symbol for greeting and call transfer. Time-controlled voice mail system Scenario The tiptel 345 pro offers a time control, allowing certain processes to be automated.
Examples of applications for the tiptel 345 pro 3. The caller presses 3. He hears the Service Department greeting and may then leave a message. 4. At 09:00, the tiptel 345 pro Call Manager switches over automatically to the “automatic attendant” function, with the corresponding message. Settings Initial state: Recording a greeting message Select the desired OGM by pressing the select button next to the OGM symbol.
Examples of applications for the tiptel 345 pro Menu item “time control” Press the menu button. The display shows the main menu. Press the select button next to time control. The input field for the first switching time is displayed. (Next to the X displayed on the top right side, you will see “1”.) Press the select button next to the time. The first digit for the time entry starts flashing. Use the control buttons (upwards/downwards) to set “9.00” as the first switching time.
Examples of applications for the tiptel 345 pro Quit the menu. Press the “stop” button several times until the display resumes the initial state. Press the time control button. The display shows a watch symbol to indicate that the time control is active. The time control manages the current function status. To deactivate the time control, press the time control button again. The watch symbol is no longer displayed.
Examples of applications for the tiptel 345 pro Greeting and call transfer Scenario Every caller is first greeted automatically and then transferred to the general office in the Accounts Department. If all the extensions are busy, the caller has the option to leave a message. Solution 1. The PABX receives an external call. 2. The PABX transfers the call to the tiptel 345 pro. 3. The tiptel 345 pro takes the call and plays the following greeting: “Welcome to the Erlensee Company Accounts Department.
Examples of applications for the tiptel 345 pro Settings Initial state As in the above example, record a greeting message without an option to leave an incoming message. The settings required for this process are described in detail in the first scenario. Select e. g. OGM “1”, now. Moreover, a busy extension message is required. For this message type, select e. g. OGM “2”. With a busy extension message, the recording of an incoming message is allowed if the target extension is busy.
Examples of applications for the tiptel 345 pro Press the select button next to “resume”. The input position flashes. You can take out desired changes or adjustments using the control buttons (upwards/downwards). Here, enter the telephone system procedure on how to resume a transferred call. Normally, this is also the FLASH function “F”. But, there are also PABXs where e. g. “F0” or “FF” need to be set.
Examples of applications for the tiptel 345 pro You can take out desired changes or adjustments using the control buttons (upwards/downwards). Here, enter the number of the OGM that you have recorded as your “bus extension message”. In our example, this is OGM “2”. To finish input, press the select button next to the relevant text again. The input position stops flashing. Quit the menu. Press the “stop” button several times until the display resumes the initial state.
Examples of applications for the tiptel 345 pro Solution 1. The PABX receives an external call. 2. If the extension is busy, the PABX transfers the call to the tiptel 345 pro (in this connection, ensure the PABX supports the feature “Call diversion on Busy” and that the extension to which the tiptel 345 pro is connected has been programmed accordingly. Modern ISDN exchanges generally support this function).
Examples of applications for the tiptel 345 pro Press the select button next to “hold”. The input position flashes. You can take out desired changes or adjustments using the control buttons (upwards/downwards). Please enter the hold function used in your telephone system. “F” (Flash= 90ms) is the factory pre-set. You should also refer to the operating instructions of your telephone system to identify the required settings. To finish input, press the select button next to the relevant text again.
Examples of applications for the tiptel 345 pro To finish input, press the select button next to the relevant text again. The input position stops flashing. Quit the menu. Press the “stop” button several times until the display resumes the initial state. In the initial state, press the “answering mode” button so that a red light indicates the activation. The display now shows “1” in the bottom right corner as a message selection option. Moreover, you will see the symbol for greeting and call transfer.
Examples of applications for the tiptel 345 pro hear details of our summer savings offer to Luxor, please press 1 on your telephone. Press 2 for details of package trips to the sunny south. Press 3 for details of cultural trips. Press 4 to leave a message, together with your telephone or fax number. Press 0 during this message to hear the options again”. 4. Say, for example, that the caller presses 1.
Examples of applications for the tiptel 345 pro Quit the menu. Press the “stop” button several times until the display resumes the initial state. The display shows the three mailboxes “1”, “2”, “3” and “4”. After having activated the mailboxes, you may now record your mailbox messages in the next step. Recording mailbox messages Press the select button next to the mailbox symbol. The first mailbox (from the left side of the display) starts flashing.
Examples of applications for the tiptel 345 pro Activate the information system. 95 In the initial state, press the “answering mode” button so that a red light indicates the activation. The display now shows “1” in the bottom right corner as a message selection option. In addition to that, you will see the activated mailboxes “1”, “2”, “3” and “4” as well as the symbol for the answering mode.
Service menu Service menu The service menu offers you an information on the currently installed program version, to restore the factory pre-set, to delete the electronic directory or to load the latest program version via the telephone network. In addition to that, you have the possibility to copy the telephone directory from one tiptel 345 pro to another via the audio interface.
Service menu Press the select button next to the menu item “service menu”. The display shows the service menu. The current program version is shown on the right side of the first line. Use the arrow buttons (up/down) to select the desired function The display shows all service menu functions. Press the select button next to the desired function and follow the instructions given in the display.
Appendix Appendix Service You have purchased a modern product of TIPTEL AG, which was designed and manufactured in Ratingen near Düsseldorf. Our high-tech manufacturing facilities “Made in Germany” grant a continuous level of the highest quality. This is even underlined by our certification according to DIN EN ISO 9001. If, however, problems occur or you have questions on operating the device, please contact your local dealer.
Appendix Claims for damage caused by transport shall be asserted to the delivery company. Notes on settlement: Repairs can only be conducted by the TIPTEL Service. A warranty repair does not prolong the warranty period – neither for the replaced parts nor for the device. This guarantee is not transferable and shall expire if the device is sold on to another party. It shall also expire if the device is interfered with by third parties or if the serial number on the device has been removed or made illegible.
Appendix Troubleshooting The following table will help you to resolve problems or malfunctions with your tiptel 345 pro. Problem Possible cause Solution / recommendation No display. AC adapter not plugged in. Check all cables and connections. Check the plug into another power outlet. Display is weak or too dark. Display contrast setting changed. Adjust the display contrast. No tone. Volume set to “0”. Adjust the volume. OGM symbol blinks. No OGM recorded. Record an OGM.
Appendix Problem Possible cause Solution / recommendation Call forwarding cannot be initiated Missing or wrong settings for the call forwarding function. Telecommunications provider or telephone system do not support this function or the function is not released. Take out the setting or check and change them if necessary. Ask your telecommunications provider or your telephone system manufacturer whether the function is possible or needs to be released.
Appendix Factory pre-set In the following table, you can see the factory pre-set parameters or values for your tiptel 345 pro. You can change all these parameters individually. You can easily reset the telephone to the factory pre-set parameters via the “service menu”.
Appendix Reminder period 20 minutes. Number of reminders 2 OGMs for message transfer 5 Target number for message transfer – Activation code for message transfer – De-activation code for call forwarding – Extension number for call forwarding – Individual ringing tone Off Automatic two-way conversation recording No All calls No Confirm saving process Yes PIN 0000 Mail boxes Off Greeting message – Hold F Target number – Busy ext. message – Auto.
Appendix Technical data Dimensions (W x H x D) tiptel 345 pro AC adapter 180 x 50 x 190 mm 58 x 67 x 48 mm Weight tiptel 345 pro AC adapter 400 g 350 g Operating voltage AC adapter Power consumption in stand by mode 230 V / 50 Hz < 2W Environmental conditions (temperature) 0 – 40 °C Outgoing messages (OGMs) Number of OGMs Length of the OGM 17 3 seconds - 3 minutes Recordings Recording method Total recording capacity Number of all messages digital (58 / 8.6 / 6.
Index Index A AC adapter ........................................ 3, 11 Activate the time control ....................... 32 Answering mode ................................... 22 Area code (prefix number) .................... 47 Audio output ......................................... 12 Autom. call forwarding to the mailbox .. 71 Automatic attendant ............................. 73 Automatic redialling .............................. 55 Automatic two-way conversation recording ...............................
Index L Language .............................................. 13 Locking the device ................................ 58 loudspeaker ......................................... 14f M Mailbox handling .................................. 70 Mailbox set-up ...................................... 68 Mailboxes .............................................. 67 Message code ................................ 14, 60 Message function ................................. 60 Message transfer ................................
Index V W VIP code ................................................ 14 VIP function ........................................... 61 Vocal Clip .............................................. 53 Voice time stamp .................................. 13 Volume .................................................... 4 Weekday ..............................................
Brief operating instructions Outgoing message recording Press the select button to select the OGM Press OGM and keep pressed Start speaking your OGM Release OGM Press the select button to set the type of OGM Testing your outgoing messages or Press the select button to choose the outgoing message Press OGM briefly Set the desired volume Press the select button to erase Playback of incoming messages or Play back new messages Play back all messages Set the desired volume Deleting incoming mes
TIPTEL AG Halskestrasse 1 D - 40880 Ratingen Hotline: Telefon: 0 18 05 - 84 78 35* Vanity Tel: 0 18 05 - tiptel* Fax: 0 18 05 - 84 78 49* E-mail: support@tiptel.de Internet: www.tiptel.de International: E-mail: int.support@tiptel.com Internet: www.tiptel.com *0,12 e pro Minute Tiptel b.v. Camerastraat 2 NL - 1322 BC Almere Telefoon: 0900 - BELTIPTEL of 0900 - 2358478 (niet gratis) Fax: 036 - 53 678 81 E-mail: info@tiptel.nl Internet: www.tiptel.