
Installation guide


Warning
Please Note
The specifications of the product detailed on this
Set-Up Guide may change without notice. RDM
Ltd. shall not be liable for errors or for incidental
or consequential damages, directly and indirectly,
in connection with the furnishing, performance or
misuse of this product or document.
Ensure that all power is
switched off before
installing or maintaining
this product
Revision 2.7 Page 8 of 83
Mercury Plant Controller Installation Guide
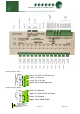
Note 2: Several probe types are available, see Probe Type
Note 3: The Status LED is not present on older variants of the Plant controller hardware. If the status LED is
present and the Plant controller software is V1.7 or greater then Analogue inputs 1 to 3 are configurable either as a
4-20mA input or a 0-10Vdc input. If the above criteria is not met then Analogue inputs 1 to 3 are configurable as 4-
20mA inputs only. In software version 2.6 or higher there is the option to have 4-20mA, 0-5V and 0-10V Inputs and
4-20mA, 0-20mA, 0-5V and 0-10V Outputs
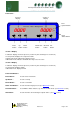
Setting up the controller
Set-up access to the controller can be achieved several ways
Through the front mounted buttons on the remote display
Direct access by PC via a USB connection
Direct access by a PC via an Ethernet Connection
Through the RDM Data Manager.
Set-up Mode
Set-up through front buttons
To enter set-up mode, hold the Enter and Down buttons together for approximately 3 seconds until the message
“Ent” appears on the display. Now press the Enter button again to enter the function menu. IO will be displayed.
Scroll up or down to go through the list. Alternatively use either a PC connection for configurations or load a
configuration from a memory-stick
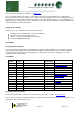
Set-up Menu
LH
Display
RH
Display
Option
Menu Item
seen in type:
Explained in Paragraph
IO
View Input/Output States
All types
View Input/Output States
PArA
Set/view Parameters
All types
Set/view parameters
Unit
Set/View Probe Type & Units
All types
Set/View Units
Uni
Set Universal IO
All types
Universal IO
StA
Set Status Input Type
All types
Status Input Type
rLy
Inverts the relay function
All types
Set Relay Output
TyPE
Set/View Controller Type
All types
Set/view product type
rtc
Set/view Clock (rtc = Real Time
Clock)
All types
Real Time Clock
nEt
Set/view network configuration
All types
Network Configuration
bCSt
Broadcast (Pressures)
All types
Broadcast
SoFt
View software version
All types
USb
Save/Load onto USB device
All types
USB
OFSt
Temperature probe offsets
All types
Set Probe Offsets
ESC
Exit set-up mode
Recommended set-up method
It is recommended that this controller is set-up using a direct connection to a PC See Setup via a PC
If you are not connecting to a network and want to set up the controller through the buttons we recommend you use
the following order from the function menu.