
User guide


Revision 1.0 Page 8 of 29
Warning
Please Note
The specifications of the product detailed on this
Set-Up Guide may change without notice. RDM
Ltd. shall not be liable for errors or for incidental
or consequential damages, directly and indirectly,
in connection with the furnishing, performance or
misuse of this product or document.
Ensure that all power is
switched off before
installing or maintaining
this product
Mercury 3 M & E Installation Guide
www.resourcedm.com
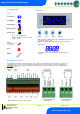
Setting up the controller
Access to the controller can be achieved by several ways;
Serial Communications Variant
Through the front mounted buttons of the display
Direct access by PC into the serial comms port. This requires a software package available on the RDM website.
Through legacy front end panels on 485 networks.
Through the RDM Data Manager.
Across an IP network (Current controller IP address required).
Ethernet Communications Variant
Through the front mounted buttons of the display.
Across an IP network (Current controller IP address required).
Through the Data Manager.
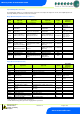
Setup through front buttons
Setup Function Menu (Common to all types)
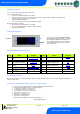
Recommended set-up method
If you are not connecting to a network and want to set up the controller through the buttons we recommend you use the following order
from the function menu.
rtc. Real time clock (This will automatically synchronise on network systems)
a. Use the up or down buttons to scroll through the display until the display reads “rtc”
b. Press enter. The display will show “t-1”. press enter again
c. Scroll hours up or down (0 – 23) press enter
d. Use up button to select “t-2”, press enter
e. Scroll minutes up or down (0 – 59) press enter
f. Repeat for t-3 (seconds 0 – 59)
g. Repeat for t -4 (Days up to 31)
h. Repeat for t -5 (months up to 12)
i. Repeat for t -6 (Year up to 99)
j. Use up button to display “ESC”, press enter to display “rtc”
Time clock is now set
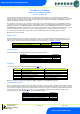
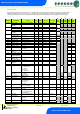
Display
Option
Explained in
Paragraph
Display
Option
Explained in
Paragraph
IO
View Inputs / Outputs and
States
Input / output table
nEt
Set/view network configuration
Network
Configuration
PArA
Set/View Parameters
Set view parameters
SoFt
View software version
Unit
Probe type and
Celsius/Fahrenheit option
Set View Unit
FANS
Toggle Fans Only mode
Fans
diSP
Display whole units or
decimal
Display
CASE
Toggle Case Off mode
Case Off
tyPE
Set/View Controller Type
Set/view controller type
Ligt
Toggle Lights Only mode
Lights
rtc
Set/view Clock (rtc = Real
Time Clock)
Real Time Clock
OFSt
Probe Offset
Probe Offset
ESC
Exit Setup mode
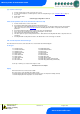
ENTER
UP
DOWN
To enter setup mode, hold the Enter and Down
buttons together for approximately 3 seconds until
the message “Ent” appears on the display. Now
press the Enter button again to enter the function
menu. IO will be displayed. Scroll up or down to
go through the list.