
User guide


Revision 1.0 Page 21 of 29
Warning
Please Note
The specifications of the product detailed on this
Set-Up Guide may change without notice. RDM
Ltd. shall not be liable for errors or for incidental
or consequential damages, directly and indirectly,
in connection with the furnishing, performance or
misuse of this product or document.
Ensure that all power is
switched off before
installing or maintaining
this product
Mercury 3 M & E Installation Guide
www.resourcedm.com
Network Configuration – IP comms
Mercury 3 controllers with the IP interface as standard does not require any communications module and will already communicate on
the IP network protocol.
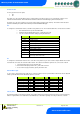
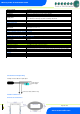
When networking the Ethernet variant, the ‘Net’ menu will have the following menus;
Display
Option
IP-L / IP-r
Read/ Write Static IP address / Read Only DHCP IP address
Id
The 3 digit network address
AtyP
IP-r / IP-L selection
ESC
Exit Menu
Similar to the IP Futura / switch setup IP-L allows you to fix a static IP address into the controller and IP-r allows you to give each
controller on the system a unique network number (using the Id).
To firstly select between IP-L and IP-r navigate to ‘AtyP’.
IP-r
Once IP-r is selected the controller must be given a unique 3 digit ‘network address’ that no other device on the network has (note if
logging on to a Data Manager, this will be the device ID). Once the ID has been set connect the controller to the IP network for it then to
be given an IP address by the DHCP server. To view the IP address given, within the Net menu, navigate to ‘IP-r’.
IP-L
If IP-L has been selected from the ‘AtyP’ menu the IP address must be given to the controller by navigating to ‘IP-L’ within ‘Net’. The
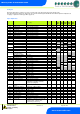
following menu’s will be available;
Display
Option
IP-1
IP Address byte 1
IP-2
IP Address byte 2
IP-3
IP Address byte 3
IP-4
IP Address byte 4
nL
Network Mask Length (see the network mask length table above)
gt-1
Gateway Address byte 1
gt-2
Gateway Address byte 2
gt-3
Gateway Address byte 3
gt-4
Gateway Address byte 4
ESC
Exit network menu. N.B. this option must be selected to save any
changes made in this menu
Once the IP address has been entered, the controller can be connected to the IP network.