
Install Instructions
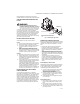
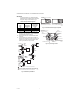
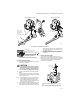
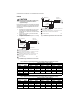


Table Of Contents

VR8300/VR8301 CONTINUOUS PILOT COMBINATION GAS CONTROL
69-0624—03 10
IF THE PILOT BURNER FLAME GOES OUT
WHEN THE GAS CONTROL KNOB IS
RELEASED
1. Assure the gas control knob is held in at least one
minute to allow the thermocouple time to heat.
2. Check the pilot burner flame adjustment. Refer to
Adjust the Pilot Burner Flame section.
3. Check the wiring between the thermocouple and
the gas control valve operator.
4. Assure thermocouple connection to the power unit
is tightened one-fourth turn beyond finger tight.
5. If pilot burner flame still goes out, measure the
open and closed thermocouple output voltage.
Compare it to the acceptable range charts in the
thermocouple specifications or in the Gas Controls
Handbook. Replace the thermocouple if voltages
are outside the acceptable range.
6. Check the power unit resistance. If above 11 ohms,
replace the gas control.
IF THE MAIN BURNER WILL NOT COME ON
WITH A CALL FOR HEAT
1. Be sure the gas control knob is in the ON position.
2. Adjust the thermostat several degrees above room
temperature.
3. Use an ac voltmeter to measure the voltage across
terminals TH and TR or MV/PV and MV. If:
a. No voltage is present, check the control circuit
for proper operation.
b. 24 Vac is present, but first operator did not
click open, check for excessive inlet gas pres-
sure. If inlet gas pressure is correct, replace the
gas control.
4. Measure the open and closed thermocouple output
voltages and compare to the acceptable range
charts in the thermocouple specifications or in the
Gas Controls Handbook. Replace the thermocouple
if voltages are outside the acceptable range.
5. Measure the open and closed thermocouple output
voltages and compare to the acceptable range
charts in the thermocouple specifications or in the
Gas Controls Handbook. Replace the thermocouple
if voltages are outside the acceptable range.
IF THE MAIN BURNER IS OVERFIRING
Adjust the gas control pressure regulator to the correct
pressure. If the regulator cannot be adjusted and supply
the pressure is in the normal range, replace the gas
control.
INSTRUCTIONS TO THE HOMEOWNER
WARNING
FIRE OR EXPLOSION HAZARD CAN CAUSE
PROPERTY DAMAGE, SEVERE INJURY, OR DEATH
Follow these warnings exactly:
1. Pilot burner flame must be lit manually. Follow
these instructions exactly.
2. Before lighting pilot burner flame, smell around the
appliance for gas. Be sure to smell next to floor
because LP gas is heavier than air.
3. IF YOU SMELL GAS:
— Turn off the gas supply at the appliance service
valve. On LP gas systems, turn off the gas supply
at the gas tank.
— Do not light any appliances in the house.
— Do not touch electrical switches or use the
phone.
— Leave the building and use a neighbor’s phone to
call your gas supplier.
— If you cannot reach your gas supplier, call the fire
department.
4. Do not force the gas control knob. Use only your
hand to push down or turn the gas control knob.
Never use any tools. If the gas control knob will not
operate by hand, the gas control should be
replaced by a qualified service technician. Force or
attempted repair can result in a fire or explosion.
5. Replace the gas control in case of any physical
damage, tampering, bent terminals, missing or bro-
ken parts, stripped threads, evidence of exposure
to heat or if flooded by water.
IMPORTANT:
Follow the operating instructions provided by
the manufacturer of your heating appliance. The
information below will be of assistance in a typ-
ical gas control application, but the specific
controls used and the procedures outlined by
the manufacturer or your appliance may differ
and require special instructions.
LIGHTING THE PILOT BURNER FLAME
STOP: READ THE WARNINGS ABOVE.
The pilot burner flame must be lit manually. If the pilot
burner flame has gone out, follow these instructions
exactly:
1. Set the thermostat to its lowest setting.
2. Disconnect all electric power to the appliance.
3. Remove the gas control access panel.
4. Push in the gas control knob slightly and turn
clockwise to OFF.
NOTE: The gas control knob can not be turned from
PILOT to OFF unless it is pushed in slightly. Do
not force the gas control knob.
5. Wait five minutes to clear out any unburned gas. If
you then smell gas, STOP! Follow step 3 in the
Warnings at the beginning of the Instructions to the
Homeowner section. If you do not smell gas, con-
tinue with the next step.
6. Remove the pilot burner access panel located
below and behind the gas control.
7. Find the pilot burner by following the metal tube
from the gas control. The pilot burner is located
between the two burner tubes behind the pilot
burner access panel.
8. Turn the gas control knob counterclockwise to
PILOT.
9. Push and hold the gas control knob all the way in.
Immediately light the pilot burner flame with a
match and continue holding the gas control knob
in for one minute after the pilot burner flame is lit.
10. Release the gas control knob and it will pop back
up. The pilot burner flame should remain lit. If pilot
burner flame goes out, repeat steps one through
ten.
— If the gas control knob does not pop up when
released, stop immediately and call your service
technician or gas supplier.
— If the pilot flame will not stay lit after several tries,
turn the gas control knob to OFF and call your
service technician or gas supplier.
11. Turn the gas control knob counterclockwise to ON.
12. Replace the pilot burner access panel.
13. Replace the gas control access panel.
14. Reconnect all electric power to the appliance.
15. Set the thermostat to the desired setting.