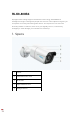
RLK8-800B4 Equipped with cutting-edge smart detection technology, RLK8-800B4 is intelligent enough to distinguish people and cars from other objects and gives you true peace of mind by eliminating false alarms. This superior kit can show the finest key details in vividness, even when you digitally zoom in, so that every ambiguity in video footage you met before is cleared up. 1.
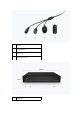
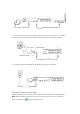
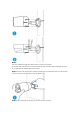
1 Power 2 Reset Button 3 Network 4 Waterproof Lid 1 USB Port
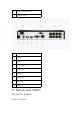
2 Power LED/HDD LED 3 Control Panel 1 On/Off Switch 2 eSATA 3 RJ45 4 Power Input 5 Audio Out 6 USB Port 7 HDMI Port 8 VGA Port 9 Network 2.
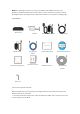
Note: The package content may vary and update with different version and platforms, please take the below information only for a reference. And the actual package content are subject to the latest information on the product selling page.
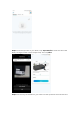
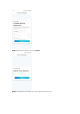
2. Connect the PoE camera to PoE port of the NVR. Or if you want to use a WiFi camera, please connect the camera to the WiFi of the same router as NVR. DC Power Reset Button Network (LAN) 3. Connect the power adapter to the NVR, and switch on the NVR. Set up the system on the App Please initially set up the system on the App by referring to the following steps. Note: Please make sure the device and your phone are on the same network. Step 1. Tap the icon on the top right corner.
Step 2. Scan the QR code on your NVR, or tap Input UID/IP to enter the UID of the NVR (a 16-digit number under the QR code). Then tap Next. Step 3. For security considerations, you need to create a password for the first time.
Step 4. Name your device. Then tap Next. Step 5. Initialization finished! You can start to live view now.
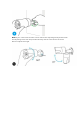
Install the Camera Please follow the steps below to install the camera. Step 1. Drill holes in accordance with the mounting hole template. Step 2. Install the mount base with the mounting screws included in the package.
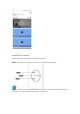
Notes: Run the cable through the cable notch on the mount base. As for the WiFi camera, it is recommended that the antennas be installed upward or horizontally for better WiFi connection. Step 3. loosen the adjustment knob by twisting it counterclockwise on the security mount, and turn the camera to get an ideal view. Step 4. Turn the knob clockwise to fix the camera in place.
Note: If your camera has another mount without the adjusting knob, please loosen the adjusting screw with the provided hex key and turn the camera as shown below to adjust the angle.