
User Manual


34
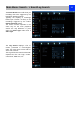
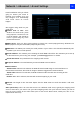
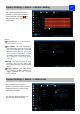
Main Menu: Network - > Advanced
On the Network: Advanced page,
you can Set
• DDNS
• NTP
• E-mail
• FTP
• IP Filter
• related media port
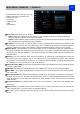
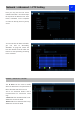
DDNS: DYNDNS is the only choice. If
you do not want to use Reolink UID for
access, you may need to apply a
DYNDNS account from
www.dyndns.com. .
NTP: Network Time Protocol. If you’ve got the Camera connected to the Internet, you can have it automatically sync
time with an online server.
Email Settings: You may configure the Camera to work with an email account of your choice. This must be correctly
configured for the Camera’s auto-email feature to work.
FTP: File Transfer Protocol, you can use FTP to transfer files between Camera and computers on a network.
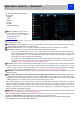
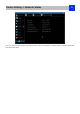
Server Port: Camera will use server port to send information through. Please note that,
You’ll need to enable UPnP on your router so your router can selectively open these ports, allowing the
NVR to communicate via the Internet. If your router doesn’t support UPnP, You may either get a new router
(which support UPNP) or you can manually forward ports from the router to the NVR. Port Forwarding is a
technical process and may require router knowledge.
The default port number is 9000, which is not used by many other devices/programs. However, if you have
another Camera or Camera-like device, this port may be used already. If this is the case, change this value to
be unique. (If you use UID, there is no need to forward this port)
HTTP Port: This is the port through which you will be able to log in to the NVR via web. It will need to be forwarded
properly in order to ensure smooth, latency-free communication. The default value is “80”. If another device on your
network is using this port, please change to other value. This is the port number you’ll need to remember when logging
in remotely from a remote PC via the HTTP interface. (If you use UID, there is no need to forward this port)
RTSP Port: Real Time Streaming Protocol”, you may use this port to send the streaming file to Realplayer,the default
RTSP port is 554
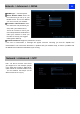
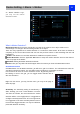
UPNP enable (This feature is not required if you are using Reolink P2P to access the Camera): UPnP makes
configuring your network easier and faster. To use the UPnP setting on the Camera, you’ll need a router which
supports this feature, with UPnP enabled. Note that many routers which do support UPnP do not come with the feature
enabled by default. You may need to ask your Internet service provider to turn it on.
When UPnP is enabled on your Camera and your router, the Ports that the Camera requires to be open for access to
and from the Internet will automatically be opened and closed as necessary by your router, saving you the trouble of
manually forwarding these ports. If UPnP is not enabled, or your router does not support this feature, you’ll need to
forward the ports the Camera uses from the router to the Camera - since this is a technically challenging process, we
strongly recommend using UPnP if possible.
UID Enable: It is enabled with checked box by default. If you do not want to use it in internet, you may uncheck the box.
Note: it will not connect via internet if you uncheck the box.
UID: The Camera’s Unique Identifier code for P2P. For convenience, you may have this code sent to your email account
by clicking the Send UID button (provided that you’ve already set up your email account).
DDNS is not required for Reolink P2P remote access. If you intend to access your NVR using older IP
technology you will need to configure this service.