
User Manual
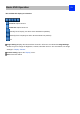

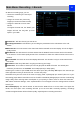

Main Menu: Display -> Camera
24
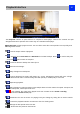
On The display: Camera page, you can
• Rename the camera
• Set the information that will be displayed
on-screen
• Set where this information will be
displayed
• Set whether information such as the date
will be recorded directly to your videos
• Set any areas of the video you want to
“mask”
• Set the camera video parameters
Camera No.: Choose the channel you want to edit here.
Camera Name: Shows the name of the camera that’s currently connected to the channel. You may also
specify a different name by using a virtual keyboard window.
Disable Preview: Check the box to disable the preview of selected channel.
Display Camera Name: When checked, the name will be displayed on-screen
Record Date: When checked, the date will be recorded directly to your videos.
OSD Display Position: Gives you access to a screen where you can easily set the exact positions of
any over-lay text, such as the camera name and the date and time.
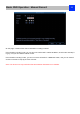
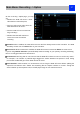
Image Settings
• Brightness: Changes how light on the image appears to be.
• Contrast: Increases the difference between the blackest black and the whitest white in the image.
Useful if sections of the image “grey out” but setting the contrast too high will degrade image quality.
• Saturation: Alters how much color is displayed in the image. The higher the saturation, the more bright
and vivid colors will appear to be. Again, setting this too high can degrade image quality.
• Hue: Changes the color mix of the image (this can have very dramatic results). It’s somewhat like
moving through a rainbow.
Mask: When checked, allows you to create, place and shape a “privacy mask” which obscures part of the
image on the associated channel.
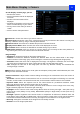
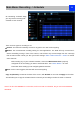
Camera Parameters: Adjust various camera settings according to the environment where the camera is
installed.
•
Anti-flicker: Use this feature if some devices such as TV screens and lights are flickering. For USA and
Canada, set this to 60Hz. For Australia and the UK, set this to 50Hz. Outdoor mode is also available.
•
Exposure Mode: Select the exposure level of the camera based on pre-defined conditions. Select
Manual to adjust the shutter speed and gain value of the camera.
•
Contextual: Change the way the camera processes white balance to correct image colors. Auto, Day,
Night or Manual (adjust the red and blue gain manually).
•
Day/Night: Set the camera’s color mode during different times of the day and night - AGC (Auto set by
image sensor, Color (Always in Day mode), Black&White (Always in Night mode) or CDS (Auto set by
light sensor).
•
Backlight: Optimize brightness and contrast levels to compensate for differences between dark and
bright objects using either BLC or WDR mode. This may improve image clarity in high contrast situations
but should be tested at different times of the day and night to ensure that there is no negative effect.
•
Mirroring: Change the orientation of the image to be horizontally reversed.
•
Rotation: Turns the image upside down.