
User Manual


Setup Wizard : E-mail Configuration
16
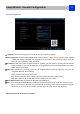
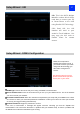
E-mail
If you want the NVR to send
email alerts when alarm
events are detected, then
you need to configure an
outgoing email server for the
NVR and choose an email
address for it.
We recommend creating an
account with Gmail specifically
for the NVR, and setup its
security level to be low. These
instructions assume you’re
using a Gmail account.
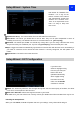
Enable SSL or TLS: Check box to enable
SMTP Port: The SMTP port of your email server. Gmail’s port is 465 (this value will self-populate)
SMTP Server: The SMTP address of your email server. There are 3 preset options to select from:
smtp.gmail.com, smtp.live.com or smtp.mail.yahoo. com
Sender Address: The email address you want your NVR to send alert from. For example,
your_email@gmail.com
Sender Password: The password of your sending email address.
Recipient Address: Enter an email address for the NVR to send alerts to (usually your personal email
address).
Attach Picture: You may select Disable, Attach Picture, or Attach Video. Disable means there is only
text information in the emai; Attach Picture means there will attach a snapshot(4MP) when MD alerts; and
Attach Video means there will attach a video clip(30s) when MD alerts.
Interval: The minimum amount of time that must elapse after the NVR sends an email alert before it can
be triggered again.
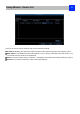
Test: To check if you’ve set up email alerts properly, click the Test button. If your connection and email
details are ok, you will see a message on the NVR screen confirming the email was sent successfully.
After a short delay, you will also receive an e-mail in your inbox (Recipient’s Address) informing you that
email alerts from the NVR has been set up. If the test is unsuccessful, please check your sender’s
address/password and recipient’s address(es) and try again.