Sept 2021 QSG1_A User Manual Reolink PoE Camera User Manual
Reolink PoE Camera contents 1. Camera Introduction......................................................................................................................2 Device Overview.......................................................................................................................... 2 2. Setup and Installation................................................................................................................... 9 Power on PoE Cameras......................................
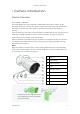
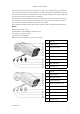
Reolink PoE Camera 1. Camera Introduction Device Overview RLC-510A/RLC-410/B400 RLC-510A: Boasting a high resolution of 2560x1920 with nearly 5 million pixels, RLC-510A security IP camera can capture crystal clear video with fine details. With the built-in microphone, it also picks up ambient sound for an extra layer of security. RLC-410: 5MP RLC-410 is with a pixel resolution of 2560x1920, that is, nearly 2.4X the resolution of 1080p Full HD, and even 1.3X the resolution of 1440p.
Reolink PoE Camera RLC-520A/RLC-520/RLC-522/RLC-820A/RLC-822A/RLC-1220A/D800 RLC-520A/RLC-520/RLC-522: Boasting a high resolution of 2560x1920 with nearly 5 million pixels, the security IP camera can capture crystal clear video with epic details. With the built-in microphone, it also picks up ambient sound for an extra layer of security. RLC-820A/RLC-822A: Equip with on-device detection technology to discern people and vehicles from other objects.
Reolink PoE Camera RLC-511: The higher the camera resolution is, the more image details you’ll obtain. RLC-511 PoE security IP camera prides in the high resolution of 2560x1920, which is about 2.4X the resolution of 1080p, and even 1.3X the resolution of 1440p Super HD. It ensures true-color images with vivid details. RLC-810A/RLC-811A: Unites security and intelligence. The security camera can not only capture its vision sharply, but understand what it sees.
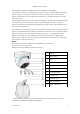
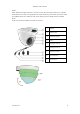
Reolink PoE Camera Micro SD Socket User Manual 5
Reolink PoE Camera RLC-423 5MP RLC-423 is with a pixel resolution of 2560x1920, that is, 2.4X the resolution of 1080p Full HD, and even 1.3X the resolution of 1440p Super HD. You will definitely have the best chance to see every image detail as you wish.
Reolink PoE Camera RLC-823A RLC-823A is smart enough to distinguish person and vehicle from other objects. It frees your mind by offering accurate detection and greatly reducing the false alarms on trivial objects' movements.
Reolink PoE Camera D400 With 2560x1440 high resolution, this top-notch PoE security camera can capture beautiful and smooth 4-megapixel live video streaming and video clips than 720p and 1080p cameras. It helps to see more clearly, and no details will be missed! Note: D400 is the same as B400, an add-on camera.
Reolink PoE Camera 2. Setup and Installation Power on PoE Cameras You may power on Reolink PoE cameras via PoE injector/switch or PoE NVR directly, or by using the power adapter. Method 1: Power via PoE Injector/Switch For Reolink RLC-423, you need to make sure that the PoE injector/switch is 802.3at compliant (48V) and supports active mode. For other Reolink PoE cameras, please make sure that the PoE injector/switch is 802.3af compliant (48V) and supports active mode.
Reolink PoE Camera Method 2: Power by PoE NVR Connect your PoE camera to the PoE NVR by a single network cable, then the PoE camera will get power via the PoE NVR.
Reolink PoE Camera Method 3: Power by Using the Power Adapter Alternatively, you can power on the camera in another way – by using a power adapter. For Reolink RLC-423, the ratings of power adapter should be DC 12V 2A. For other Reolink PoE camera models, the ratings of power adapter should be DC 12V 2/1A. Notes: Do not purchase passive PoE injectors as they won’t work with Reolink PoE cameras. It's better to use high-quality PoE injectors/switches.
Reolink PoE Camera Step 2. Create the password, name the device, and then start live view. Note: There are four ways to set up the camera on Reolink App: scan QR code on the camera, scan device in LAN, enter UID, enter IP address. For the other three ways, please refer to this video. Install the Camera Install Dome Cameras RLC-520A/RLC-520/RLC-522/RLC-820A/RLC-822A/RLC-1220A/D800 Step 1.
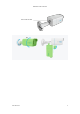
Reolink PoE Camera Step 3. Fit the concave at the bottom of the camera (marked as 4, 5, 6 in the picture below) to the convex on the base panel (marked as 1, 2, 3 in the picture below), and then rotate the camera seating (marked as Part A) clockwise to lock the camera tightly with the base panel. Note: To take down the camera, please rotate part A anti-clockwise.
Reolink PoE Camera Step 4. Once the camera is installed, you can adjust the angle up & down 70 degrees or 360 degrees horizontally. Manually rotate the camera body to adjust the surveillance angle. Install Bullet Cameras RLC-510A/RLC-410/B400/RLC-511/RLC-810A/RLC-811A/RLC-1210A/B800 Note: It is not recommended to install Reolink bullet cameras in the open air in this way. You can follow these steps to install Reolink bullet cameras to the ceiling. Step 1.
Reolink PoE Camera Step 3. Drill three screw holes on the wall according to the mounting hole template. Step 4. Secure the camera in place by tightening the screws. Step 5. If you want to adjust the angle of this camera, you can loosen the screw toward the direction of Unlock symbol.
Reolink PoE Camera Notes: 1. Twist it with the wrench to unlock, and adjust the cam (green part) in any directions. 2. After adjustment, twist it back to lock it. 3. Store the wrench here for later use. 3. View Your Camera Live View Note: The live view screen may vary for different models. Icon Meaning Settings: Provide access to a camera’s settings such as system information, detection alarm and camera recording. More options of live view: Channel Selection, Day and Night, Immersive.
Reolink PoE Camera Audio Enable audio Manually capture Manually record Live view in sub-stream mode Manually recording Live view in main stream mode View your camera in a full-screen mode. Talk: Tap to talk (two-way audio). Clip: Drag the rectangle to the position you want to see. PTZ: Control pan,tilt or zoom. Playback: Replay the recordings saved to the SD card. Channel Selection You can choose the devices you want on the device list.
Reolink PoE Camera Day and Night Set the camera’s color mode during different times of the day and night. Set the camera’s color mode during different times of the day and night. -Color: The camera will capture color images that usually appear during the day. -Black & White: The camera will capture black-and-white images that usually appear during the night with the IR LEDs on. -Auto: The camera will automatically switch between Color and Black & White modes according to the light conditions.
Reolink PoE Camera Multiple Views If you have several cameras added in your Reolink App, you can view multiple streams at the same time on Reolink App. Full-Screen View Click to enter the full-screen mode.
Reolink PoE Camera Click to return back. Two-Way Audio Note: Two-way audio is only available for RLC-811A and RLC-823A. Step 1. Click Step 2. Click User Manual to enter into the two-way audio page; to talk.
Reolink PoE Camera Clip Step 1. Click to enter into the clip page; Step 2. Drag the rectangle to the position you want to see. PTZ Step 1. Click to enter into the PTZ page; Step 2. Choose the direction you want the camera to pan and tilt.
Reolink PoE Camera Display Settings Flip Click , then the image will be turned upside down. Quality Step 1. Click Quality to enter into the Quality page; Step 2.
Reolink PoE Camera Step 3. Click Save to save the settings. Anti-flicker Use this feature if some devices such as TV screens and lights are flickering. - 50GHz: Used for Australia and the UK. - 60GHz: Used for the USA and Canada. Step 1. Click Anti-flicker; Step 2. Choose a proper setting.
Reolink PoE Camera Day and Night Click Day and Night to enter into the settings page. Note: It is the same as the settings on the Live View part. Brightness Drag the circle in the progress bar to adjust the brightness of the image.
Reolink PoE Camera Camera Name You can set the position of the camera name on the screen. Date You can set the position of the date on the screen.
Reolink PoE Camera Watermark Click to disable the watermark shown on the screen. Privacy If you don’t want others to view some parts in the image, you can set the privacy mask to protect your privacy. Press and drag to draw a black rectangle (up to 4 rectangles) on the screen to block out a specific area.
Reolink PoE Camera Advanced It includes Exposure and Backlight. Exposure: Select the exposure level of the camera based on pre-defined conditions. Select Manual to adjust the shutter range and gain range of the camera manually.
Reolink PoE Camera Backlight: Optimize brightness and contrast levels to compensate for differences between dark and bright objects. This may improve image clarity in high contrast situations but should be tested at different times of the day and night to ensure there is no negative effect.
Reolink PoE Camera Lights and LED Infrared Lights By default, the infrared lights on the cameras are set to Auto. They will be automatically turned on in dim environment. If there is enough illumination, you may choose to turn off the infrared lights. Spotlight When an alarm event is detected, it will be automatically turned on, and the spotlight can also add light sources to produce full-color images. By default, the Night Mode is set as Auto.
Reolink PoE Camera And you can also enable the Auto-On for Live View, which means the spotlight will automatically turn on when viewing the live feed and turn off afterwards. 4. Alarm and Detection Set up Motion Detection Reolink camera judges whether each macroblock has moved by dividing the grid. When the number of moved blocks reaches a certain proportion of the number of armed blocks, the alarm will start.
Reolink PoE Camera Sensitivity Sensitivity can be set for motion detection and smart detection. Note: Smart detection is only for PoE cameras which support the smart person and vehicle detection.
Reolink PoE Camera Drag the bar to adjust the sensitivity from low, mid to high. For the sensitivity of motion detection, you can also add sensitivity schedule. Object Size You can set the minimum and maximum object size. Moving objects that are smaller or bigger than the size will not trigger alarm.
Reolink PoE Camera Set up Motion Alerts Push Notification When the camera detects a motion, it will send a push notification, which pops up on your mobile phone. 1. Tap on Push Notifications to enable this function. 2. Set a Push Schedule if you need: Any Motion, Person, Vehicle.
Reolink PoE Camera Notes: 1. The push notification for person and vehicle is only for PoE cameras which support the smart person and vehicle detection. 2. For iOS, please set your phone to allow Reolink App to send push notifications. Go to your phone Settings, find Notifications and among the App list find the Reolink App. Make sure the Reolink App can send notifications.
Reolink PoE Camera Alarm Email When the camera detects a motion, it will send an alarm email with plain texts or the camera’s live image. 1. Tap Set up Now to enter Email Settings, and enter the Email address and Email password, SMTP server and port. Then tap on Save.
Reolink PoE Camera 2. Tap Schedule to set up a schedule when you’d like to receive the email alerts, and tap Save. Note: The email notification for person and vehicle is only for PoE cameras which support the smart person and vehicle detection 3. Tap Email Content to choose for the camera to send email, you can choose Text, Picture, Text with Picture or Text with Video.
Reolink PoE Camera 4. Tap Email Settings, then +Add Email Address to add more recipients of email alerts, then tap Save. Alarm Siren You can set up the camera siren to make an alert sound when a motion is detected. 1. Tap on User Manual . Tap on Siren and enable Siren.
Reolink PoE Camera 2. Tap on Custom Alarm Sound, if you want to use a custom sound. Tap Custom sounds, then tap Change custom sounds to record an up-to-5-second sound. 3. Tap Start to start recording or tap Stop to stop recording. Tap on Sound Test to test the recorded sound or tap Re-record to record again till you’re satisfied. Then tap Apply to save the changes.
Reolink PoE Camera 4. Tap Schedule to set up a schedule when you want the siren to work, then tap Save. For PoE cameras supporting the smart person and vehicle detection, you can also choose the Detection Type: Person, Vehicle or Any Motion. Alarm Spotlight Camera model RLC-811A and RLC-823A have built-in spotlights, which can automatically turn on when a motion is detected. 1. Tap on User Manual . Then tap Advanced, then tap Spotlight.
Reolink PoE Camera 2. Tap Night Mode to set it as Auto, in this way, when a motion is detected during night time, it’ll automatically turn on the spotlights. And you can drag the bar to adjust the spotlight brightness. Set up Motion Recording When the camera detects a motion, it can record and save motion recordings to SD card automatically. You need to install a SD card to the camera. 1. Tap on User Manual . Then tap on Camera Recording, tap again to enable it.
Reolink PoE Camera 2. Tap Schedule to set up a schedule when you want the camera to save motion recordings, then tap Save. For the PoE cameras which support the smart person and vehicle detection, you can also choose the Detection Type: Person, Vehicle or Any Motion. 3. Tap Post-Motion Record Duration to set up the motion recording length, you can choose 15 sec, 30 sec or 1 min.
Reolink PoE Camera 4. Tap Overwrite to overwrite the recordings when the SD card is full, and the overwrite function is enabled by default. 5. Recording and Playback Set up Recording Reolink PoE cameras support both motion recordings and continuous recordings. And recordings can be saved into micro SD cards and uploaded to FTP server. For how to set up the motion recording, please refer to chapter 4 “Set up Motion Recording”.
Reolink PoE Camera FTP Settings Step 1. Go to Advanced > FTP Upload page, enable FTP Upload option and then click FTP Settings to enter this page.
Reolink PoE Camera Step 2. Complete the information required and click Save to save all the settings. Server Address: Type in the address of your FTP server and FTP Port. The default FTP Port for Reolink products is 21. User Name and Password: Enter the User Name and Password of your FTP server. If there is no username and password required, please enable Anonymous FTP. Upload Directory: Set an upload directory for device video recording. You may also leave it blank.
Reolink PoE Camera Replay and Download Recordings Replay Recordings 1. Open live view of the camera. Then tap on Playback on the bottom.
Reolink PoE Camera 2. Select a date to search the recordings. Slide through the timeline to find the recordings you want to replay, tap on the selected recording and it’ll automatically starts to play. 3. Tap on to choose Fluent or Clear to replay the recordings in clear mode or fluent mode.
Reolink PoE Camera 4. Tap show alarm icon on the bottom to show the alarm recordings only. For PoE cameras supporting the smart person and vehicle detection, you can select motion recording type of Person,Vehicle or Any Motion to replay. 5. To replay the recording in slow or fast speed, please tap on the icon and then choose the playback speed at 0.25X, 0.5X, 1X, 2X, 4X, 8X or 16X.
Reolink PoE Camera Download Recordings 1. Open live view of the camera. Tap on Playback on the bottom. 2. Select a date to search the recordings. Slide through the timeline to find the recordings you want to replay, tap on the selected recording and then tap on the Download icon User Manual .
Reolink PoE Camera 3. Drag on the timeline to cut the recordings up to 120 seconds, then tap on Download to download the recording to your phone. Delete Recordings Reolink cameras don’t support deleting selected recordings. The camera will automatically delete and overwrite the older recordings when the SD card is full. Or you can manually format the SD card to delete all recordings. Time Lapse Time-lapse photography, also known as time-lapse video, is a shooting technique that compresses time.
Reolink PoE Camera Set up Time Lapse 1. Tap on the . Then tap on Time Lapse. 2. Tap Try Now or Create New Time Lapse Capture.
Reolink PoE Camera 3. Select a scene from the list or tap on Customize to create a customized time lapse capture. 4. Customize when the capture starts, Duration, Interval, Quality and File Type, then tap on Start. The camera will automatically start to capture at the set time.
Reolink PoE Camera 5. Later when the time lapse video is created, you can tap on View on the Time Lapse page to play back or download it. It usually takes several seconds or minutes for the time lapse video to cache before playback starts. You can also tap on the trash icon to manually delete the time lapse video. 6. Tap on icon, here you can turn on or off the option Overwrite Time Lapse Files.
Reolink PoE Camera 7. Tap on the pictures icon to view the Time Lapse Gallery. Here you can view or manage all time lapse videos. 6. Use the Reolink App Share Your Devices with Others 1. Launch Reolink App on your phone, then tap on to enter the Device Settings page.
Reolink PoE Camera 2. Tap Share Camera to get the camera’s QR code. 3. Launch the Reolink App in another phone and tap button to scan the QR code.
Reolink PoE Camera Or you can manually input the camera’s UID to add the device. The camera UID consists of 16 digits that start with 9527000xxxxxxx. After entering the UID, please tap > User Manual Next to enter the camera password to log in.
Reolink PoE Camera Scene Modes The Scene Modes setting is designed for different usage scenarios. You could control all your cameras under different modes as you need. For instance, you could disable all cameras alarm under home mode when you're home, but enable all the alarms under outside mode when you’re away. 1. Scroll down the Devices list to find the Scene Modes configuration entrance. 2. Tap it to name the scene and select a scene.
Reolink PoE Camera 3. Select devices for this scene and customize the alarm settings. 4. If you want to receive push, email, audio alarm under this scene mode that you can enable the alarm settings with push, email, audio, alarm, the blue icon means enabled, gray means disabled.
Reolink PoE Camera Add or Delete a Camera Add the camera in LAN 1. If you want to add the camera in LAN, we recommend that you enable the Add Devices Automatically option. Once your smart phone and camera are connected to the same network, the Reolink App can find the Reolink device automatically in LAN. 2. Tap and go to Settings > Add Devices Automatically. Or you can go to the home page and tap > LAN and select the camera you want to add.
Reolink PoE Camera 3. Enter the camera password to log in. Add Camera by Scanning the Camera QR Code 1. Tap and scan the QR code on the camera body.
Reolink PoE Camera 2. Enter the camera password to log in. Add Camera by Entering the Camera UID 1. Select Input UID/IP, please note that you are unable to add the camera with IP address. Note: The camera UID consists of 16 digits that start with 9527000xxxxxxx.
Reolink PoE Camera 2. Enter the camera UID, tap Next to log in with the camera password. Delete a Camera from Reolink App Tap then scroll down the page to delete the device.
Reolink PoE Camera Register Account A Reolink account can be used to place orders on the Reolink website, check order history, and log in to cloud or smart home like Google Home or Alexa. You can follow up the steps below to register a Reolink Account. Tap and enter your email address and password to sign up. Note: Only check “I have read and agree to Terms & Conditions and Privacy Policy”. After that you will receive a verify email.
Reolink PoE Camera App Settings Launch the Reolink App. Tap and you can adjust the device order, change sound settings, App password, clean cache, etc. Adjust Device Order: Adjust order for a quicker access to the devices you want, tap and drag the device to the channel as you want.
Reolink PoE Camera Message Sound Settings: Like the push notification sounds, tap and you can choose the notification sound you like. App Password: You can set up an App password to protect the App. Appearance: There are three modes to choose: Light mode, dark mode, follow system. Clear Cache: Clean the Reolink App cache. Cache is the temporary data generated when you use the App. Clearing cache will not affect the normal use of Reolink App.
Reolink PoE Camera 7. Camera Settings SD Card Storage Choose a Proper SD Card Please choose a SD card with specifications below so it can be compatible with the camera.
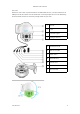
Reolink PoE Camera Install the Micro SD Card Bullet Cameras Step 1. Find the micro SD card slot at the back of the camera and unscrew the screws to open it. Step 2. Insert the micro SD card just like the way in the picture below, please use your fingernail (or use the provided reset needle) to push the micro SD card in until it is locked, and you will hear a click sound and the micro SD card will not pop out if it is inserted in properly.
Reolink PoE Camera Step 3. Screw the screws to close the cover tightly. RLC-420/D400 Step 1. Find the micro SD card slot at the top of the camera and unscrew the screws to open it.
Reolink PoE Camera Step 2. Insert the micro SD card just like the way in the picture below, please use your fingernail (or use the provided reset needle) to push the micro SD card in until it is locked, and you will hear a click sound and the micro SD card will not pop out if it is inserted in properly. Step 3. Screw the screws to close the cover tightly.
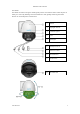
Reolink PoE Camera RLC-423 Note: Before installing/uninstalling the SD card, please power off the camera first, in case it will damage the SD card. Step 1. Find the micro SD card slot and unscrew the screws to open it. Step 2. Insert the micro SD card just like the way in the picture below, please use your fingernail (or use the provided reset needle) to push the micro SD card in until it is locked, and you will hear a click sound and the micro SD card will not pop out if it is inserted in properly.
Reolink PoE Camera Step 3. Screw the screws to close the cover tightly. Remove the Micro SD Card Please refer to the steps below to remove the SD card from your camera. Note: Before uninstalling the SD card, please power off the camera first, in case it will damage the SD card. Please find the SD card slot and open its cover like the picture below. Check the Micro SD Card Status 1. Launch the Reolink App and tap , then tap the camera to enter Device Info page.
Reolink PoE Camera 2. Tap Storage, and you can see the SD card used space/total storage space. Tap Format to format the SD card. Device Information From device information page, you can check the basic information about your camera include Model No., UID, and Firmware Version. Launch the Reolink App then tap User Manual , then go to Device Info.
Reolink PoE Camera Device Password To access and use a camera, a password is required. The default username is admin and password is blank (no password). When setting up the camera, it’ll ask for a password before you can access the camera. Change Device Password 1. Launch Reolink App and tap > Advanced > User Management > Admin > Change password.
Reolink PoE Camera 2. Enter the old and new password, then tap on Save. Notes: 1. The confirm password must be the same as the new password. 2. Tap Save to save the changes. Date and Time Sync Camera Time With Your Phone 1. Launch Reolink App and tap User Manual > Advanced > Date & Time.
Reolink PoE Camera 2. Then tap Synchronize phone time. Reboot and Restore Launch the Reolink App and tap > Advanced > Reboot or Restore. Here you can choose to reboot the camera or restore the camera to default. Note: Restoring will remove all the camera settings including camera password, camera name, PIR settings, etc.
Reolink PoE Camera Firmware Upgrade 1. Launch the Reolink App and tap > Device Info > Upgrade Device. 2. If Auto Upgrade turns on, the camera will upgrade to the latest firmware automatically.
Reolink PoE Camera If Auto Upgrade is off, you can choose to upgrade manually. If you see the image below that means the camera’s firmware is already the latest one, there is no newer firmware to upgrade. Note: The online upgrading is only for PoE cameras with the firmware of IPC_523, but it will not take into effect until there is online firmware released. 8. Smart Homes Google Home Note: IP cameras with hardware IPC_513, IPC_515 and IPC_523 can work with google home and Alexa.
Reolink PoE Camera 1. Launch the Reolink App to tap to log in your Reolink account and go to Cloud > Smart Home. 2. Tap Enable to add the device to Google Home in the Smart Home page. Note: Only when it turns to disable that means the smart home feature is enabled.
Reolink PoE Camera 3. Launch the Google Home, sign in your account and then Get Started to create a home. 4. Name your home and tap Next to build a connection between the Chromecast and the Google Home. 5. After the Chromecast found, please check the code shown on your TV and tap Yes to continue.
Reolink PoE Camera 6. Connect the Wi-Fi network you would like to use with your Chromecast, then you can customize a room name, which will be added to your room list. 7. Now tap the button to enter the account page, and then tap Settings > Assistant > Home Control.
Reolink PoE Camera 8. Tap the button, and search Reolink in the search bar and assign the room for the camera you enabled in the cloud account via Reolink App. 9. Done! Now you've added the Reolink camera to the Google Home successfully.
Reolink PoE Camera 9. To test your camera, please launch the Google Assistance and say “Hey Google, show [name of room where the camera is placed] on [name of Chromecast device].” Amazon Alexa To connect your camera to Alexa, make sure you have 3 devices at hand: a Reolink camera, an Amazon Alexa device and your mobile phone; and 2 apps on your phone: the Reolink App and Amazon Alexa App. If the current camera firmware is not compatible with Alexa, please upgrade it to the latest in the Download Center.
Reolink PoE Camera 1. Launch the Reolink App to tap to log in your Reolink account and go to Cloud > Smart Home. 2. Tap Enable to add the device to Amazon Alexa in the Smart Home page. Note: Only when it turns to disable that means the smart home feature is enabled.
Reolink PoE Camera 3. Launch the Amazon Alexa App, sign in to your Alexa account and then tap on Devices in the bottom right corner. 4. Select Your Smart Home Skills and tap Enable Smart Home Skills. Please tap the Search icon at the top right corner and search Reolink Smart Home.
Reolink PoE Camera 5. After search and find Reolink Smart Home, tap ENABLE TO USE. 6. Type in your Reolink account, and then Tap Log in. After logging in successfully, then tap Allow, the App will remind that “Reolink Smart Home has been successfully linked”. Tap Close to go to the next step.
Reolink PoE Camera 7. Tap on Discover Devices or say the voice command "Alexa, discover devices". Alexa will scan and show the cameras bound to your Reolink account. 8. Tap Set up Device. You can tap Choose Group to add your device to a group if you want to, or you can skip this step and tap Close to finish the setup. 9. Done! Now you've added the Reolink camera to Amazon Alexa successfully.
Reolink PoE Camera 9. FAQs and Troubleshooting FAQs Q1: Can the Recordings Saved to FTP Server be Overwritten? A: Sorry to tell you that our device does not have permission to delete FTP files. Whether the recordings saved to the FTP server can be overwritten depends on the function of the FTP server. Some FTP servers support overwrite function, and you can set on FTP. Q2: Specification of Ethernet Cables that Reolink PoE Cameras Require.
Reolink PoE Camera A: Rotating image 90 degrees is not supported. Please note that mounting cameras sideways is not recommended. Q6: Can I Play back or Download Recordings Remotely? A: If you access the camera with the user accounts of an admin user, you can play back and download recordings remotely. But if you access the camera with the user accounts of a common user, you cannot do that.
Reolink PoE Camera If you added more than 3 cameras on one PoE switch and connect the switch to the PoE port on the NVR, the video stream may be delayed or frozen. Troubleshooting Camera Is Not Powered up If your camera is not powered up, please try the following solutions: 1. Please change another working adapter/working cable/working port to connect the camera. 2. Please refer to this user manual to reset the camera. 3.