Go Plus Reolink Go Plus, a 100% wire-free mobile HD security camera, operates on 4G-LTE and 3G networks. An ideal video monitoring solution with no cords, no wiring hassles, when in areas with limited or no WiFi access, no electrical power source! 1.
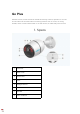
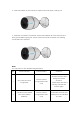
1 Micro SD Card Slot 2 SIM Card Slot 3 Reset Hole 4 Battery Status LED Status Light Note: If the camera connects the network successfully,there will be no status LED light up during idle mode. Status Light Red LED solid light up then starts to flash Camera Status Camera cannot recognize the SIM card or there is PIN code of the SIM card. Red LED solid light up then flash Camera cannot register the mobile slowly about once every second carrier network.
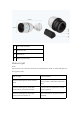
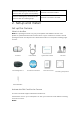
Red LED solid light up then blue LED starts to flash and goes off completely Red LED solid light up then blue LED starts to flash and solid light up Network connection failed. Network connection succeed. 2. Setup and Install Set up the Camera What’s in the Box Note: The package content may vary and update with different version and platforms, please take the below information only for a reference. And the actual package content are subject to the latest information on the product selling page.
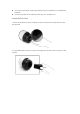
Some SIM cards have a PIN code, please use your smartphone to disable the PIN first. Do not insert the IoT or M2M SIM card into your smartphone. Install the SIM Card 1. Remove the back cover by rotating counterclockwise and insert the SIM card into the slot. 2. Insert the battery into the camera and tighten the back cover to power on the camera.
3. A red LED will be on and solid for a couple of seconds, then it will go out. 4. “Network connection succeeded”. A blue LED will flash for a few seconds and then go solid before going out, which means the camera has been successfully connected to the network. Note: You may also run into the following situations: No. Voice Prompts Camera Status Solutions 1. Check if the SIM card is 1 “SIM card cannot be recognized” Camera cannot recognize this SIM card. facing the reverse direction. 2.
1. Check whether your card is activated or not. If not, please call your operator to activate the “Not registered on 3 network. Please activate your SIM card and check the signal strength” SIM card. Camera fails to 2. The signal is weak at register to the the current position. operator network. Please move the camera to a location with better signal. 3. Check if you are using the correct version of the camera. 4 “Network connection failed” “Data call failed.
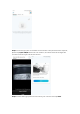
Step 2. Scan the QR code on the back of the camera. If the phone doesn't respond, please tap Input UID/IP below the scan window, and then enter the 16-digit UID number under the QR code of the camera. Step 3. Create the login password and name your camera. Then tap Next.
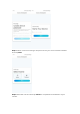
Step 4. Select a scene according to the place where your camera will be installed. Then tap Next. Step 5. Read the note and then tap Finish to complete the initialization of your camera.
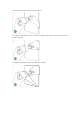
Now the initialization is finished and you can move it to the position you want. Here is an article to choose a good position for the camera. Install the Camera We offer you guides on different scenes in which the camera could be installed. Check out them respectively. Mount the Camera to the Wall 1. Drill holes in accordance with the mounting hole template and screw the security mount to the wall. If you are mounting the camera on any hard surface, insert plastic anchors into the holes first.
2. Install the camera on the security mount. 3. To get the best field of view, loosen the adjustment knob on security mount and turn the camera. 4. Stiffen the adjustment knob to lock the camera.
Attach the Camera to a Tree 1. Thread the provided strap to the mounting plate. 2. Attach the plate to the security mount with the smaller screws. 3. Fasten the security mount to a tree.
4. Install the camera and adjust the camera angles as instructed in Step 2 & 4 in the previous installation guide.