March 2021 QSG1_B_EN Reolink Argus 3 Series Quick Start Guide 58.03.001.0180 @ReolinkTech https://reolink.
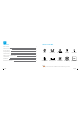
EN What’s in the Box Contents What's in the Box 2 Camera Introduction 3 Set up the Camera 4 Charge the Battery 6 Install the Camera 7 Safety Instructions of Battery Usage 11 Troubleshooting 12 ±ƖĞĐŃȊĐóƭŃŲŦơ 13 vŲƭŃȊĐóƭŃŲŦ ŲĶ !ŲŤƖśŃóŦĐĞ 13 Camera Stand Bracket Security Bracket Loop Strap Reset Needle Micro USB Cable Mounting Template Pack of Screws Surveillance Sign Quick Start Guide NOTE: Ɋ ¨ƵóŦƭŃƭǔ ŲĶ óĐĐĞơơŲƙŃĞơ ǍóƙŃĞơ ǎŃƭľ ėŃȅĞƙĞŦƭ ĐóŤĞƙó ŤŲėĞśơ ƭľóƭ ǔŲƵ ƖƵƙĐľóơĞɔ 1 English
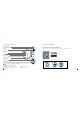
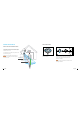
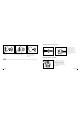
Camera Introduction Set up the Camera Battery Status LED Micro USB Power Port USB Set up the Camera using a Smartphone Step 1 ±ĐóŦ ƭŲ ėŲǎŦśŲóė ƭľĞ ©ĞŲśŃŦŘ ƖƖ ĶƙŲŤ ƭľĞ ƖƖ ±ƭŲƙĞ Ųƙ IŲŲķśĞ ¦śóǔ ơƭŲƙĞɔ Speaker Spotlight Status LED Available on the Lens Daylight Sensor Built-in Mic PIR Motion Sensor Reset Button Ɋ ¦ƙĞơơ ĶŲƙ ŤŲƙĞ ƭľóŦ ȊǍĞ ơĞĐŲŦėơ ƭŲ ƙĞơĞƭ ƭľĞ ėĞǍŃĐĞ ƭŲ ĶóĐƭŲƙǔ ơĞƭƭŃŦķơɔ Power Switch English ON Switch MicroSD (ŃȅĞƙĞŦƭ ơƭóƭĞơ ŲĶ ƭľĞ ơƭóƭƵơ j1(Ɏ 3 ON MicroSD Micro SD Card Slot NOTE:
Step 3 jóƵŦĐľ ƭľĞ ©ĞŲśŃŦŘ ƖƖɏ óŦė ĐśŃĐŘ ƭľĞ ɽ ɾ ďƵƭƭŲŦ ŃŦ ƭľĞ ƭŲƖ ƙŃķľƭ ĐŲƙŦĞƙ ƭŲ óėė ƭľĞ ĐóŤĞƙóɔ ±ĐóŦ ƭľĞ ¨© ĐŲėĞ ŲŦ ƭľĞ ėĞǍŃĐĞ óŦė ĶŲśśŲǎ ƭľĞ ŲŦơĐƙĞĞŦ ŃŦơƭƙƵĐƭŃŲŦơ ƭŲ ȊŦŃơľ ŃŦŃƭŃóś ơĞƭƵƖɔ Charge the Battery Uƭɘơ ƙĞĐŲŤŤĞŦėĞė ƭŲ ĶƵśśǔ ĐľóƙķĞ ƭľĞ ďóƭƭĞƙǔ ďĞĶŲƙĞ ŤŲƵŦƭŃŦķ ƭľĞ ĐóŤĞƙó ŲƵƭėŲŲƙơɔ Devices Cloud You haven't added any device.
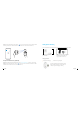
Install the Camera Mount the Camera Notes on Camera Installation Position • Install the camera 2-3 meters (7-10ft) above the ground to maximize the detection range of ƭľĞ ¦U© ŤŲƭŃŲŦ ơĞŦơŲƙɔ ɍ HŲƙ ĞȅĞĐƭŃǍĞ ŤŲƭŃŲŦ ėĞƭĞĐƭŃŲŦɏ ƖśĞóơĞ ŃŦơƭóśś ƭľĞ ĐóŤĞƙó óŦķƵśóƙśǔɔ NOTE: If a moving object approaches the PIR sensor vertically, the camera may fail ƭŲ ėĞƭĞĐƭ ŤŲƭŃŲŦɔ A B 1 Rotate to separate the base ĶƙŲŤ ƭľĞ ďƙóĐŘĞƭɔ Mounting Height: 2-3 Meters PIR Detection Distance: 2-10 Meters  7 English 2 Drill hole
Install the Camera with Loop Strap 3 Screw the camera to ƭľĞ ďƙóĐŘĞƭɔ 4 Adjust the camera angle to ķĞƭ ƭľĞ ďĞơƭ ȊĞśė ŲĶ ǍŃĞǎɔ 5 Secure the camera by turning the part on the bracket ŃėĞŦƭŃȊĞė ŃŦ ƭľĞ Đľóƙƭ ĐśŲĐŘǎŃơĞɔ NOTE: ¾Ų óėŕƵơƭ ƭľĞ ĐóŤĞƙó óŦķśĞ śóƭĞƙɏ ƖśĞóơĞ śŲŲơĞŦ ƭľĞ ďƙóĐŘĞƭ ďǔ ƭƵƙŦŃŦķ ƭľĞ ƵƖƖĞƙ Ɩóƙƭ óŦƭŃĐśŲĐŘǎŃơĞɔ 9 English Thread the loop strap through the slots and ĶóơƭĞŦ ƭľĞ ơƭƙóƖɔ Uƭ Ńơ ƭľĞ most recommended installation method if you plan to mount the camera ƭŲ ƭľĞ ƭƙĞĞɔ Place the Camera
Safety Instructions of Battery Usage Troubleshooting ©ĞŲśŃŦŘ ƙķƵơ Ȓɚ ƙķƵơ Ȓ ¦ƙŲ Ńơ ŦŲƭ ėĞơŃķŦĞė ĶŲƙ ƙƵŦŦŃŦķ ȑȓɚȖ óƭʉĶƵśś ĐóƖóĐŃƭǔ Ųƙ óƙŲƵŦėɲƭľĞɲĐśŲĐŘ śŃǍĞ ơƭƙĞóŤŃŦķɔ Uƭʀơ ėĞơŃķŦĞė ƭŲ ƙĞĐŲƙė ŤŲƭŃŲŦ ĞǍĞŦƭơ óŦė ƭŲ śŃǍĞ ǍŃĞǎ ƙĞŤŲƭĞśǔ ŲŦśǔ ǎľĞŦ ǔŲƵ ŦĞĞė Ńƭɔ jĞóƙŦ ƵơĞĶƵś ƭŃƖơ ŲŦ ľŲǎ ƭŲ ĞǓƭĞŦė ƭľĞ ďóƭƭĞƙǔ śŃĶĞ ŃŦ ƭľŃơ ƖŲơƭɎ ľƭƭƖơɎɚɚơƵƖƖŲƙƭɔƙĞŲśŃŦŘɔĐŲŤɚľĐɚĞŦɲƵơɚóƙƭŃĐśĞơɚȒȕȏȏȏȕȘȘȐȗȘȒ Camera Is Not Powering on Ȑɔ ¾ľĞ ďóƭƭĞƙǔ Ńơ ďƵŃśƭɲŃŦɏ ơŲ ėŲ ŦŲƭ ƙĞŤŲǍĞ Ńƭ ĶƙŲŤ ƭľĞ ĐóŤĞƙóɔ ȑɔ !ľóƙķĞ ƭľĞ ƙĞĐľóƙķĞóďśĞ ďóƭƭĞƙǔ
• Set your password using only the characters óǍóŃśóďśĞ ŲŦ ƭľĞ ŘĞǔďŲóƙėɔ If these won't work, please contact Reolink Support ơƵƖƖŲƙƭʿƙĞŲśŃŦŘɔĐŲŤ ±ƖĞĐŃȊĐóƭŃŲŦơ Video 13 General Operating Temperature: ɲȐȏˆ! ƭŲ ȔȔˆ! ɦȐȓˆH ƭŲ ȐȒȐˆHɧ ÞĞóƭľĞƙ ©ĞơŃơƭóŦĐĞɎU¦ȕȔ ĐĞƙƭŃȊĞė ǎĞóƭľĞƙƖƙŲŲĶ ±ŃǞĞɎ ȐȑȐ Ǔ Șȏ Ǔ Ȕȕ ŤŤ ÞĞŃķľƭ ɦ óƭƭĞƙǔ ŃŦĐśƵėĞėɧɎ ȒȒȏķ ɦȐȐɔȕ ŲǞɧ HŲƙ ŤŲƙĞ ơƖĞĐŃȊĐóƭŃŲŦơɏ ǍŃơŃƭ ľƭƭƖơɎɚɚƙĞŲśŃŦŘɔĐŲŤɚɔ HŃĞśė ŲĶ ÝŃĞǎɎ Ȑȑȏˆ ėŃóķŲŦóś Night Vision: Up to 10m (33 ft) vŲƭŃȊĐóƭŃŲŦ ŲĶ !ŲŤƖśŃóŦĐĞ PIR Detection & Alerts FC
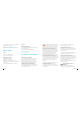
and other relevant provisions of Directive ȑȏȐȓɚȔȒɚ1Åɔ Correct Disposal of This Product This marking indicates that this product should not be disposed with other household wastes ƭľƙŲƵķľŲƵƭ ƭľĞ 1Åɔ ¾Ų ƖƙĞǍĞŦƭ ƖŲơơŃďśĞ ľóƙŤ to the environment or human health from uncontrolled waste disposal, recycle it ±ŃŤƖśŃȊĞė 1Å (ĞĐśóƙóƭŃŲŦ ŲĶ !ŲŦĶŲƙŤŃƭǔ responsibly to promote the sustainable reuse ŲĶ ŤóƭĞƙŃóś ƙĞơŲƵƙĐĞơɔ ¾Ų ƙĞƭƵƙŦ ǔŲƵƙ ƵơĞė device, please use the return and collection systems or contact the retailer