
User manual


ThisisapublicationbyConradElectronicSE,Klaus-Conrad-Str.1,D-92240Hirschau(www.conrad.com).
All rights including translation reserved. Reproduction by any method, e.g. photocopy, microlming, or the capture in electronic data
processingsystems requirethepriorwrittenapprovalbytheeditor.Reprinting,alsoinpart,is prohibited.This publicationrepresent the
technicalstatusatthetimeofprinting.
©Copyright 2014 byConradElectronicSE. V1_0614_02-KV
Installation
Heedallinformationcontainedinthechapter“Preparinginstallation”.
Makesurethatthecablesarenotsqueezed,bentordamagedinanyother
way.Donotexertanyforcewheninstallingtheproduct.
• Removethewallmountfromthebacksideoftheproduct.Inordertodoso,unscrew
thetwocapnuts.
• Usethewallmountastemplateandmarkthepositionofbothboreholesthroughthe
twobigscrewholesontothewall.
Whendrillingortighteningscrews,makesurenottodamageanycables,
wiresorpipeslocatedunderneaththesurface.
Fig.1
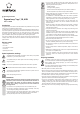
• Drill bothholesinthewall and insert the dowels. Attachthewallmountto the
mountingbaseusingthetwoscrewsandtoothlockwashers(g.1).
• Removethecoverfromtheterminalblock.
• Connectthemainscordwiththeterminalblock(g.2):
Fig.2
Bluecable=N/neutralwire
Browncable=L/phase
Green/yellowcable=PE/groundwire;groundingsymbol
The ground wire must be connected to the terminal block under all
circumstances.
Makesurethatthecablesarenotbarefortoolongasthismaycauseshort-
circuiting.
Makesurethatallscrewconnectionsonbothsidesoftheterminalblock
aretight.
• Reattachthecovertotheterminalblock.
• Placetheproductonthethreadedendsofthewallmount.Whendoingso,make
surethewiresdonotgetpinchedorjammed.
• Attachtheproducttothewallmountusingthepreviouslyremovedcapnuts.
• Insertasuitableilluminant(notincluded)intothesocket.Observetheinformation
containedunderTechnicalData.
• Connectthemainsvoltageandcheckthefunctioningoftheproduct.
Iftheilluminantdoesnotlightup,cutthepowersupplyimmediately(remove
thefuseorturnothecircuitbreaker).
Thenchecktheconnectiontothepowercircuit.
Incaseofdoubt,contactaprofessional(i.e.anelectrician).
Replacing the illuminant
Beforereplacingtheilluminant,lettheproductcooldownsuciently.Ifthe
illuminantisnotcooleddownsucientlyandyoutouchit,thereisariskof
burning!
• Makesuretheproductisturnedo.
• Removethedefectiveilluminantandinsertanewone.
Maintenance and cleaning
Donotuseanyaggressive,chemicalorabrasivecleaningagentsasthese
maycausesurfacediscolorationorevenchangesinthematerial.
• The product is maintenance-free except for any light replacement required or
occasionalcleaning.
• Turnotheproductandletitcooldownsucientlybeforecleaning.
• Useaclean,softanddryclothforcleaningtheproduct.Youcaneasilyremovedust
usingaclean,softbrushoravacuumcleaner.
• Donotcleantheproductwithwater.
Disposal
Electronicdevicesarerecyclablewasteandmustnotbedisposedofinthe
householdwaste.
At the end of its service life, dispose of the product according to the
relevantstatutoryregulations.
Youthusfullyourstatutoryobligationsandcontributetotheprotectionof
theenvironment.
Technical data
Operatingvoltage................................220-240V/AC,50Hz
Power....................................................max.40W
Illuminant..............................................1xG9
Protectionclass..................................I
Material................................................Gypsum
Operatingconditions..........................0to+40°C,30–90%RH(non-condensing)
Storageconditions..............................-20to+50ºC,10–70%RH(non-condensing)
Dimensions(WxHxD)......................200x85x120mm
Weight...................................................approx.795g