
User manual

49
• Before closing the lid again, adjust the unit for the temperature display if necessary.
For this, push the slider B1 either to the position °C to display the temperature in °C or
to °F.
• Last, close the battery compartment lid again. Push it down until it latches.
• This completes the general commissioning of the projection radio alarm clock.
You can operate the projection radio alarm clock without the plug-in mains
adapter this way. However, the display will only be lit and the projection
switched on when the button “SNOOZE/LIGHT” (A2) is pushed. This lasts
about 5 seconds.
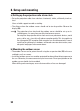
c) Connecting the plug-in mains adapter
Connecting the plug-in mains adapter will switch to permanent lighting of the
display and permanent projection as the standard setting.
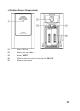
• Connect the output of the plug-in mains adapter to the intended socket B10 at the rear
of the projection radio alarm clock.
• Now plug the mains adapter into a mains socket.
Now the display lighting should go on automatically and a projection should appear.
You can deactivate both permanent display lighting and permanent projection.
• To deactivate permanent projection, push the switch “PROJECTION ON” (B7) from
“ON” to the left.
• To deactivate permanent display lighting, push the switch “LIGHT ON” (B8) from
“ON” to the left.
• When one of the two functions is deactivated, it can still be activated for 5 seconds
with the button “SNOOZE/LIGHT” (A2).