
User manual


Preparation for mounting
Pay attention to the "Safety instructions" section.
Attention! The product must only be installed by a qualied electrician
who is familiar with the relevant regulations (e.g. VDE)! By carrying out
improper work on the mains voltage you endanger not only yourself, but
also others! If you do not know how to mount the product, get an expert to
do it for you; do not mount it yourself.
• Only mount the product in dry, storm-free conditions.
• Only mount the light on a stable surface.
• The light must be protected with a 10/16A fuse at the sub-distribution. An earth
leakage circuit breaker must be installed before this.
• The light may only be installed when it is disconnected from the power supply. It is
not sucient just to turn o the light switch!
• Isolate all poles of the mains cable from the mains supply by removing the electric
circuit fuse or switching o the circuit breaker. Then turn o the earth leakage
circuit breaker. Protect it against an unauthorised restart, e.g. with a danger sign.
• Before mounting the product, always check that the power supply to which you will
connect the light is turned o! Use a suitable measuring device to ensure that the
power supply is isolated.
Mounting and connection
Pay attention to the information in the "Preparation for mounting" section.
Ensure that no existing cables or pipes (including water pipes) are
damaged when drilling mounting holes or securing screws.
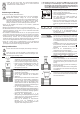
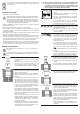
• Unscrew the screws using the Allen key provided and
then remove the stainless steel light cover.
• Remove the lamp glass with the rubber seal.
• Remove the screws underneath using a suitable
screwdriver, then separate the stainless steel light
housing from the plastic mounting housing.
• Use the mounting housing as a template to prepare the
mounting hole in concrete or brickwork.
• Equip the bottom of the mounting hole with the
necessary casing for the electrical cables.
• When mounting the product in damp areas, a 30 cm
thick drainage layer of gravel/grit must be placed under
the deepest part of the recessed oor luminaire. If the
mounting surface is suitable, you can also allow water
to drain directly into the ground. You do not need to
create a drainage system if you mount the light on a
wall.
• To check the water can drain properly, insert the
mounting housing in the mounting hole and ll it with
water. Start a stopwatch. If all the water has drained
completely after 30 minutes, this indicates that the
drainage system is working properly.
• Insert the mounting housing into the mounting hole,
ensuring that you will be able to easily insert cables
during subsequent steps. If necessary, you can also
set the mounting housing in concrete.
• Insert the mains cable through the cable opening into
the mounting housing. If you need to connect the light
to other lights, guide the cable back out of the housing.
Ensure that the thread holes are aligned correctly (only necessary for
item no. 1398969) to ensure that the stainless steel light housing will sit in
the correct position. After you set the mounting housing in concrete, you will
not be able to turn it with the screw holes to align the light housing.
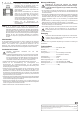
• Pierce the rubber cable hole built into the light housing
with a round, pointed object.
• Insert the mains cable through the cable hole into the
light housing.
• If necessary, seal the hole with silicon to guarantee the
protection rating (IP67).
• If a second cable is not required, the corresponding
cable hole should remain closed with a cable plug. If
necessary, seal the other cable hole with silicon.
• If you are going to connect several recessed oor
luminaires together, guide the cables out of the lamp
housing for the other lamps.
• You can connect up to 10 recessed oor luminaries
in parallel to a mains connection and control them
together.
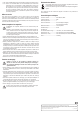
10 mm
6 mm
• Remove the outer insulation on the mains cable to a
maximum length of about 16 mm. Strip the insulation
on each of the three wires on the mains cable to a
length of about 6 mm. The protective earth cable
(yellow-green cable) should be at least 6 mm longer so
that it remains the last cable in the screw terminal in
the event of a fault.
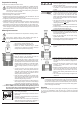
• The neutral wire should be connected to "N", the live
wire (phase) to "L" and the protective earth to the
clamping point with the " " symbol.
• Pull the light bulb holder and the screw terminal out of
the light housing.
• Connect the wires for the next light in the circuit to the
corresponding terminals (parallel circuit).
• Remove the snap ring on the light bulb holder.
• Remove the protective cap from the light bulb holder,
then insert the bulb (not included) into the holder and
ensure that it locks in place.
• Insert the light bulb holder into the light housing
together with the cables.
• Place the light bulb onto the light housing and secure it
by inserting the snap ring into the holding slot.
• Insert the light housing into the mounting housing in
the correct position. Use a screwdriver to screw them
together.
• Insert the lamp glass into the rounded groove together
with the rubber seal. Do not touch the lamp glass and
ensure that you do not leave behind any ngerprints or
other dirt.
• Ensure that the lamp glass is inserted in the correct
orientation. The printed symbols must be visible
(not upside down).
• Replace the stainless steel light cover and tighten the
screws using the Allen key. Ensure that the seal is
clean and watertight. There should be no dirt (such as
leaves or sand) remaining underneath the cover or the
light cover.
• Turn on the power supply to the light. The light is now
ready to use.
You are advised to install a switch to turn the light on/o. If you wish to
connect a plug (not included) to the mains cable, you must ensure that there
is an extension cable or a mains socket available near to where the light is
mounted. These components are not included with the product. Ensure that
all components used correspond to the necessary protection rating (splash-
proof sockets, plugs and switches).
Operation
To turn on the light, turn on the power supply corresponding to your setup method,
e.g. turn on the switch/dimmer, insert the mains plug or activate the connected
switching device (infra-red sensor switch). (These components are not included with
the product.)