
User manual


• Use the wall mount as a template to mark the xing
points on the surface. Pay attention to the orientation
of the light base.
• Drill two holes for the dowels into the mounting
surface. (If you are using a wooden surface, you can
directly screw the wall mount to the surface. However,
you should still drill holes even when using wood. The
dowels are not required in this case.)
• Insert the dowels into the drilled holes.
• Pierce the rubber cable hole with a round, pointed
object.
• Guide the mains cable through the hole.
• Secure the wall mount to the surface using the screws
provided.
10 mm
6 mm
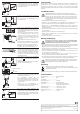
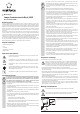
• Remove the outer insulation on the mains cable to a
maximum length of about 16 mm. Strip the insulation on
each of the three wires on the mains cable to a length
of about 6 mm. The earth cable (yellow-green cable)
should be at least 6mm longer so that it remains the
last cable in the screw terminal in the event of a fault.
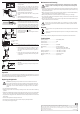
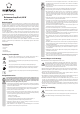
• The neutral wire should be connected to "N", the live
wire (phase) to "L" and the protective earth to the
clamping point with the " " symbol.
• Secure the light to the wall mount using the screws on
the top and bottom.
• Insert the light bulb (not included) into the holder (turn
the light bulb in a clockwise direction).
• Place the light cover back onto the base. The cover
can be inserted in two dierent positions at 180° to
each other. The screws must t into the grooves on
the cover.
• Fix the light cover to the base by screwing the side
screws that you previously removed into the grooves
on the cover.
• You can adjust the radial position of the cover slightly
before securing it by turning it when the screws are
still loose.
• Turn on the power supply to the light. The light is now
ready to use.
Operation
To turn on the light, turn on the power supply corresponding to your setup method, e.g. turn on the
switch/dimmer, insert the mains plug or activate the connected switching device (infra-red sensor
switch). (These components are not included with the product.)
Replacing the light bulb
WARNING! Light bulbs get very hot when turned on and constitute a re hazard!
Turn the light o and let the light bulb cool down for at least 10 minutes before you
replace it. Do not touch the light bulb with bare hands. Contaminants on the skin's
natural layer of fat can reduce the lifespan of the light bulb. Use a clean towel or
gloves.
• Turn o the power supply to the light.
• Remove the light cover from the base by removing the two side screws with the Allen key
provided.
• Remove the used/defective light bulb from the light bulb socket by turning it in an anticlockwise
direction. You do not need to remove the light bulb when using the product for the rst time.
• Only replace the old light bulb with a model that conforms to the specications in the "Technical
data" section.
• Insert the new light bulb into the light bulb socket.
• Fix the light cover onto the base using the screws that you previously removed.
• Turn on the power supply to the light.
L = brown or black
N = blue
= green / yellow
Maintenance and cleaning
Never use aggressive and abrasive detergents, rubbing alcohol or other chemical
solutions, as these could damage the casing or even impair the functioning of the
product.
• The product does not require any maintenance apart from occasionally changing the light bulb.
Leave all other maintenance or repair work to an expert. Repairs must only be carried out using
original replacement parts!
• When carrying out any work on the product (including cleaning), you must not wear metallic or
conductive jewellery such as necklaces, bracelets and rings.
• Never point a garden hose or a pressure washer etc. at the product (e.g. for cleaning)!
• Turn o the mains voltage for the lamp before cleaning or disconnect it from the mains; let the
lamp cool down suciently.
• You can use a clean, soft and dry cloth to clean the light. Dust can be easily removed using a
clean and soft brush and a vacuum cleaner.
Ensure that the two drainage outlets on the bottom of the base are always
unobstructed so that there is sucient ventilation and to allow any water inside the
base to drain.
Disposal
Electronic devices are recyclable waste and must not be disposed of in the household
waste.
At the end of its service life, dispose of the product according to the relevant statutory
regulations.
You thus full your statutory obligations and contribute to the protection of the environment.
Technical data
Operating voltage.........................................220 - 240 V/AC, 50 Hz
Protection type ............................................. IP44
Protection class ...........................................I
Power consumption.....................................max. 46 W
Base material................................................Die-cast aluminium
Bulb ............................................................... E27, standard bulb (max. 46 W),
LED/energy-saving bulb (max. 11 W)
Operating conditions ................................... -20 to +40 °C, 5 - 85 % RH
Storage conditions.......................................-20 to +50 °C, 5 - 85 % RH
Dimensions (W x H x D)...............................167 x 200 x 177 mm
Weight ............................................................ approx. 742 g
This is a publication by Conrad Electronic SE, Klaus-Conrad-Str. 1, D-92240 Hirschau (www.conrad.com).
All rights including translation reserved. Reproduction by any method, e.g. photocopy, microlming, or the capture in electronic data
processing systems require the prior written approval by the editor. Reprinting, also in part, is prohibited. This publication represent the
technical status at the time of printing.
© Copyright 2016 by Conrad Electronic SE. V2_0216_02-HK