
User`s manual


SuperH Family E10A-USB Emulator for Multi-core Microcomputers Section 3 Preparation before Use
R20UT0363EJ0500 Rev. 5.00 Page 37 of 296
Aug 10, 2012
3.9 System Check
Before executing software, follow the procedure below to check that the emulator is connected
correctly. At this point, use the tutorial workspace that is provided with the product and start up
the High-performance Embedded Workshop for CPU0 only.
Refer to section 4, Preparations for Debugging, for the other activating method to create a new
project or use an existing workspace.
1. Connect the emulator to the host computer.
2. Connect the user system interface cable to the connector of the emulator.
3. Connect the user system interface cable to the connector in the user system.
4. Select [Renesas] [High-performance Embedded Workshop] [High-performance
Embedded Workshop] from the [Program] item in the [Start] menu.
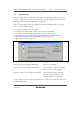
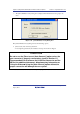
5. [Welcome!] dialog box is displayed.
Figure 3.15 [Welcome!] Dialog Box
[Create a new project workspace] radio button: Creates a new workspace.
[Open a recent project workspace] radio button: Uses an existing workspace and displays
the history of the opened workspace.
[Browse to another project workspace] radio button: Uses an existing workspace; this radio
button is used when the history of the
opened workspace does not remain.
To use a workspace for the tutorial, select the [Browse to another project workspace] radio button
and click the [OK] button.