REJ10J1330-0200 Renesas Starter Kit for 7542 Tutorial Manual (for M3T-SRA74) RENESAS SINGLE-CHIP 8-BIT CMOS MICROCOMPUTER 740 FAMILY Rev.2.00 Revision date: Aug.10,2007 Renesas Solutions Corp. www.renesas.
Table of Contents Chapter 1. Preface .................................................................................................................................................. 1 Chapter 2. Introduction............................................................................................................................................ 2 Chapter 3. Tutorial Project Workspace ...................................................................................................................
Chapter 1. Preface Cautions This document may be, wholly or partially, subject to change without notice. All rights reserved. Duplication of this document, either in whole or part is prohibited without the written permission of Renesas Solutions Corporation. Trademarks All brand or product names used in this manual are trademarks or registered trademarks of their respective companies or organisations. Copyright © Renesas Solutions Corporation. 2007. All rights reserved. © Renesas Technology Europe Ltd.
Chapter 2.
Chapter 3. Tutorial Project Workspace The workspace includes all of the files for two build configurations. The tutorial code is common to both the Debug and the Release build configurations. The tutorial is designed to show how code can be written, debugged then downloaded in a ‘Debug’ situation. The build configuration menu in High-performance Embedded Workshop allows the project to be configured such that certain files may be excluded from each of the build configurations.
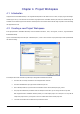
Chapter 4. Project Workspace 4.1. Introduction High-performance Embedded Workshop is an integrated development tool that allows the user to write, compile, program and debug a software project on any of the Renesas Microcontrollers. High-performance Embedded Workshop will have been installed during the installation of the software support for the Renesas Starter Kit product. This manual will describe the stages required to create and debug the supplied tutorial code. 4.2.
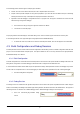
The next dialog presents the three types of example project available: 1. Tutorial: This is the one of interest at this time; the code is explained later in this manual. 2. Sample code: this provides examples for using various peripherals. If you select this and click it will open a new dialog allowing the selection of many code examples for the peripheral modules of the device. 3. Application: where the debugger is configured but there is no program code.
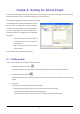
Chapter 5. Building the Tutorial Project The tutorial project build settings have been pre-configured in the tool-chain options. To view the tool chain options select the ‘Build’ menu item and the relevant tool-chain. This should be the first option on the drop down menu. The dialog that is displayed will be specific to the tool-chain selected. The Configuration pane on the left hand side will exist on all the tool-chain options.
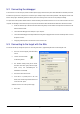
5.2. Connecting the debugger For this tutorial it is not necessary to provide an external power supply to the board. The power will be obtained from the USB port. Please be aware that if you have too many devices connected to your USB port it may be shut down by Windows. If this happens remove some devices and try again. Alternatively provide an external power source taking care to ensure the correct polarity and voltage.
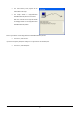
• The Flash Memory write program will be downloaded to the target. • The Output window in High-performance Embedded Workshop will show ‘Connected’ Note: The connection to the target will activate the debugger buttons on the High-performance Embedded Workshop toolbar. Now is a good time to save the High-performance Embedded Workshop session. • Select ‘File’ | ‘Save Session’. If you have changed any workspace settings now is a good time to save the workspace. • Select ‘File’ | ‘Save Workspace’.
Chapter 6. Downloading and Running the Tutorial Once the code has been built in High-performance Embedded Workshop it needs to be downloaded to the Renesas Starter Kit itself. There will now be an additional category in the workspace view for ‘Download Modules’ • Right click on the download module listed and select ‘Download’. Note: The output display will show “Flash memory write end” to confirm the completion of the download.
• Place a breakpoint at the call to InitialiseDisplay subroutine. Breakpoints can only be set when the E8a is connected to the target and the module is downloaded. Breakpoints can be set by double-clicking in the grey column containing the PC arrow next to the line to break at; or selecting the line and pressing F9; or right click on the line and select ‘Toggle breakpoint’. Alternatively set an eventpoint, by double-clicking in the column to the left of the breakpoint column.
• Right click on the call to FlashLEDs subroutine and select ‘Go To Cursor’ as illustrated. The code will execute to the selected line and stop. An automatic breakpoint was inserted in the code and then removed after calling the break. • Press ‘Step Over’ on the debug toolbar. The code will run and flash the LEDs 200 times. The debugger will not exit until all 200 flashes have completed or a button is pressed on the Renesas Starter Kit.
• Press on the debug toolbar. • Press ‘CTRL-B’ to open the breakpoint window. This dialog is not available if user debugged using eventpoints as suggested at top of page 10. ‘CTRL-E’ will open the eventpoint window. Eventpoints can be viewed in Breakcondition tab of event window. • Press . • Press . • Open the file ‘main.a74’ • Insert a breakpoint on Statics_Test subroutine.
The dialog will close and a new pane will open in the workspace containing the variable. • Press In the ASCII column on a Memory Window, it is possible to see that the string has been successfully initialised to ‘ STATIC ‘. • Set a breakpoint on the call to DisplayString subroutine inside the for loop. • Press ‘Go’ to run the code from the current PC position. • Press ‘Step Over’ on the debug toolbar.
Chapter 7. Project Files 7.1. Standard Project Files Each of the tutorial files has detailed comment text describing the function of each code entry. Please refer to the source code for greater detail on the purpose and operation of the assembler specific details. 7.1.1. Main tutorial code (main.a74 / main.inc) This is the entry point of the main tutorial code.
7.1.2. Board initialisation code (hwsetup.a74) There are two stages to the configuration of the microcontroller device. The code to demonstrate this is therefore split into two functions. Each function is written specifically for the device supported. The function calls are shown below.
Chapter 8. Additional Information For details on how to use High-performance Embedded Workshop, refer to the High-performance Embedded Workshop manual available on the CD or from the web site. Further information available for this product can be found on the Renesas website at: http://www.renesas.com/renesas_starter_kits General information on Renesas Microcontrollers can be found at the following websites. Global: http://www.renesas.
Renesas Starter Kit for 7542 Tutorial Manual (for M3T-SRA74) Publication Date Rev.2.00 Aug.10,2007 Published by: Renesas Solutions Corp. 4-1-6, Miyahara, Yodogawa-ku, Osaka City, 532-0003, Japan ©2007 Renesas Solutions Corp., Renesas Technology Europe Ltd. and Renesas Technology Corp., All Rights Reserved.
Renesas Starter Kit for 7542 Tutorial Manual (for M3T-SRA74) Renesas Solutions Corp.