REJ10J0746-0110 R8C/15, R8C/17 StarterKit Tutorial RENESAS SINGLE-CHIP MICROCOMPUTER M16C FAMILY / R8C/Tiny SERIES Rev.1.10 Revision date : Mar 01, 2005 Renesas Solutions Corp. www.renesas.
Keep safety first in your circuit designs! 1. Renesas Technology Corporation puts the maximum effort into making semiconductor products better and more reliable, but there is always the possibility that trouble may occur with them. Trouble with semiconductors may lead to personal injury, fire or property damage.
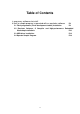
Table of Contents 1.accessory softwares to install 2.Until a sample program is operated with an emulator software P4 2.1 Flash programmer (Flash development toolkit) Installation P4 2.2 Emulator Software, C Compiler and High-performance Embedded Workshop Installations P10 2.3 USB driver installation P14 2.
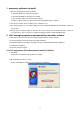
1. accessory softwares to install 1) Note the following points before installing. a) The M3T-NC8C has already been installed. b) The M3T-NC30WA has already been installed. c) The emulator software has already been installed. Install the software attached to this product after uninstalling the above software. 2) The directory and file names including space cannot be used. 3) The sample program uses C compiler, High-performance Embedded Workshop and emulator software to this product.
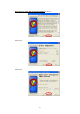
Click “OK”.
Only when you agree with License Agreement, click "Yes". Click “Next”. Click “Next”.
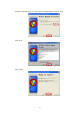
Remove a check. Click “Next” Click “Next”. Refer to a new folder name, or select from the existing folder list and Click “Next”.
Refer to a new folder name, or select from the existing folder list and Click “Next”. Click “Next”. Click “Install”.
Click “finish”.
2.2 Emulator Software, C Compiler and High-performance Embedded Workshop Installations 1) Installation Double-click an installer of CD-ROM ¥ dlp_tool ¥. 2) Installation procedures are described below. Select the language to be used and click “Next”.
Only when you agree with License Agreement, click "Yes". Select all and click “Next” Refer to a new folder name, or select from the existing folder list and click “Next”.
Refer to a new folder name, or select from the existing folder list and click “Next”. Click “Yes” Check the setting before starting the installation and if the setting is correct, click “Next”.
Check the setting before starting the installation and if the setting is correct, click “Next”. Then, a copy will be started. Click “Finish”.
2.3 USB driver installation Connect the E8 emulator using the USB cable to the USB port of host machine. Installation procedures are described below. If the E8 emulator is connected, it is recognized as a new hardware. Click “Next” after selecting “Install the software automatically”. Click “Continue”. Microsoft has advocated authentication of the USB drivers to the USB vendors in the Microsoft® Windows® XP and Windows®-based operating systems released after Microsoft® Windows® XP.
Renesas USB drivers are not authenticated by Microsoft, but we provide them based on the sufficient examination. Insert CD-ROM and specify ¥dlp_tool¥DRIVERS¥USB¥XP¥. Click “OK”. Click “Finish”. The installation is completed above.
Installation procedures are described below. If E8 emulator is connected, it is recognized as a new hardware. Click “Next” and start installing a driver. Put a check into “search for the best driver for your device” and click “Next”. Insert CD-ROM and Put a check into “Specify a location”. Specify ¥dlp_tool¥DRIVERS¥USB¥ME¥ (or ¥98¥) and click “Next”.
Click “Next”. Click “Finish”. The installation is completed above.
2.4 Operate Sample Program 1) Copy ¥Japanese¥M3A0115_17¥PROGRAM¥ in CD-ROM to the given folder. 2) Change a file attribute Since the copied file attribute is set to “read-only”, change it to the attribute which can be read or written. Select “Property” of the copied folder and set to the attribute which can be read or written. Remove a check of “Read-only” and click “Apply”.
Click “OK”. The installation is completed above.
Select all files in the copied folder by a mouse. Select “File” and “Property”. Remove a check of “Read-only” and click “Apply”.
Click “Close”. Perform this setting to files in all folders of “3min_timer” and “ad_onkai”. The installation is completed above.
3) Connect a target board Use a user cable to the E8 emulator and connect a target board. Perform the below setting for the jumper setting of a target board. JP1 : “AN8” JP2 : “BZ” JP No.
4) Compile a sample program The example of the musical scale program (ad_onkai.hws) is shown below. (1) Start High-performance Embedded Workshop Select “program” of start menu - “Renesas” - “High-performance Embedded Workshop” “High-performance Embedded Workshop” and click. (2) Select “refer to another project work space” and click “OK”. (3) Select the folder which is copied at 1) to “File location”. Select ad_onkai.hws and click “Open”.
(4) Select “R5F21174” for Device and put a check into “Download emulator firmware” for Mode. Click “OK”. (5) When 5V power supply is performed from E8, put a check into “Power supply is carried out”. Select 5.0V and click “OK”. (6) Select location to download a firmware and click “OK”. (8) If clicking “Build” of menu - “All build” and compile. The installation is completed above. 5) Execute a program (1) Download a program Click “Debug” - “Download” - “ad_onkai.x30”.
(3) Execute Click “Debug” - “Execute”. (4) If clicking “Debug” - “Stop a program”, a program will stop. When executing the program again, click “Debug” - “Execute”. When a program execution starts, LED1(red) lights up. When pressing SW4 on the target board, the buzzer starts sounding. When pressing SW4 again, the buzzer stops sounding. When a program execution starts, LED1(red) lights up.
REVISION HISTORY Rev. Description Date Page 0.10 2004.08.18 1.00 2005.02.01 Summary - First edition issued - It changed from FDTlight to flash programmer (Flash Development Toolkit). The installation method changed, too. 1.10 2005.03.
R8C/15, R8C/17 StarterKit Tutorial Publication Date Rev.1.10 Mar 01, 2005 Published by: Renesas Solutions Corp. 4-1-6, Miyahara, Yodogawa-ku, Osaka City, 532-0003, Japan ©2005 Renesas Technology Corp. and Renesas Solutions Corp., All Rights Reserved. Printed in Japan.
R8C/15, R8C/17 StarterKit Tutorial Renesas Solutions Corp.