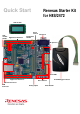
Renesas Starter Kit for H8S/2472 Quick Start LCD module Reset Switch LCD module header Application interfaces Serial Port E10 Enable Header DC power in User LEDs Application interfaces E10A debugger interface User switches Ethernet Connector USB Connector Analog adjust E10A Header
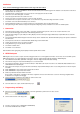
Installation Do not connect the E10A debugger hardware until the software support has been installed. 1. 2. 3. 4. 5. 6. 7. 8. 9. Insert the CD into your computer’s CD-ROM drive. The CD should automatically run the installation program. If the installer does not start, browse to the CD root folder and double click on ‘setup.exe’. The installer will ask you which language is to be used, please choose the appropriate one and click . On the first screen of the installer proper, click .
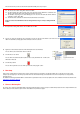
If this isn’t the first time you have used the E10A module with this RSK, please skip to step 36. First use of the E10A module 32. The ‘Please choose driver’ dialog will be shown. Click 33. The ‘Driver Details’ dialog will be shown, please select “Renesas E-Series USB Driver” as illustrated. The ‘Interface’ and ‘Channel’ items will be automatically populated. Click . 34. The Firmware setup dialog will be shown warning you not to disconnect the USB cable until the firmware download is complete.
6. Support Online technical support and information is available at: www.renesas.com/renesas_starter_kits Technical Contact Details America: techsupport.rta@renesas.com Europe: tools.support.eu@renesas.com Japan: csc@renesas.com Note on Autoupdate: The Autoupdater is configured to automatically add itself to the Startup folder in the Windows Start Menu and use the registry defaults for access to the web. After restarting the machine the Icon will appear in the System Tray next to the clock.