
Instruction manual


Maintenance and Test Procedures
46
Access Control Design Guide
Installing the Renesas Flash Development Toolkit
To install the Renesas Flash Development Toolkit:
1. Go to www.renesas.com, and select your region.
2. Enter the search string "Flash Development Toolkit" and click the first result.
3. Click Downloads.
4. Search for the evaluation version of the Flash Development Toolkit, v3.07, and download it to your
computer.
5. Double-click the downloaded exe file, and follow the prompts. Accept all defaults.
You may be requested to perform an automatic update to v4.00. It is recommended that you do not
perform the upgrade; the procedure documented in this guide has been tested against v3.07 only.
Configuring the Flash Development Toolkit
The toolkit must be configured the first time it is used, as follows:
1. Connect one end of the programming interface to a serial port of your PC. Connect the other end to
the 6-way socket on the database unit/controller (see page 45). You will need to remove the overlay
to access the socket. The red wire must connect to pin 1; this is marked by the removed corner from
the box drawn around the socket on the silkscreen.
2. Switch on the database unit/controller (if it is not already switched on).
Note: There is no need to disconnect the network or serial port at a database unit, since the upgrade
process will reset communications.
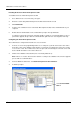
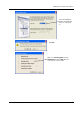
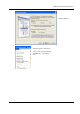
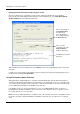
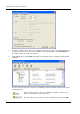
3. From the Windows Start menu, start Flash Development Toolkit 3.07 Basic.
4. Follow the prompts:
Select Generic BOOT
Device
.