
Emulation Pod User's Manual
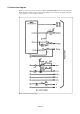


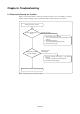
Table Of Contents
- Preface
- Contents
- 1. Precautions for Safety
- 2. Preparation
- 3. Setting Up
- 4. Usage
- 5. Specifications
- 6. Troubleshooting
- 6.1 Flowchart to Remedy the Troubles
- 6.2 When the Emulator Debugger Does Not Start Up Properly
- 6.3 Operation Differs from That of PROM Version MCUs
- (1) Does Not Operate with Operating Frequencies (3.6 V to 5.5 V) Properly
- (2) Does Not Operate with Operating Frequencies (2.7 V to 3.6 V) Properly
- (3) Cannot Reset from Target System
- (4) Data Values of ROM Area at Power-on Are Different
- (5) HOLD* control
- (6) A-D Conversion Values are Different from Expected Values
- (7) Outputs of ALE, Address and Others are Different from Those of Actual MCUs
- 7. Maintenance and Guarantee
( 68 / 78 )
Chapter 6. Troubleshooting
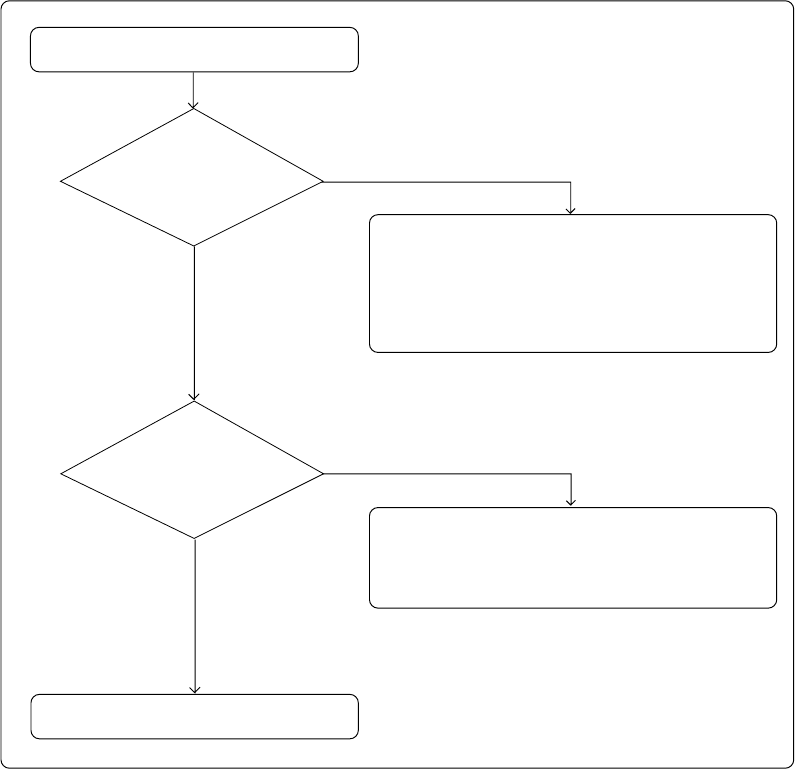
6.1 Flowchart to Remedy the Troubles
Figure 6.1 shows the flowchart to remedy the troubles from when power to the emulator is activated
until the emulator debugger starts up. Check this while the target system is disconnected.
Figure 6.1 Flowchart to remedy the troubles
LED status not normal
Display not normal.
Error displayed.
Turning on the power of PC4701
Program window of emulator debugger displayed
Front panel LED status of
PC4701
Init dialog box of emulator
debugger displayed
1. Check the operating environment etc. of the emulator
debugger.
See the user's manual of the emulator debugger.
2. Reinstall the emulator debugger.
1. Check emulator system connections.
See, "3.4 Connecting the PC4701 and Emulation Pod"
(page 33).
2. Redownload the firmware.
See "4.2 Downloading Firmware" (page 40).
3. Restart the PC4701 system.