
Emulation Pod User's Manual
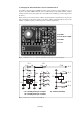
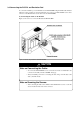
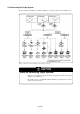


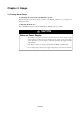
Table Of Contents
- Preface
- Contents
- 1. Precautions for Safety
- 2. Preparation
- 3. Setting Up
- 4. Usage
- 5. Specifications
- 6. Troubleshooting
- 6.1 Flowchart to Remedy the Troubles
- 6.2 When the Emulator Debugger Does Not Start Up Properly
- 6.3 Operation Differs from That of PROM Version MCUs
- (1) Does Not Operate with Operating Frequencies (3.6 V to 5.5 V) Properly
- (2) Does Not Operate with Operating Frequencies (2.7 V to 3.6 V) Properly
- (3) Cannot Reset from Target System
- (4) Data Values of ROM Area at Power-on Are Different
- (5) HOLD* control
- (6) A-D Conversion Values are Different from Expected Values
- (7) Outputs of ALE, Address and Others are Different from Those of Actual MCUs
- 7. Maintenance and Guarantee

( 38 / 78 )
Chapter 4. Usage
4.1 Turning On the Power
(1) Checking the Connection of the Emulator System
Before turning the power ON, check the connection of the PC4701, emulation pod, converter board
and target system.
(2) Turning On the Power
Power ON/OFF the target system and the PC4701 as simultaneously as possible.
CAUTION
Notes on Power Supply:
•The emulator's VCC pin is connected to the target system in order to monitor target
system voltage. For this reason, the emulator cannot supply power to the target
system. Therefore, provide the target system with a separate power supply from that
of the emulator.
• Keep target system power supply voltage within the MCU's specified range.
• Do not change target system power supply voltage after power has been activated.