
Emulation Pod User's Manual
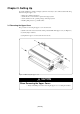
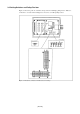
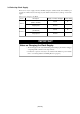
Table Of Contents
- Preface
- Contents
- 1. Precautions for Safety
- 2. Preparation
- 3. Setting Up
- 4. Usage
- 5. Specifications
- 6. Troubleshooting
- 6.1 Flowchart to Remedy the Troubles
- 6.2 When the Emulator Debugger Does Not Start Up Properly
- 6.3 Operation Differs from That of PROM Version MCUs
- (1) Does Not Operate with Operating Frequencies (3.6 V to 5.5 V) Properly
- (2) Does Not Operate with Operating Frequencies (2.7 V to 3.6 V) Properly
- (3) Cannot Reset from Target System
- (4) Data Values of ROM Area at Power-on Are Different
- (5) HOLD* control
- (6) A-D Conversion Values are Different from Expected Values
- (7) Outputs of ALE, Address and Others are Different from Those of Actual MCUs
- 7. Maintenance and Guarantee
( 24 / 78 )
Chapter 3. Setting Up
To use this emulation pod with your target system, it is necessary to set as follows. Set the following
after removing the upper cover.
• Change the oscillation frequency.
• Set the XIN, XOUT, XCIN and XCOUT pins for the target system.
• Set the switches for the operating voltage of the target system.
• Install a pullup resistor to ports P00 to P57.
3.1 Removing the Upper Cover
The procedure of removing the upper cover is shown below.
(1) Remove the four screws of both sides of this product and lift off the upper cover. (see Figure 3.1)
(2) Set the jumper switches.
(3) Replace the upper cover and secure the four screws.
Figure 3.1 Removing the upper cover
CAUTION
When Removing the Upper Cover:
• Always shut OFF power when removing the upper cover or setting the switches.