
Installation Guide

Options include: installation height,
undermount reveal, and range of
forward extension. These choices
determine what type of additional
support will be necessary in the
base cabinet. Featured below are
some of the more popular mounting
techniques.
THE STEPS
• Evaluate the style of apron sink that is
being installed, and determine the type of
mounting that will be done.
• Keep in mind that unlike other sink styles
that are dropped into a hole and supported
by the countertop, apron sinks are
positioned through an opening in the front
of the cabinet. Apron sinks are supported
only by the cabinet.
• Measure the sink and cabinet in order to
prepare the base cabinet.
• Install the necessary support braces.
Supports can be customized to uphold
various types of sinks in different fashions.
One standard technique, using 2˝ x 4˝
supports with or without a plywood
platform, is shown here.
• Use denatured alcohol to clean the areas
where the surface of the sink will meet the
countertop.
• Place sink in position on the base cabinet
supports.
• If performing an undermount installation,
apply a bead of silicone along the outer
edge of the sink rim in order to form a
secure bond with the countertop.
• Attach the countertop making sure there is
tight contact with the sink.
• Re-check that the sink is properly aligned
and level.
• Remove any excess sealant along the
edges.
872.241.0016
Toledo, Ohio
sales@renesinks.com
renesinks.com
APRON SINKS
Installation/
Mounting Guide
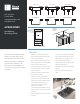
FLUSH MOUNT NEGATIVE MOUNT POSTIVE MOUNT
UNDERMOUNT ELEVATED MOUNTFLUSH MOUNT
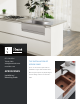
Cabinet
Countertop
Forward Sink Extension
(variable per model)
EXAMPLE
UNDERMOUNT
WITH POSITIVE
REVEAL
EXAMPLE
SUPPORT
FRAME