
User's Manual
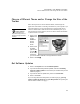

Table Of Contents
- Free Online Training
- Support by Phone and Web
- What You Received
- Renaissance Receiver Setup and Key Tasks
- Responder Settings and Key Tasks
- Software-the 2Know! Toolbar
- Install the Toolbar
- Start the 2Know! Toolbar and Get Ready for the Session
- Start the Session
- Ask the Questions
- Use the Graph
- Ask Pulse Questions
- Use the Teacher Responder Feature
- Choose a Different Theme and/or Change the Size of the Toolbar
- Get Software Updates
- View 2Know! Toolbar Instructions while Using the Toolbar
- View the Toolbar Version and Other Information
- Tips for Using the 2Know! Toolbar in a Classroom
- Software-AccelTest Key Tasks
- Software-Accelerated Math RP
- Frequently Asked Questions
- Limited Warranty

S OFTWARE—ACCELTEST KEY TASKS
Installing the Software
23
S
OFTWARE
—A
CCEL
T
EST
K
EY
T
ASKS
This section describes key AccelTest tasks. For more information, see the
AccelTest User Manual in the Start menu (Windows) or program folder
(Macintosh).
Installing the Software
To install the software from the AccelTest CD you received, see the
instructions in the AccelTest Software Installation Guide.
Getting Started with AccelTest
Entering the AccelTest Password
Type the password (default is admin) and click OK.
Entering the Serial Number the First Time AccelTest Is
Started on a Computer
1. Type the serial number (on the serial number sheet), school name, and
teacher name; then, click OK.
2. Type the password (default is admin) and click OK.
Setting Up the School Year
When the School Year Setup Reminder appears, click Setup School Year
Now to start the wizard, or cancel the reminder. If you cancel the Reminder,
later you can click the Preferences menu and select School Year to start the
wizard.
Adding Students
1. Go to the Classes tab and click Add Student.
2. Type the first and last name of the student and change the ID if
necessary. Then, click OK.
3. Click Yes to add another student, or No to finish adding students.