
User's Manual


20
NEO
User Manual
G ETTING STARTED
Setting Up the Renaissance Receiver and Using NEO 2’s Wireless Capabilities
. . . . .
Naming the Renaissance Receiver (Wireless Network)
It is important to set a unique name for the computer/Receiver combination
(network) so that students know they’re connecting to the correct Receiver.
This is especially important if you have more than one Renaissance Receiver
in the same building. Follow these steps to set a name for your Receiver:
1. Start the Renaissance Wireless Server Utility:
• Windows computers: Right-click in the lower-right corner of
your computer screen (the system tray) and choose Manage from the
menu that appears. If you don’t see this icon in your system tray, click
StartProgramsRenaissance Wireless ServerRenaissance
Wireless Server Utility.
• Macintosh computers: In your computer’s Applications folder, open
the Renaissance Wireless Server folder. Then, double-click
Renaissance Wireless Server Utility.
2. Type 1234 and click OK to log in. (This is the default Administrator PIN. If
you have changed the PIN, enter your new PIN.) If necessary, click Start.
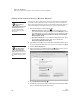
3. Click the Server Settings tab.
4. Enter a new name in the Network Name field
A. Make sure the name is
different from the name of your school’s other Receivers.
5. Click Update Network Settings
B.
6. Click OK when the program finishes updating the network settings. Make
sure your students know the Receiver name.
The Renaissance
Wireless Server
Utility is
automatically installed with
NEO Manager. Make sure
you have installed NEO
Manager before you follow
these steps.
You can also change
the Administrator
PIN on this tab by
clicking Set Administrator
PIN, entering a new PIN, and
clicking OK. Be sure to update
the network settings if you do
this.
A
B