
User's Manual


14
NEO
User Manual
G ETTING STARTED
Getting Started with the NEO Manager Software
. . . . .
2. If you have a NEO Manager CD, insert it into your computer and view the
contents.
If you have downloaded a new version of the software, extract the files
from the .zip file you downloaded. View the extracted files.
3. Double-click the setup.exe file.
4. If your computer does not have Microsoft .NET Framework Full, you will
see a message telling you that NEO Manager requires it. Click Install.
5. When the NEO Manager installation wizard opens, click Next > in the first
panel.
6. Read the license agreement. You can print the license if you wish by
clicking the button provided. Click the first option to accept the terms and
click Next >.
7. If you already have Renaissance Wireless Server installed, you may see
a screen that tells you that it is using files that need to be updated. Leave
the first option (Automatically close and attempt to restart
applications) selected and click OK.
8. On 64-bit computers only, this happens next:
a. A message will tell you that 64-bit drivers must be installed. Click
OK.
b. The NEO Manager 64-bit Driver wizard will open. Click Next >.
c. Leave Complete selected and click Next >.
d. Click Install.
e. Click Finish.
9. If you need to restart your computer, on the last panel of the NEO
Manager installation wizard, click an option to choose whether to restart
your computer now or later. Then, click Finish.
If a restart is not required, leave the box checked if you want to view the
Read Me file. Click Finish.
On Macintosh Computers
NEO Manager software works in OS 10.4.x, 10.5.x, and 10.6.x.
1. Make sure that you are logged in to the computer as an administrator or
that you have administrator privileges.
2. If you have a NEO Manager CD, insert it into your computer and view the
contents.
If you have downloaded a new version of the software, open the .dmg file
you downloaded.
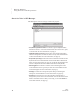
3. Double-click NEO Manager Installer.
On Windows 7, you
may be asked whether
you want to allow the
program to make changes to
your computer. Click Yes to
continue.