
User's Manual


G ETTING STARTED
Connecting a NEO to Your Computer
9
. . . . .
NEO
User Manual
Connecting a NEO to Your Computer
You should connect your NEO to your computer when you want to
• Send a file to a program in your computer (see page 10).
• Manage your NEO using the NEO Manager software (see page 13).
Follow these steps to connect the NEO to your computer:
1. If this is the first time you have connected the NEO to your computer,
check the following:
• Make sure that you are logged in as an administrator or that you have
permissions that allow the device drivers to load properly.
• Exit the NEO Manager software if it is running on the computer.
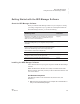
2. Using the cable that came with the NEO, connect the thin, flat connector
A to your computer, and connect the square end B to your NEO at C.
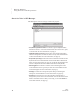
3. On Windows computers, you may be prompted to install a driver the first
time you connect your NEO to the computer with a USB cable. If so,
accept the default values in the Wizard and click Next > in each panel.
When you’ve finished, restart the computer.
On Macintosh OS 10 computers, the first time you connect your NEO, a
keyboard setup assistant will open. Follow the instructions in the
assistant.
4. The message on your NEO will tell you that it is connected and remind
you what to press to send a file or to switch files.
If you have a
SmartOption Mobile
Lab, and you want to
use NEO Manager to work
with your NEOs, connect
them to the lab instead of
connecting them directly to
your computer. See the
instructions that came with
your lab.
B
A
C
On Windows XP
computers, you may
be notified that the
driver is not certified for
Windows XP. The driver will
work for your system; to go on,
click Continue Anyway.