
User's Manual


U SING NEO MANAGER TO MANAGE NEOS
Updating Your NEO Operating System or SmartApplets Using NEO Manager
201
. . . . .
NEO
User Manual
Important: This procedure removes all AlphaWord Plus files and student
work in KeyWords and AlphaQuiz, and it restores all default settings. The
procedure also removes any SmartApplets that aren’t in the standard set. The
NEO operating system and SmartApplets will be updated to the versions you
have available in NEO Manager. If you want to follow these steps, make sure
you retrieve any files you need and complete all KeyWords instruction before
updating the NEOs.
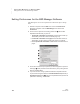
1. Start NEO Manager on your computer (see page 15) and connect your
NEO (see page 9) or the SmartOption Mobile Lab.
2. In NEO Manager, click the Setup menu and choose Reset All NEO
Devices.
3. A warning message about loss of data appears. Click Yes (Windows) or
OK (Macintosh). NEO Manager will send a new list that contains the
factory default settings and updates to the connected NEOs.
How to Update NEOs While Preserving AlphaWord Plus Files and
KeyWords Data
These steps allow you to update your NEOs and still keep all AlphaWord Plus
files and your students’ KeyWords work. While this procedure will make the
updates you need, the standard procedure above is the best practice.
For a SmartOption Mobile Lab, this procedure takes about 2–4 hours for
NEO 2s.
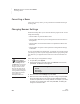
1. Start NEO Manager on your computer (see page 15) and connect your
NEO (see page 9) or the SmartOption Mobile Lab.
2. In NEO Manager, click the SmartApplets tab.
3. For each SmartApplet that you want to update, click the SmartApplet
name and click Add. The NEO operating system will also be updated.
4. Click the Send List tab.
5. If you have a SmartOption Mobile Lab and you want to send the changes
to some, but not all, of the NEOs, click Select Devices. Check the NEOs
to which you want to send the text, then click OK. (To send to all
connected NEOs, skip this step.)
6. Click Send.