
User's Manual


122
NEO
User Manual
K EYW ORDS SMARTA PPLET
Adding a Student on a NEO 1 or a NEO 2 in Offline Mode
. . . . .
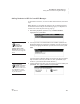
4. You will see a “Checking Settings” message, then “Adding new student.”
After this, you will return to the KeyWords starting screen, and the student
who was added will be listed.
Teachers may want to set students’ pre-test levels before they begin
working in KeyWords. You can set each student’s level to Beginning
Typist, Intermediate Typist, or Advanced Typist. This determines what the
student will be asked to do in the test. To set the pre-test level, see
page 139.
Adding a Student on a NEO 1 or a NEO 2 in Offline Mode
Use this method to add your students to the KeyWords SmartApplet if any of
the following is true:
• You are using NEO 1.
• You are using NEO 2, but you don’t have a Renaissance Receiver, and you
are using the KeyWords SmartApplet in offline mode (see page 140).
Students can also add themselves to the NEO by following these steps.
Note: The examples in the steps below show NEO 2 screens. NEO 1 screens
look different, but the steps are the same.
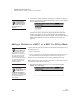
1. After starting KeyWords, press the
↓ key to move down to Add a
student; then, press enter.
Use the Student
Information Report
in NEO Manager to
get students’ user names
and passwords. See
page 149.
Add each student to
just one NEO to avoid
confusion in reports.
The student can only use
KeyWords on a NEO where
he or she has been added,
and limiting the student to
work on a single NEO will help
you accurately monitor the
student’s progress through
KeyWords lessons.
These steps
describe how to add
a student to the
KeyWords SmartApplet. If
you want to use KeyWords RP
for reports, you’ll need to add
students in Renaissance
Place as well.