
User's Manual
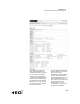


Table Of Contents
- Contact Information
- Copyright Notice
- Contents
- About SmartApplets
- AlphaWord Plus
- Calculator
- Control Panel
- How to Change Settings Using Control Panel
- About the Settings in the Control Panel
- Spell Check Settings
- AlphaWord Settings
- Change Default SmartApplet Font
- Turn Calculator Off or On
- Two-button On Setting
- Set Screen Contrast Setting
- Keyboard Command Reference List
- View Keyboard Layout Settings (Including Special Characters)
- Display Battery Status Setting
- Change Keyboard Settings
- KeyWords
- Welcome to KeyWords
- How the KeyWords SmartApplet Works
- Starting the KeyWords SmartApplet
- Adding a Student
- Choosing Your Name and Starting Lessons
- Learning New Keys
- Building Accuracy and Speed
- Taking an Accuracy and Speed Test
- How Students Check Progress Using Reports
- Teacher Options
- Deleting Students
- Creating a Group Progress Report
- Setting Speed and Accuracy Goals for KeyWords Students
- Choosing Whether to Enforce Use of the Correct Shift Key
- Enforcing Use of the Home Row
- Requiring One or Two Spaces Between Sentences
- Using AlphaSmart Manager 2 with KeyWords
- About KeyWords Reports
- Using KeyWords RP to View and Print Reports
- How KeyWords RP Works
- Programs You’ll Use
- Learning KeyWords RP
- Checking System Requirements
- Logging in to Renaissance Place and Changing Your Password
- Switching Roles in Renaissance Place
- Navigating the KeyWords RP Software
- Logging Out and Closing the Renaissance Place Software
- Setting Up the KeyWords RP Software
- Activating Schools
- Bringing KeyWords Data into KeyWords RP
- Viewing KeyWords RP Reports
- KeyWords Resources for Teachers
- Lessons in KeyWords
- Frequently Asked Questions
- Why can’t I use the backspace key when using KeyWords?
- Why is there so much repetition of words in the practice passages?
- Why are the passages so easy?
- Why is the sequence of key introduction so different from what I am used to in other typing programs?
- Why do the students learn the ASKL keys first?
- What is the rationale for how the practice passages are sequenced?
- Why aren't my test scores updated when I retake an accuracy and speed builder test in KeyWords?
- Beamer
- Starting Beamer
- Finding the Infrared Ports
- Beamer and the NEO Clipboard
- Beaming from One NEO to Another
- Beaming AlphaWord Plus files between devices
- Beaming from a NEO to a Palm OS Device
- Beaming from a Palm OS device to a NEO
- Cancelling a Beam
- Changing Beamer Settings
- Troubleshooting
- I want to change a setting, but I don’t know the master password.
- I don’t see the Send option on my Beamer screen.
- My NEO says it can’t find a receiving device.
- I received an error when I tried to beam or receive a file.
- I have data on the clipboard that I don’t want to lose. What should I do?
- I keep getting an invalid password message.
- I beamed a file with a password, but now that file doesn’t have a password on the receiving device.
- What does the message “could not find a sending device” mean?
- What do I do if the file I’m receiving is too big?
- My buddy beamed an AlphaWord Plus file to me, but Beamer didn’t let me choose a file to put it in. It automatically put it in a new file. What happened?
- AlphaQuiz
- How AlphaQuiz Works
- Programs You’ll Use with AlphaQuiz
- Downloading and Installing QuizDesigner and QuizManager
- Starting QuizDesigner
- About the Options in QuizDesigner
- Creating Quizzes in QuizDesigner
- Opening and Changing Quizzes in QuizDesigner
- Copying Questions in QuizDesigner
- Password Requirements for Quizzes
- KeyBoard ShortCuts in QuizDesigner
- Previewing Questions in QuizDesigner (Seeing Questions as They Appear on NEO)
- Printing a Quiz from QuizDesigner
- Exporting a Quiz from QuizDesigner to a Word Processing Program
- Spell-checking a Quiz
- Deleting Quizzes
- Creating a Question Library in QuizDesigner
- Starting QuizManager
- About the QuizManager Control Bar
- Sending Quizzes to NEOs Using QuizManager
- Deleting Quizzes from NEOs
- How Students Take a Quiz Using the AlphaQuiz SmartApplet
- How Students Print Quizzes
- How Students Save Quizzes to an AlphaWord File
- Teacher Options in for Quizzes in AlphaQuiz
- Retrieving Students’ Responses from NEOs Using QuizManager
- Deleting Students’ Responses to Quizzes Using QuizManager
- Turning NEOs On or Off Using QuizManager
- Assigning Points (Weights) to Quiz Questions in QuizManager
- Grading Quizzes in QuizManager
- Printing Reports in QuizManager
- Exporting Student Quiz Scores
- KeyBoard ShortCuts in QuizManager
- Frequently Asked Questions
- How many students can take a quiz on one NEO?
- How many different quizzes can be loaded onto a NEO?
- Does the student response to a short answer question have to be spelled correctly? Is it case-sensitive?
- What happens if a student skips a question?
- If I’m using an AlphaHub (SmartOption Cart), and I also have an open USB port on my computer, can I use both methods of communication between QuizManager and NEOs at the same time?
- Can a student spell check an essay question?
- What do students do when they complete a quiz?
- Can a student take a quiz twice?
- Is it possible to print a quiz from the teacher’s computer?
- Once an essay question is graded, what capabilities are there to make notes on the student response in QuizManager?
- How and when do I assign the point values for each question?
- Can the grades from quizzes be saved as a spreadsheet file or be copied and pasted directly into a tab-delimited grading program?
- In essay responses, will AlphaQuiz or QuizManager highlight or underline key words that were defined when creating the question?
- What happens if the NEO is turned off before a quiz is completed? What appears on the screen when the NEO is turned back on? How does a student continue the quiz?
- Troubleshooting
- The QuizManager control bar shows a yellow indicator.
- The QuizManager control bar shows a black indicator, but a NEO is connected to that location on the Cart or to the USB port on the computer.
- I have a quiz installed on some NEOs, and I have student responses that I have not yet retrieved, but I’ve accidentally erased the quiz document from my computer. Now I can’t retrieve, or even remove, the responses.
- I have a quiz installed on some NEOs, but I have accidentally erased the quiz document from my computer and I don’t remember the Admin Password. Now I am unable to remove the quiz from the NEOs.
- Index

K EYW ORDS
KeyWords Resources for Teachers
5-46
. . . . .
The handouts and transparency masters contained in the PDF file are
described in the following table.
Name of handout Description of master
Prepare these masters before using KeyWords on NEOs:
Posture and Wrist Placement This master shows a drawing of a
student seated properly with good wrist
and hand position. Use it to create an
overhead transparency or a reference
handout for students.
Key Strike This master shows close-up sketches of
correct finger strike positions. Use it to
create an overhead transparency or a
student handout.
Finger Zones This master illustrates the keyboard
divided into zones. A graphic shows the
fingers that correspond to the zones on
the keyboard on each hand.
Home Row Keys This master shows Home Row positions
for the left and right hands. Use this
master as a handout or a poster.
Use these masters while working with KeyWords on NEOs:
Finger Placement for Lesson 1: Start
Here!
This master illustrates the right and left
hands with fingers labeled, and shows
those fingers in their home row
positions. It also illustrates the finger
reach to the enter key and the use of the
thumb to strike the space bar. Use it to
create handouts or posters.
Finger Placement for Lessons 2 through
16
These masters illustrate finger
placement and reaches useful for
student reference as they learn each
level. Use the masters to create a
handout for each lesson.
Progress Report Use this master to create hardcopy
reports for students to fill in so they can
track their progress or hand in progress
reports. This is the same information
kept by the NEO in the students’
records.