
User's Manual
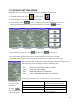
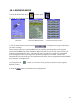


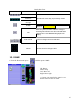

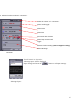

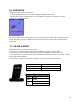
Table Of Contents

07. MYPICK SETTING MODE
/or personalize your remote.
ill see the following screen below:
2)
rayed out buttons will not work because the particular device hasn't been set-up yet.
e refer to
e chart below for a description of what each button does.
Ex) press m )
displayed.
6. Press
to save and exit to
label edit mode.
Jump Jump a screen setting.
ve to <Screen1 .
to the
previous mode without saving.
With MY PICK, you can program macros and
1. From the Home menu press and then press
In this example we will set-up a macro with Audio.
2. Press the My Audio button. And you w
3. Press any button to be p (in this example we will use the button)
gin set-u
<Screen1> <Screen2> <Screen3> <Screen4>
4. Press buttons to input (i.e. press and then press per screen 2)
Note: the buttons will look like they are pressed (just lik e picture screene in th
G
You may press Exit, Jump, Edit or Done during this process. Pleas
th
Exit Move to the previous mode<Screen1>.
Edit Move the buttons to <Screen4>.
Done Save, Label Edit and Mo >
ore buttons (i.e. for TV press 1, 2, 3 per screen 3
Cancel Cancel settings and move
5.Screen 4 is
The last screen
View View the allotted buttons.
Delete Delete the allotted buttons.
Done Save and move to the previous
mode <Screen3>.
11