
Operator's Manual
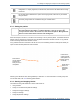
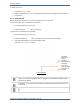
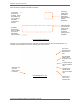
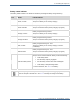
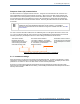
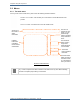
Table Of Contents

5.1 Controlling the Tempus Pro
Tempus Pro User/Operator Manual - 41-2001EN-00 – Page 45
5.1.2 Membrane buttons and LED indicators
The Tempus can be controlled through the following membrane buttons:
The On/Off button – pressing and holding down this starts and stops the Tempus –
see “4.3.1 Switching on”.
The Alarm Suspend button – pressing this latches all alarms off for 2 minutes (factory
default – this is configurable by the operating institution) – see “7.6 Silencing or
suspending alarms”.
The Alarm Silence button – pressing this stops any audible alarm signals for 2
minutes (factory default – this is configurable by the operating institution) from
monitoring parameters (and clears alarm signals from discrete measurements such as
non-invasive blood pressure – see “7.6 Silencing or suspending alarms”.
The Home button - this returns the unit to the results screen
The Data Input/Output button – pressing this launches a menu which offers options
on outputting data to peripherals such as printers or USB memory sticks – see “9.1
Data input and output”.
Note that pressing and holding the Data Input/Output button for 2 seconds will
automatically launch the function that is shown at the top of the Data Input / Output
menu. This acts as a short cut to make activating this function easier.
The
Display
button – pressing this launches a menu which offers a range of display
options
– see “9.2 Display options”.
Note that pressing and holding the Display button for 2 seconds will automatically
switch the display mode into a high contrast mode (black on white) for use in strong
daylight conditions. This acts as a short cut to make activating the high contrast
display easier.
The
Patient
button – pressing this allows the user to manage the patient information –
see “9.3 Patient information”.
Note that pressing and holding the Patient Information button for 2 seconds will
automatically launch the function that is shown at the top of the Patient Information
menu. This acts as a short cut to make activating this function easier.
The Connect button – pressing this will bring up instructions on how to connect the
device to a Response Centre to transmit voice, data and images in real time – see “9.6
Connecting to an alternate location”.
The Disconnect button – if the device is connected to a Response Centre (i2i
ReachBak only), pressing this will bring up a 10 second countdown after which the
voice and data connection will be dropped – see “9.6 Connecting to an alternate
location”.