
Operator's Manual
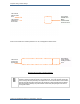
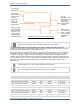
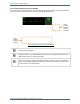
Table Of Contents

6.6 Invasive pressure
Tempus Pro User/Operator Manual - 41-2001EN-00 – Page 113
Note
The invasive pressure meter will require warming up if it is started from cold. The warm up
time is specified in section “14.1.6 Invasive pressure”. Once the Tempus is turned on and
the invasive pressure parameter functional, the pressure waveform will appear on the
display.
Note
Check all cables and connections before use. Request that an appropriate service
technician check the function of the device (including operation of all audible and visual
alarms) on a regular basis.
The Tempus is compatible with a range of invasive pressure sensors – see “12.1.2 Invasive pressure
accessories”
Always use the correct adaptor cable for the desired transducer to connect it to the Tempus.
The Tempus provides two channels of invasive pressure which can be extended to four channels via a USB
IP Module. The Tempus Pro can then be used with one, two, three or four transducers.
6.6.1 Getting started
To measure invasive pressure, open the transducer packaging and inspect the transducer cable. If the
cable shows signs of damage or wear, then replace it.
Attach the transducer to the patient following the instructions supplied with the device’s packaging.
Attach the appropriate adaptor cable for the transducers you wish to use to the Tempus (white socket).
Then connect the transducers to the cable, taking care to note and understand which transducer is attached
to channel P1 and which to channel P2.
6.6.2 Taking readings
Then zero the transducers using the process described in section “6.6.5 Zeroing transducers”.
WARNING
Always zero the transducer before using it.
Then attach the transducer to the patient following the instructions on the transducer’s packaging.
Note
The invasive pressure feature can be used to monitor a single channel at a time. In this case,
either channel P1 or P2 can be used. See the example shown below where channel P2 is
being used in isolation.