VirtualDJ 8 – Reloop NEON 1
Table of Contents INSTALLATION ......................................................................................................................... 3 Firmware & Drivers ................................................................................................................ 3 VirtualDJ 8 Setup ................................................................................................................... 3 Advanced Setup .......................................................................
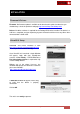
INSTALLATION Firmware & Drivers Firmware: No firmware update is available at the time that this guide is written, but you should always check the product’s webpage http://www.reloop.com/reloop-neon Drivers: No driver software is required for the Reloop NEON to be installed. The device is a USB class compliant and your Operating System will auto-install the necessary driver when connected with a USB cable. VirtualDJ 8 Setup Download and install VirtualDJ 8 from http://www.virtualdj.com/download/index.
Advanced Setup MIDI Operation The unit should be visible in the CONTROLLERS tab of Config and the “factory default” available/selected from the Mappings drop-down list. The factory default Mapping offers the functions described in this Manual, however those can be adjusted to your needs via VDJ Script actions. Find more details at http://www.virtualdj.com/wiki/VDJscript.html AUDIO Setup The unit is not offering any pre-defined audio configuration, as no built-in audio interface is available.
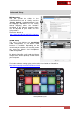
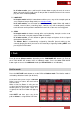
A. Control buttons S. SHIFT. Press and hold this button down to access secondary functions of the Reloop NEON 1. DECK/BANK SELECT. In Sampler mode (see Sampler mode), use these buttons to select Sampler Banks 1 to 4. Hold SHIFT down and then use these buttons to select the Output channel (1 to 4) for the Sampler. By default VirtualDJ will output Sampler to all available decks if External mixer audio configuration is set and to the Master Output in other case.
In all other modes, press and keep this button down to play the track in reverse. When released, the track will return to the position it would have been if the reverse play was never enabled (censor) 7. LOOP/SLIP. In Sampler mode hold this button down and then press any of the Sampler pads to set a Sample to Loop or Drop mode (see Sampler mode). In all other modes, use this button to enable/disable Slip mode. When Slip mode is enabled, several actions (scratching, loops, HotCues etc.
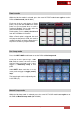
Remix mode While the Hot Cue mode is selected, press the same HOTCUE mode button again to set the PADs to Remix mode (led will blink). Each one of the 8 pads triggers a Remix point (1 to 8) from the loaded track. Remix points are pre-assigned when a track is analyzed (loaded) and usually offer the Start and End points of a Break. Remix points can be added/edited/deleted from the POI Editor of VirtualDJ.
Each one of the 8 pad offers a different loop function. Pad 1 enables/disables Smart Loop. If enabled VirtualDJ will auto-create a seamless loop if a manual loop is set. Pad 2 enables/disables Loop Roll mode. If enabled, the loops will act temporary and the track will return to the position it would have been if the loop was never triggered. Pad 3 enables/disables Back Loop mode. If enabled and a loop is triggered by a number of beats, the current position will be set as the end point of the loop.
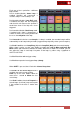
Slicer mode Press the SLICER mode button to set the PADs to Slicer mode. The eight pads represent eight sequential beats—"Slices"—in the Beat Grid. The playing Slice is represented by the currently green lit pad. The green light will "move through the pads" as it progresses through each eight-Slice phrase. Press a pad to repeat that Slice (hold it down if you want to keep looping it). Once the Pad is released the track will continue to play from the position it would have been if the pad was never pressed.
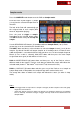
Sampler mode Press the SAMPLER mode button to set the PADs to Sampler mode. Each one of the 8 pads triggers a sample (1 to 8) from the selected Sampler Bank of VirtualDJ. The leds of the Pads will automatically get the assigned color of each sample (dark when off, bright when playing). Press the pads to trigger a sample. Depending on the selected trigger mode, use SHIFT and the same pads to stop the sample. Use the DECK/BANK SEL buttons (1) to select a different Sampler Bank (1 to 4).
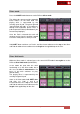
Effects mode While the Sampler mode is selected, press the same SAMPLER mode button again to set the PADs to FX mode (led will blink). In this mode, Pads 5, 6 and 7 enable/disable the selected Effect for Slots 1 to 3 respectively. Press and hold Pads 1, 2 and 3 to temporary trigger the selected Effect for slots 1 to 3 respectively. Hold SHIFT down and then use Pads 5, 6 and 7 to select the next Effect for each slot.
Useful Links VirtualDJ web-page: http://www.virtualdj.com VirtualDJ Support Center: http://www.virtualdj.com/contact/index.html VirtualDJ 8 Operation Guides: http://www.virtualdj.com/wiki/PDFManuals.html Reloop web-page: http://www.reloop.com/ Reloop Support Center: http://support.reloopdj.com/ Reloop NEON product page: http://www.reloop.com/reloop-neon Reloop NEON Quick Start Guide: http://www.reloop.com/media/custom/upload/ReloopQSG_NEON_web_V1.2.