
Instruction Manual


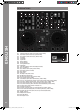

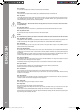

By using this button in advanced effect mode you can activate the effect.
Shift: FX 2. With this function it is possible to assign and activate the effect bank for player B. [Trak-
tor PRO]
With the Dry/Wet encoder the effect rate can be faded in and out.
Shift: Loop +/-. By holding the shift button and simultaneously turning the Dry/Wet Encoder it is
possible to vary the Auto Loop bar length.
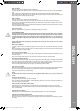
With this controller the master output volume can be adjusted.
With this controller the headphones volume can be adjusted.
With the Cue Mix controller you can simulate a pre-mix via the headphones. In the right position you
can hear the master signal and in the left position you can hear the cue signal.
Standardized connection for theft protection.
You can connect a microphone with a 6.3 mm jack to this input.
Via this knob it is possible to adjust the Phono/Line input volume.
Via this knob it is possible to adjust the volume of a connected microphone.
You can connect headphones with a 6.3 mm jack to this input.
With this equalizer it is possible to adjust the headphones‘ sound characteristics.
With this controller you can adjust the crossfading curve. The curve is steplessly adjustable from a
constantly increasing curve up to a hard adjustment.
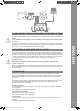
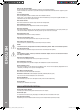
With this the cord will be relieved from strain.
(mains adapter optionally available, DC 6V, 1,5A)
You can connect a mains adapter to this connection.
With this button you can turn the Digital Jockey 2 on and off respectively.
Connect your USB cord to this input.
Connect your main sound system via RCA cord to this output.
An external sound source (e.g. CD player, turntable) can be connected to this input.
Depending on the connected sound source you can de-/activate the phono pre-amp.
IM_Digital_Jockey_2_Interface_Edition_US_GB.indd 20 10.12.2010 11:09:21