
Manual
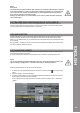
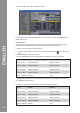
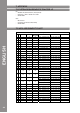
Table Of Contents
- DEUTSCH
- Inhaltsverzeichnis
- Sicherheitshinweise
- Bestimmungsmäßige Verwendung
- Wartung
- 1. Aufbau
- 1.1 Bedienelemente
- 1.2 Anschlüsse
- 2. Geräteinstallation
- 3. Computer-Konfiguration
- 3.1 Grundschritte
- 3.2 Traktor LE-Einrichtung
- 3.2.1 Installation
- 3.2.2 Konfiguration
- 3.3 Traktor Pro-Konfiguration [gegebenenfalls]
- 3.3.1 Audio Setup
- 3.3.2 Mapping-Import
- 4. Bedienung
- 5. Geräteeinstellungen und -tests
- 5.1 MIDI-Channel-Zuweisung
- 5.2 Jog Wheel-Kalibrierung
- 5.3 LED-Funktionstest
- 6. Updates & Support
- 7. Anhang
- 7.1 Systemanforderungen Traktor LE
- 7.2 MIDI-Zuweisungstabelle
- 7.3 Tipps zur Fehlerbehebung
- 7.4 Technische Daten
- ENGLISH
- Table of contents
- Safety Instructions
- Application In Accordance With Regulations
- Maintenance
- 1. Setup
- 1.1 Control Elements
- 1.2 Connections
- 2. Device Setup
- 3. Computer Configuration
- 3.1 Basic Steps
- 3.2 Traktor LE Setup
- 3.2.1 Installation
- 3.2.2 Configuration
- 3.3 Traktor Pro Configuration (if applicable)
- 3.3.1 Audio Setup
- 3.3.2 Mapping Import
- 4. Operation
- 5. Device Settings and Tests
- 5.1 MIDI Channel Assignment
- 5.2 Jog Wheel Calibration
- 5.3 LED Functionality Test
- 6. Updates & Support
- 7. Appendix
- 7.1 System Requirements Traktor LE
- 7.2 MIDI Assignment Chart
- 7.3 Troubleshooting
- 7.4 Technical Specification
- FRANCAIS
- Sommaire
- Consignes De Sécurité
- Utilisation Conforme
- Entretien
- 1. Installation
- 1.1 Éléments de commande
- 1.2 Connectique
- 2. Installation de l‘équipement
- 3. Configuration de l‘ordinateur
- 3.1 Étapes de base
- 3.2 Installation Traktor
- 3.2.1 Installation
- 3.2.2 Configuration
- 3.3 Configuration Traktor Pro [le cas échéant]
- 3.3.1 Audio Setup
- 3.3.2 Importation De Mappage
- 4. Utilisation
- 5. Réglages et tests de l‘équipement
- 5.1 Affectation des canaux MIDI
- 5.2 Calibrage de la Jog Wheel
- 5.3 Test de fonctionnement des DEL
- 6. Mises à jours & assistance
- 7. Annexe
- 7.1 Matériel requis Traktor LE
- 7.2 Table d‘affectation MIDI
- 7.3 Conseils de dépannage
- 7.4 Caractéristiques

5. By pressing the Shift Button -T29- one last time the selection is saved and the Controller will
be rebooted. The new MIDI channels have now been determined.
Should the Jog Wheel -T28- not react correctly any more, its touch-sensitivity can be recalibrated.
Proceed as follows.
1. Make sure that Contour is turnd off (see ON/OFF Button -B34-).
2. Press and hold the Play/pause Button -T32- and turn on Contour via the ON/OFF Button -B34-.
3. Now release the Play/Pause Button -T32-.
4. Then touch the Jog Wheel‘s -T28- metal surface. Simultaneously the feedback LEDs that are
placed around the Encoder -T7/9- should go out from the right to the left.
5. Release your nger from the surface and in the following press the Play/Pause Button -T32- in
order to complete the calibration procedure. The controller will automatically reboot.
Herewith you can test whether all of Contour‘s built-in LEDs work faultlessly. For the functionality
test please proceed as follows:
1. Make sure that Contour is turned off (see ON/OFF Button -B34-).
2. Press and hold the Cup Button -T30- and turn on Contour via the ON/OFF Button -B34-.
3. Now release the Cup Button -T30-.
4. All LEDs should be lit now.
5. In order to complete the test simply turn off the device via the ON/OFF Button -B34-.
For Reloop Contour it is possible to update the rmware. This way it is subsequently possible to
carry out changes or add new features. An instruction for this procedure can be found online under
the below mentioned address.
Also there will be updated mappings for follow-up versions of Traktor Pro and other DJ softwares
so that you can use Reloop Contour in the future as well. It is also possible to purchase mappings
for differing setups that partly come from the user community.
Therefore please regularly visit the following website:
Besides numerous downloads you can also nd a supprot forum there.