
Manual
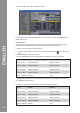
Table Of Contents
- DEUTSCH
- Inhaltsverzeichnis
- Sicherheitshinweise
- Bestimmungsmäßige Verwendung
- Wartung
- 1. Aufbau
- 1.1 Bedienelemente
- 1.2 Anschlüsse
- 2. Geräteinstallation
- 3. Computer-Konfiguration
- 3.1 Grundschritte
- 3.2 Traktor LE-Einrichtung
- 3.2.1 Installation
- 3.2.2 Konfiguration
- 3.3 Traktor Pro-Konfiguration [gegebenenfalls]
- 3.3.1 Audio Setup
- 3.3.2 Mapping-Import
- 4. Bedienung
- 5. Geräteeinstellungen und -tests
- 5.1 MIDI-Channel-Zuweisung
- 5.2 Jog Wheel-Kalibrierung
- 5.3 LED-Funktionstest
- 6. Updates & Support
- 7. Anhang
- 7.1 Systemanforderungen Traktor LE
- 7.2 MIDI-Zuweisungstabelle
- 7.3 Tipps zur Fehlerbehebung
- 7.4 Technische Daten
- ENGLISH
- Table of contents
- Safety Instructions
- Application In Accordance With Regulations
- Maintenance
- 1. Setup
- 1.1 Control Elements
- 1.2 Connections
- 2. Device Setup
- 3. Computer Configuration
- 3.1 Basic Steps
- 3.2 Traktor LE Setup
- 3.2.1 Installation
- 3.2.2 Configuration
- 3.3 Traktor Pro Configuration (if applicable)
- 3.3.1 Audio Setup
- 3.3.2 Mapping Import
- 4. Operation
- 5. Device Settings and Tests
- 5.1 MIDI Channel Assignment
- 5.2 Jog Wheel Calibration
- 5.3 LED Functionality Test
- 6. Updates & Support
- 7. Appendix
- 7.1 System Requirements Traktor LE
- 7.2 MIDI Assignment Chart
- 7.3 Troubleshooting
- 7.4 Technical Specification
- FRANCAIS
- Sommaire
- Consignes De Sécurité
- Utilisation Conforme
- Entretien
- 1. Installation
- 1.1 Éléments de commande
- 1.2 Connectique
- 2. Installation de l‘équipement
- 3. Configuration de l‘ordinateur
- 3.1 Étapes de base
- 3.2 Installation Traktor
- 3.2.1 Installation
- 3.2.2 Configuration
- 3.3 Configuration Traktor Pro [le cas échéant]
- 3.3.1 Audio Setup
- 3.3.2 Importation De Mappage
- 4. Utilisation
- 5. Réglages et tests de l‘équipement
- 5.1 Affectation des canaux MIDI
- 5.2 Calibrage de la Jog Wheel
- 5.3 Test de fonctionnement des DEL
- 6. Mises à jours & assistance
- 7. Annexe
- 7.1 Matériel requis Traktor LE
- 7.2 Table d‘affectation MIDI
- 7.3 Conseils de dépannage
- 7.4 Caractéristiques
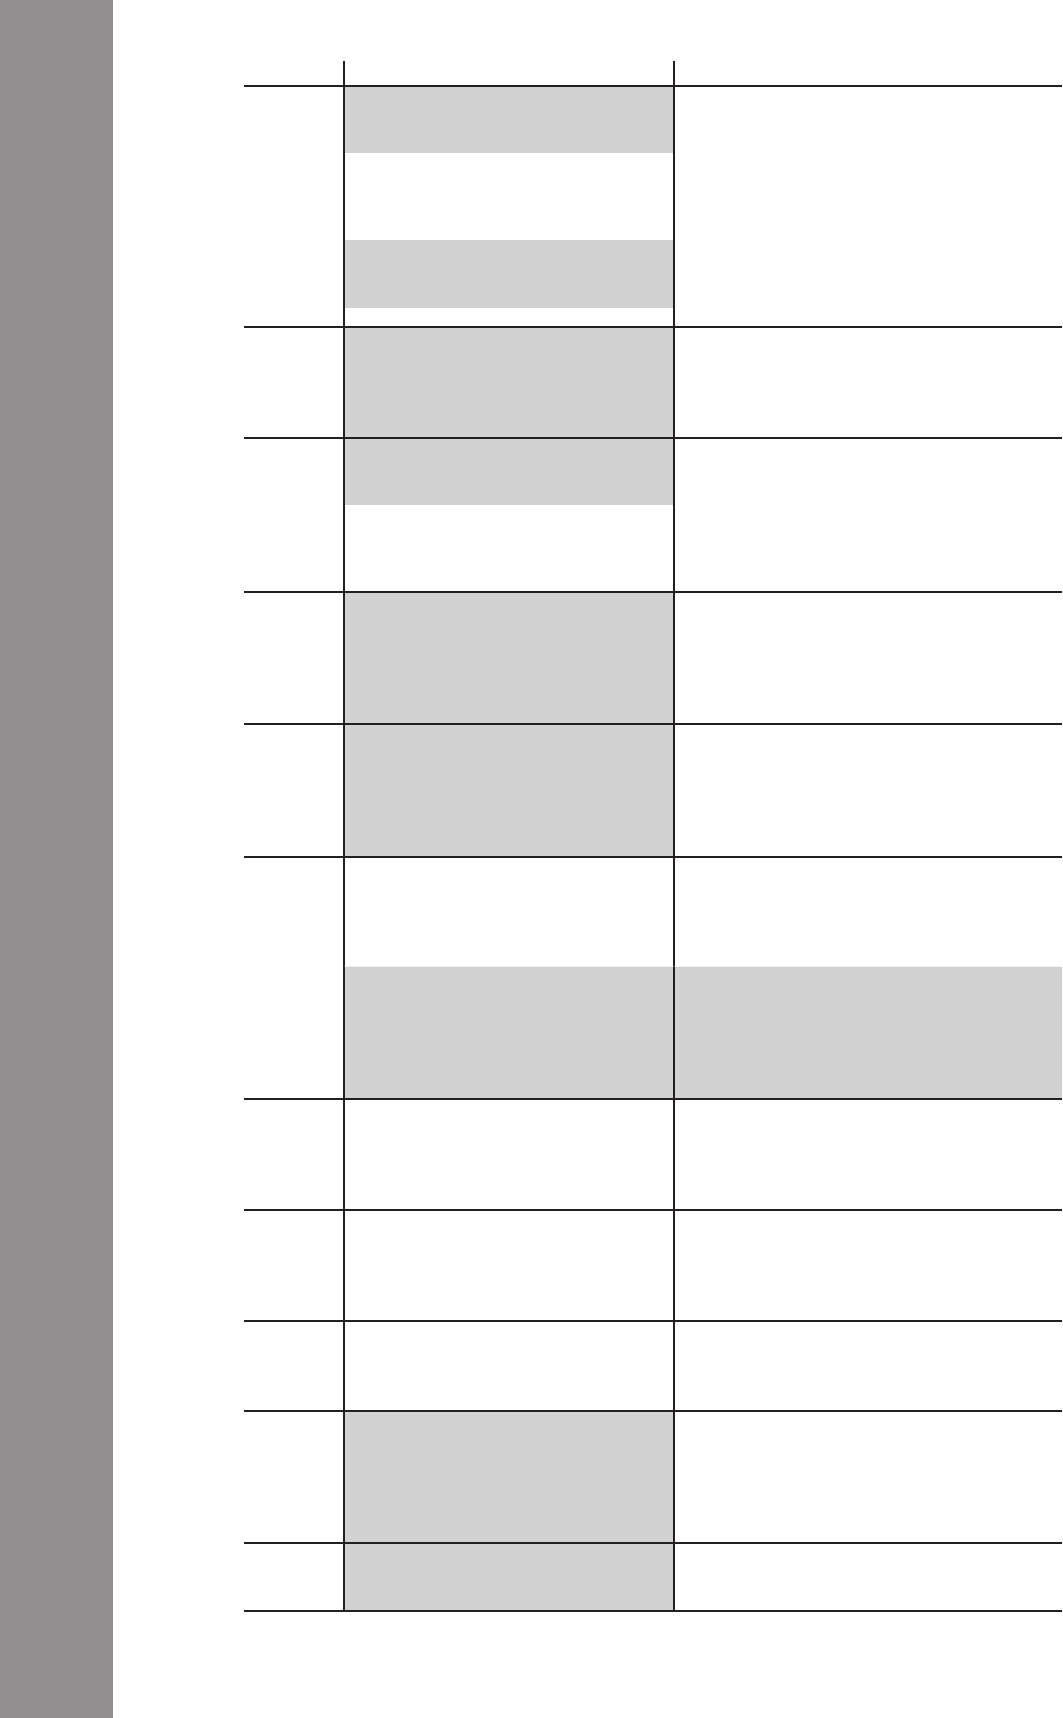
T10
In Advanced Effect Mode the parameters
can be changed quickly hereby.
If Chained Effect Mode is used the single
effects can be controlled via the faders.
By moving the fader the equalizer‘s parame-
ters can be adjusted. The rst fader from the
left controls the high frequencies, the second
fader controls the mid frequencies and the
third fader controlls the low frequencies that
are audible in the following.
T11
Activates the Advanced FX Section cor-
responding to the deck. (Deck A --> FX1,
Deck B --> FX2, Deck C --> FX3, Deck D
--> FX4)
T12
In Advanced Effect Mode the effect can
be reset hereby.
Activates/deactivates the rst effect in
Chained Effect Mode.
T13
Activates/deactivates the Effect Button
1 in Advanced Effect Mode.
Activates/deactivates the second effect
in Chained Effect Mode.
T14
Activates/deactivates the Effect Button
2 in Advanced Effect Mode.
Activates/deactivates the third effect in
Chained Effect Mode.
T15
Turning the encoder varies a set loop‘s
length.
By pressing the encoder the Loop Acti-
ve function is activated/deactivated.
Herewith the current deck‘s pitch fader can be
adjusted exactly.
T16
By turning the encoder a set loop can
be shifted.
Simultaneously pressing and tur-
ning the encoder determines the
movement‘s range.
Allows the temporary acceleration (clockwise)
or deceleration (counterclockwise) of a track.
T17
Regulates the lter effect for the active
deck. In the zero position the lter will
be deactivated automatically.
Via the Cue Mix Fader a pre-mix can be simula-
ted in your headphones. When to the right the
master signal is audible, when to the left the
cue signal is audible.
T18
Herewith you can adjust the volume
division for the left and right channel.
The zero position corresponds to an
equal level on both channels.
Adjusts the master volume.
T19
Sets an automatic loop with the adjus-
ted loop length (-T15-), without having
to manually set the ending point.
Manually sets the starting point of a loop.
Simultaneously a cue point will be set.
T20
Jumps to the last set loop and reacti-
vates it.
Manually sets the ending point of a loop.
Now the deck is in a loop mode, the selected
sequence is permanentely repeated.
Pressing the button again will end the loop
mode.
T21
Carries out a beat jump opposed to the
playback direction.
Shifts the grid that Traktor puts over the bass
line a step to the left.